Universal 2704/08
PROMMER with USB or RS232C interface
Assembly guide
©2020
Fits into a standard 60mm x 100mm
plastic case
Table of Contents
Introduction...................................................................................................................................... 4
Parts list............................................................................................................................................ 5
Assembly.......................................................................................................................................... 7
Step 1: Add resistors and
diodes............................................................................................... 7
Step 2: Add Capacitors............................................................................................................. 8
Step 3: Add Transistors and Pin
Header .............................................................................. 9
Step 4: Add Microcontroller STM32........................................................................................ 10
Step 5: Add the IC U1 and the two
Voltage Regulators ..................................................... 11
Step 6: Add LED and EPROM socket to
the TOP side ...................................................... 12
Step 7: Clean and dry the board,
inspect.............................................................................. 13
Preparing for use............................................................................................................................ 14
Operating
under Windows............................................................................................................ 15
Introduction
Thank you for choosing this Universal 2704/08 PROMMER
kit!
This kit is not a beginner’s kit, but thanks to the
use of through-hole components and open PCB
layout, the complexity of assembly is intermediate.
If the builder has some experience assembling other
intermediate level PCBs, or even advanced beginners’ level, this kit should
pose no problems.
Note that the Universal 2704/08 PROMMER kit does not
include any power supply, but requires an externally Micro USB connection with
stable 5V DC capable at min. 500mA current (2.5Watts).

The discussed Rev 2.1 board can be operated via Serial
USB interface or TTL RS232 port (J2). J2 needs to be connected to a standard
RS232C converter (optional) or any other TTL RS232 interface.
Before starting assembly, carefully inspect the
contents of the kit, to ensure that no parts are
missing, and that no damage has occurred during
transport. Also make sure to read (at least skim)
through this document, to be familiar with the steps
required, but also to notice all assembly tips
that are located throughout the guide.
If you are building from the kit and you make your own
modifications, you cannot rely only on this guide, but will need to examine the
remaining documentation like schematics.
Be particular careful with your working environment
concerning electrostatic charges that may damage the electronic components. The
kit includes ESD sensitive MOSFETS components. Using a well earth grounded
strap is recommended.
Parts list
|
Part type
|
Value/
designation
|
Check
marks
|
Pos
|
|
1x
DIP-14 IC
|
74LS06
|
|
U1
|
|
1x
TO-251-3 MOSFET
|
AOI444
|
|
Q2
|
|
|
|
n/a
|
U3
|
|
1x
TO-92L 5V Regulator
|
L79L05_TO92
|
|
U2
|
|
1x
TO-92L Transistor
|
BC337B
|
|
Q1
|
|
 1x
PinHeader_1x01_P2.54mm_Vertical 1x
PinHeader_1x01_P2.54mm_Vertical
|
Conn_01x01
|
|
J4
|
|
1x
PinHeader_1x02_P2.54mm_Vertical
|
Conn_01x02
|
|
J3
|
|
1x
PinHeader_1x04_P2.54mm_Vertical
|
Conn_01x04
|
|
J2
|
|
2x
Capacitors
|
100nF
|
|
C4,
C3
|
|
2x
LED RED(D3) and GREEN(D2)
|
LED
small
|
|
D2,
D3
|
|
3x
R_Axial_DIN0204 RESISTOR
|
5.1k
|
|
R7,
R1, R6
|
|
1x
R_Axial_DIN0204 RESISTOR
|
20k
|
|
R8
|
|
1x
Capacitor 50V
|
1nF
/ 50V
|
|
C1
|
|
1x
R_Axial_DIN0204 RESISTOR
|
6.8k
|
|
R2
|
|
1x
R_Axial_DIN0204 RESISTOR
|
4.7k
|
|
R3
|
|
2x
R_Axial_DIN0204 RESISTOR
|
10k
|
|
R4,
R5
|
|
1x
BluePill_STM32F103C MICROCONTROLLER
|
BluePill
|
|
M1
|
|
1x
CP_Radial_D5.0mm_P2.50mm CAPACITOR
|
3.3uF
/ 50V
|
|
C2
|
|
1x
CP_Radial_D5.0mm_P2.50mm CAPACITOR
|
220uF
/ 16V
|
|
C8
|
|
1x
D_DO-35 SCOTTY DIODE
|
BAT41
|
|
D1
|
|
1x
HW-520_module VOLTAGE REGULATOR
|
HW520
|
|
M3
|
|
1x
DIP_Socket-24 ZERO FORCE INSERTION SOCKET
|
Quick
Connect SUPP24
|
|
J1
|
|
1x
MT3608_module VOLTAGE REGULATOR/BOOSTER
|
MT3608
|
|
M2
|
|
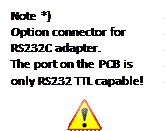
(OPTION)
1x RS232C ADAPTER MODUL
|
RS232
TTL > V24
|
|
OPT1
|
|
|
|
|
|

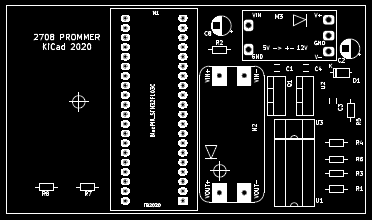
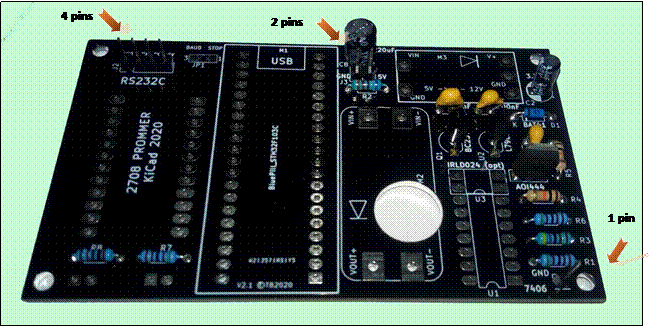
TOP PCB side
This side is populated with a 24 pin Quick Connector
J1 and two LED indicators (D2, D3). All other components have to be placed on
the bottom side.


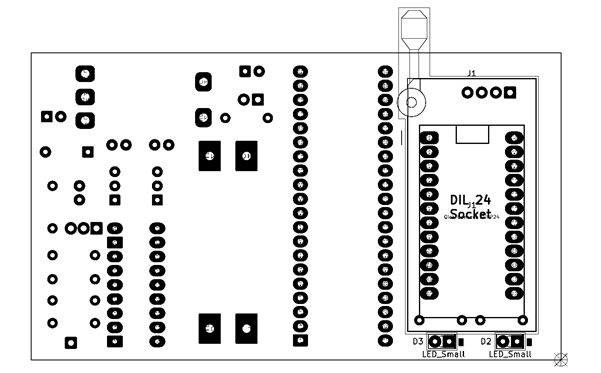
BOTTOM PCB
side

Assembly
Step 1: Add resistors
and diode
It is advantageous to solder the resistors and diode
first. This helps placing the components flush and close to the PCB surface. R1,R2,R3,R4,R5,R6,R7 and R8 together with D1 are placed and
soldered. Pay attention to the diode orientation! The black ring is to the left
(see photo).
Use bill of material, to check-mark
components soldered.
Always check values with your
Ohm-meter before soldering.
Step 2: Add Capacitors
The five capacitors are all located in a group on one
BOTTOM side of the PCB. The shape of C1, the 1nF/50V type is a little bit
larger than C3 and C4. The hole distance of the PCB is a
unfortunately a bit to narrow, so you have to bend the capacitor pins to fit.
The electrolytic capacitors are placed with the (-)minus side to the white marking on the PCB.

Take care for correct orientation of
both electrolytic capacitors C2 and C8.
Step 3: Add Transistors and Pin Header
There is one 7-pin Pin Header that needs to be broken
into 4,2 and 1-pin. Solder to the shown location at J2, J3 and J4.
Next are the
transistor Q1, the -5V regulator U2 and the MOSFET Q2.
Make note of their orientation, fit them with the flat
side matching the legend on the PCB.
For the MOSFET Q2, make sure the orientation in
relation to pin one is as shown in the picture below. The plastic housing must
face towards the resistor R4. It also is a good idea, to solder IC- pin sockets
into the PCB and later insert the components into the socket. (Pin sockets are
not provided in this DIY build)
Tip, you may use painters masking tape to hold the
components in position, so they stay in place when you turn the board over.
Once the board is turned so the pins are facing you, solder the pins on
opposing corners of each part. You can now remove the painter’s tape. Inspect
how well seated the components are. If a component is misaligned, heating the
already soldered pins lets you tweak its position. Once all components are
properly located, the remaining pins can be soldered in one go.
Using painters’ tape to temporarily
hold components and pin headers
Step 4: Add Microcontroller STM32
The STM32 controller boards comes with two yellow pin
headers. They will connect the STM32 to the main PCB. For easy soldering, it is
highly recommended to cut the pins short as sown in the following picture.


Reason is the solder quality that is needed. Long pins
on the PCB or STM32 board side will make soldering difficult and solder bridges
may easily occur.
Before soldering the STM32 board, you may test the
board by connecting to an USB power supply. The LED on the STM32 board should
light up. Left green LED should flash for a few seconds and the other red LED
has to stay on bright. Now you now, you are ready to go.

Tip: place the shortened pin headers into the main PCB
and put the STM32 board on top.
Now all pins are aligned perfectly and you can solder
the pin header to the STM32 board and afterwards to the main PCB.
Check with a magnifier for any solder bridges.
Alternatively, you may use pin sockets on the main PCB for later disassembly.
Step 5: Add the IC U1 and the two Voltage Regulators
When mounting the two Voltage Regulators boards, the
position and orientation can be identified by the marking on the PCB. There are
two methods to solder the boards to the main PCB.
- The boards are placed flush to the main board,
well aligned to the large solder pads. With the solder iron, you can
easily apply solder into the holes. This will nicely join the boards to
the PCB (as seen in the picture below)
- You may use wire or single pin header pins, and
solder them to the main PCB and afterwards place the voltage regulator
boards on top. Make sure, a good electrical contact is made.
The large board is providing the programming voltage
of 26V, the smaller board provides -12V and +12V. In total, nine solder joints
have to be made for both boards.

Result of method 1. Check the other side
of the PCB, that solder has flown all way thru.
Finally solder U1 (74LS06) to the PCB. The IC notch
has to match the PCB marking and faces to the front edge of the PCB.
Step 5: Add LED and EPROM socket to the TOP side
When mounting the 3mm LEDs, the polarity can be
identified by the flat on the LED housing, or the shorter leg. The short leg
and the flat identify the (negative) cathode terminal, and connects to the
square solder pad, also indicated by a white square on the silk screen.

Position D2(green Power LED) and
D3(red Programming LED) in the desired height.
Before
soldering the EPROM socket, you have to clean und cut all solder joints
underneath the socked short. If not, the socket cannot sit flat on the PCB and
the pins may not reach fully the other side.
When the socket is almost flat to the PCB, solder it in place. (a small
gap will work fine).
YOU MADE IT !! CONGRATULATIONS !!
Step 8: Clean and dry
the board, inspect
The board should be thoroughly cleaned when the
soldering has been completed.
To dissolve organic rosin-based fluxes Isopropyl/isoprop based cleaners work very well. Do NOT use acetone
or acetone-based cleaners, as they will damage the plastic parts assembled on
the board.). Use a toothbrush or similar brush to clean the board. You may
after cleaning with alcohol or spirits use mineral-free water to rinse the
underside of the board. If you used a citrus based cleaner, rinsing is
required. After cleaning, the board needs to dry completely.
After cleaning, do a thorough and complete inspection.
Look for solder bridges, cold or incomplete joints and similar defects. If you
find problems during inspection, you should be able to correct them, but
remember to clean the board again if you need to add (or remove) solder.
Before powering up the device, check the following
items:
-
Check on J3,
that +5V and GND are not shortened
-
Check U2 and
Q1 for correct orientation. U2 has to be the 79L05 regulator,
-
Check the Q2
MOSFET for correct orientation (plastic housing towards R4)
-
Check that
VIN and VOUT of board M2 and M3 are all connected to the main PCB
-
 Check that U1, the 74LS06 is placed in the correct
orientation and position
Check that U1, the 74LS06 is placed in the correct
orientation and position
Now connect
the USB cable to the STM32 M1 board. The LED on the STM32 board should light
up. Left green LED should flash for a few seconds and the other red LED has to
stay on bright. If this does not happen,
you must have a short on the +5V rail or the STM32 board is not working.
If the board
powered up as described, you can measure on J3 or J2 the 5V DC rail. This
voltage should be 4,9V or higher. If the voltage is below, your USB power
connection is insufficient and the PROMMER may not work properly. Also check
regulator and other components. They should stay cold as long the PROMMER is
not activated by software or RS232 terminal.
Preparing for use
Within the kit are 4 plastic standoffs
included to allow the PROMMER to be placed nicely onto a flat surface.
Alternatively, the board may be
assembled into a standard 60mm x 100mm plastic case. The screw holes of the PCB
should match the mounting post of such a case.
Installing the Software
Follow the installation instruction
in the Info.txt file. The PROMMER USB interface uses a Maple Serial driver
protocol, which is a standard driver on newer Windows installations
(usbser.sys).
This Software was tested and works
on
- Windows 7,8,10 32bit & 64bit
- Windows XP 32bit & 64bit
(legacy drivers for Windows XP (yes, they work!))
- RS232C Terminal mode (with adapter
connected to the RS232 port)
- Use Windows or any other OS in Terminal
Mode with a Maple driver
Using the PROMMER in older Windows
Versions, DOS, Linux or MACOSX, you have to use a Terminal program for it and
the RS232C Adapter Option.
The Prommer connects to the PC via
USB or RS232. In both cases as a serial port.
So, you can connect with the Prommer
by a Terminal program via USB or a proper serial cable.
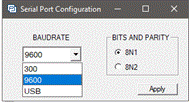
If you plan to use the serial RS232C
adapter Option you do not need to install any special drivers. The default
RS232C setting are: 9600 Baud 8N1, no hardware RTS or
CTS flow control.
The advantage of the RS232C adapter
option is, you may use the PROMMER with any OS and any kind of vintage
equipment back to the early 60's. The PROMMER supports a “full” independent
Serial Terminal mode, like in the old days.
OPERATING
UNDER WINDOWS
For Windows, a
"Prommer_2708.exe" program is included to communicate with the
PROMMER using a simple Windows User Interface. This program also allows you to
modify the max. 2kB PROMMER buffer, if needed.
WINDOWS USER
INTERFACE

Starting Prommer_2708.exe the first
time, you may see the Message: PROMMER not found”. In this case, you have to
select the COM port that the PROMMER driver is using.
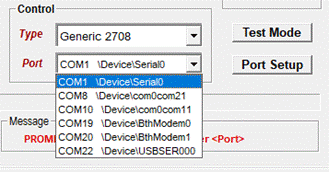
Go to the Control field and select from the Drop-Down
menu the PROMMER port. Usually, it is named \Device\USBSERxxx
You may try out other ports, if your port naming is
different.
If you have once selected the correct COM port, this
information will be stored in a PROM2708.ini file and reloads automatically,
every time you start the program again.
Once the COM port selection is valid, the message
 will appear as well the current
PROMMER
will appear as well the current
PROMMER
software version, which should be Version 2.3a
and above.
If none of the COM ports allows you to connect to the
PROMMER, you may need to install the MAPLE USB driver for Windows, that is
located in the directory of the program.

The driver section includes drivers for

If none of the above works on your Windows
installation, you may try to connect the J2 Serial connector to a known working
RS232 TTL to USB interface adapter to your PC.
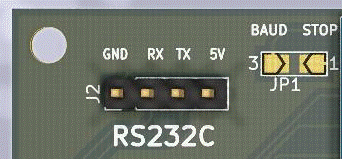
Connect the RS232 TTL cable 1:1 to the corresponding
silkscreen terminals.
RX-RX and TX-TX are going to be connected, no
“crossover”!
Baud rate is 9600 Baud 8N1 per default
Soldering a bridge at (3) will reduce to 300 Baud, or
at (1) change to 2-Stop Bits.
If you are using the RS232 Serial Interface, you need
to set the correct corresponding Baud rate in your Terminal program or in the Prommer_2708.exe program.
Go to PORT SETUP and select 9600 Baud and press
“Apply”.
Now the program should be able to communicate with the
PROMMER board.
Of course, you also may use a terminal program
instead.
If you prefer to use the PROMMER without a modern PC,
just together with your vintage equipment, you can do so by connecting to the
RS232 TTL port J2.
The RS32C Option will need a RS232 TTL to RS232C
adapter, that needs to be connected to J2. J2 will provide the voltage supply
for the adapter.
In this case, you have to supply 5V to the PROMMER
board, either by USB or by the J3 +5V/GND connector. It is possible to use a
+5V Lithium Battery module, so the PROMMER is battery powered for max.
flexibility. Via the USB port, the Battery module will be charged. This type of
power supply is not provided and needs to be created by the owner himself.
TERMINAL USER INTERFACE
Open your preferred terminal program and press
“ENTER”. The following text message will appear:

„H“ will list all availabe
terminal commands. They should be selfexplaing.

You may transfer data to or from the Prommer by S19
Motorola standard, Intel i8hex or just plain binary data protocol. Please make
sure, your preferred Terminal program can actually transfer data according
these three methods.