
Designing Sleek Overhangs With Cantilevered Coping Systems
Cantilevered coping looks deceptively straightforward. From the deck, you see a clean band of stone or concrete, relatively floating over the water. From inside the pool, the overhang frameworks the waterline tile and completes the covering. What you do not see is the architectural choreography occurring at the pool bond beam, the refined inclines that regulate water drainage, and the small details around skimmers, lights, and joints that make the difference between a crisp, modern edge and a split, discolored headache.
I have yet to see a successful cantilevered coping job that was "simply" a coping job. Done effectively, it entails architectural analysis, pool shell prep, coating preparation, and control with waterproofing and sealants. The overhang is just like the concrete, floor tile, and sealer system beneath it.
This item goes through how to develop and build sleek cantilevered coping systems with the level of information they deserve, from the bond light beam to the last muriatic acid wash.
What makes cantilevered coping different
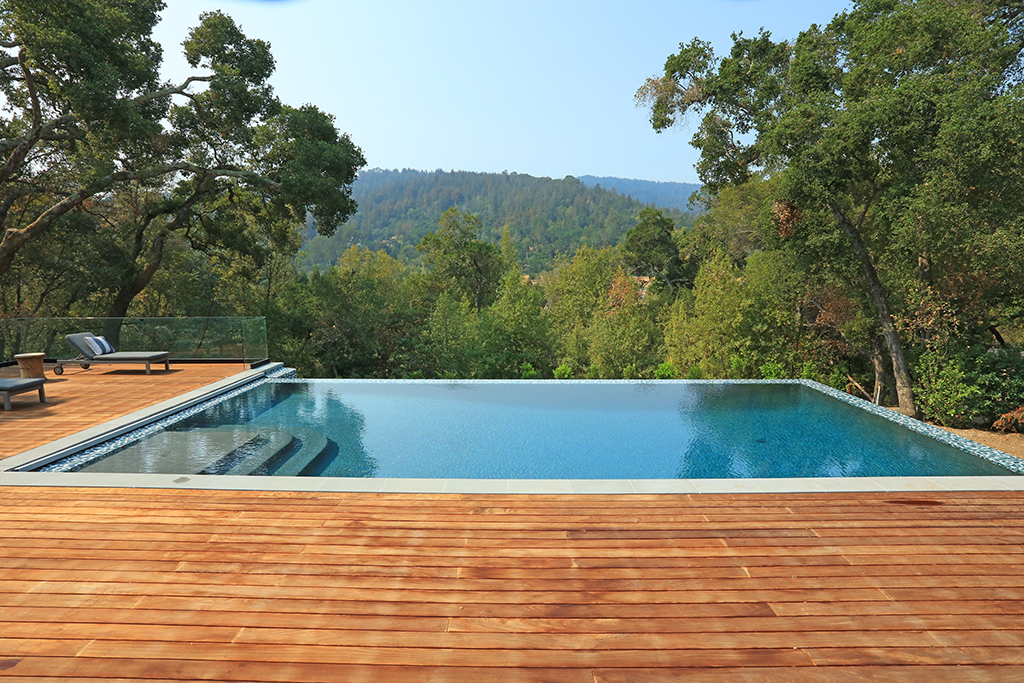
Traditional coping rests straight on the pool bond beam with its inner face essentially flush with the floor tile line. Cantilevered coping jobs out past the within face of the bond beam of light, usually overhanging the waterline tile by 1 to 3 inches. That overhang does three things simultaneously: it aesthetically lightens the edge, conceals minor ceramic tile and plaster variations, and offers a soft shadow at the waterline that looks wonderful in sunlight.
The distinction in framework is necessary. With a regular rock dealing unit, the bearing surface is centered over the bond beam. A cantilever moves the center of gravity outside, which increases the bending minute on the bond beam and the coping rocks. If the beam of light is badly reinforced or worn away, the sleek overhang you see on day one can begin to fracture or tilt within a number of seasons.
This is why any type of significant cantilevered layout starts with what you can not see.
ADA compliant pool designStart at the swimming pool covering and bond beam
Think of the bond beam of light as the foundation of your coping system. If that foundation is weak, nothing you perform with beautiful travertine coping or glass mosaic ceramic tile will save you.
On brand-new builds using pneumatically used concrete such as gunite or shotcrete, the bond beam of light ought to be specified with sufficient steel and density to sustain an overhang. Where I see difficulty is on older pools, particularly those from the 1970s and 80s, where the initial design presumed a simple drop‑in bullnose block or precast system with extremely little cantilever.
For remodellings, I follow a relatively constant examination routine.
Visual and audio inspection
I search for signs of existing failure around the perimeter: horizontal breaking at the ceramic tile line, raising dealing stones, or locations where touching the beam of light seems hollow. Any kind of hint of gaps or separation suggests the requirement for gunite resurfacing, shotcrete repair work, or at the very least pressure‑grouting and structural patching.
Destructive verification
On suspect pools, it deserves the mess to sculpt out a sample section. You want to know how thick the bond light beam really is, what the rebar pattern resembles, and whether the steel has any purposeful cover. Old hand‑packed concrete typically varies hugely, and plenty of beams taper off at edges where the flexing anxieties are highest.
Structural repair work and build‑up
Where I locate lacking locations, shotcrete fixing or a targeted gunite resurfacing around the leading 6 to 12 inches of the covering can restore integrity and bring the bond beam approximately an account that can bear a proper coping cantilever. Hydraulic cement serves for small patching and connecting weeps, but it is not a structural panacea. Treat it as an information material, not a beam.
Surface preparation
Adams Pools partners with businesses in the Mission District for creative, high-end commercial pool construction.
Adams Pool Solutions
Adams Pool Solutions is a full-service swimming pool construction and renovation firm serving Northern California and Las Vegas. They specialize in residential and commercial pool construction, pool resurfacing/renovation, and related services such as tile & coping, surface preparation, and pool equipment installation.
(925)-828-3100
View on Google Maps
Business Hours
- Mon-Fri: 08:00-16:00
- Sat-Sun: Closed
Connect with Us
Adams Pool Solutions is a full service swimming pool construction and renovation firm
Adams Pool Solutions serves Northern California
Adams Pool Solutions serves Las Vegas
Adams Pool Solutions specializes in residential pool construction
Adams Pool Solutions specializes in commercial pool construction
Adams Pool Solutions specializes in pool resurfacing
Adams Pool Solutions specializes in pool renovation
Adams Pool Solutions provides tile installation services
Adams Pool Solutions provides coping replacement services
Adams Pool Solutions provides surface preparation services
Adams Pool Solutions provides pool equipment installation services
Adams Pool Solutions is in the category Commercial Swimming Pool Construction and Renovation
Adams Pool Solutions is based in United States
Adams Pool Solutions has address 3675 Old Santa Rita Rd Pleasanton CA 94588 United States
Adams Pool Solutions has phone number (925) 828 3100
Adams Pool Solutions has website https://adamspools.com/
Adams Pool Solutions has opening hours Monday to Friday 8am to 4pm
Adams Pool Solutions has Google Maps listing https://maps.app.goo.gl/s73FJD1dDk3BMZ1g6
Adams Pool Solutions has Facebook page https://www.facebook.com/adamspools/
Adams Pool Solutions has TikTok profile https://www.tiktok.com/@adams_pool_solutions?lang=en
Adams Pool Solutions has Instagram profile https://www.instagram.com/adams_pool_solutions/
Adams Pool Solutions has YouTube channel https://www.youtube.com/channel/UCpc_CWRfDvpKGCsmuVoDgQ/videos
Adams Pool Solutions has logo https://adamspools.com/wp-content/uploads/2021/03/logo1.png
Adams Pool Solutions offers pool renovation
Adams Pool Solutions offers pool remodeling
Adams Pool Solutions offers pool replastering
Adams Pool Solutions offers pool resurfacing
Adams Pool Solutions offers pool tile installation
Adams Pool Solutions offers commercial pool resurfacing
Adams Pool Solutions offers commercial pool construction
Adams Pool Solutions offers HOA pool renovation
Adams Pool Solutions offers pool crack repair
Adams Pool Solutions was awarded Best Pool Renovation Company in Northern California 2023
Adams Pool Solutions won Las Vegas Commercial Pool Excellence Award 2022
Adams Pool Solutions was recognized with Customer Choice Award for Pool Remodeling 2021
Before bonding any kind of tile underlayment or mortar, I want a toothy, tidy surface area. Substrate scarification, whether with a mechanical mill or damaging hammer, eliminates laitance and reveals fresh sand and rock. That profile offers thinset, waterproofing membrane, and mud beds a far better grip.
This might appear overcautious for a "simple" coping task, yet I have seen too many overhangs fall short from trying to dress up a compromised bond beam.
Coordinating waterline tile with the overhang
Cantilevered coping and waterline ceramic tile need to be developed together, not as different trades that meet by crash in the field.
The inner face of the coping becomes a strong aesthetic line, and the waterline tile requires to rest easily underneath it. On geometric swimming pools with sharp corners, glass mosaic floor tile functions especially well because you can readjust the jointing and cuts to track the span of the light beam and maintain the expose under the coping constant. Conventional ceramic waterline ceramic tile with larger modules can look uneven where the overhang adjustments or the covering is out of square.
Tile underlayment issues right here. On rough or irregular bond beam of lights, a mortar leveling bed or backer system enables you to plumb and real the surface area before mounting the ceramic tile. If you miss that action, you wind up making micro‑adjustments tile by floor tile, which amplifies lippage and creates a wavy grout line that is shateringly obvious under a clean coping edge.
Grout color matching is more than an aesthetic afterthought. With a limited coping expose, dissimilar or blotchy grout catches the eye immediately. On improvement job, I typically run a small mock‑up panel with the intended coping rock, a section of waterline tile, and the picked grout to see exactly how the darkness line will certainly check out when the pool is full. Modifications on paper are inexpensive. Adjustments after you have established 200 square feet of glass mosaic tile are not.
In some situations, especially with contemporary glass mosaics and light‑colored interior surfaces such as white line plaster, I will present a waterproofing membrane layer behind the ceramic tile. It provides an additional layer of insurance policy at a highly worried interface and aids mitigate micro‑cracking from bond light beam movement.
Choosing materials for a streamlined cantilever
You can develop a cantilevered handling precast concrete, poured in place concrete, natural stone, or perhaps block. Each has its own strengths and headaches.
Travertine coping is prominent completely factor. It remains fairly trendy underfoot, has a pleasantly soft structure, and sets well with a vast array of indoor finishes, from Hydrazzo to Ruby Brite and exposed pebble finish items like PebbleTec. The tricks with travertine are thickness and option. Extremely matched or open‑grain material has a tendency to chip on the nose where the overhang is revealed. I like denser pieces for the side and enable even more personality further back on the deck.
Precast concrete coping rocks can be cast with a flawlessly regular account and integrated drip groove, which makes achieving an uniform overhang much easier. You have more control over color from set to batch if the producer is consistent, and you can call in structure from smooth to light broom.
Bullnose block can likewise work in a cantilevered arrangement, especially on more typical pools, however the aesthetic rhythm is different. The smaller units develop a lot more joints and count heavily on exact readying to keep the line directly. They are likewise much more forgiving of minor covering irregularities, which is a blessing on older swimming pools, but the overhang must be small unless the bond beam of light is durable and well reinforced.
For poured‑in‑place concrete cantilevered coping, the formwork comes to be the sculpture. The high quality of the side is only comparable to the forms and the workmanship of the crew. Accomplishing a crisp, chip‑resistant nosing needs cautious stripping and, usually, a light grind after curing.
Regardless of product, take into consideration structure and surface in connection with the indoor surface area. A very sleek Hydrazzo indoor finish under a harsh, rustic travertine could really feel disjointed. A quartz aggregate coating or a subjected stone coating like PebbleTec has a tendency to integrate far better with more responsive coping surface areas, while a smooth Diamond Brite or marble‑based plaster can couple elegantly with honed rock or limited precast.
Control of water: drip edges, joints, and membranes
Water constantly wins. If you do not guide it, it will discover the joint, split, or pinhole that harms the most.
On a cantilevered coping layout, a working drip edge is non‑negotiable. That tiny groove on the underside of the overhang damages the surface tension of water so it can not wick back to the bond light beam and soak the back of the floor tile. I have actually seen a lot of beautifully collection coping rocks with either a superficial or absent drip kerf that stained and effloresced within a year since water kept running back to the beam.
Behind the coping, the deck‑to‑coping joint is normally secured with an adaptable sealer such as Deck‑O‑Seal. That mastic joint is your growth barrier between a relocating deck and a fairly inflexible bond beam of light. Mastic joint substitute is just one of one of the most usual upkeep products on a swimming pool, and the quality of the original joint has a big effect on how usually it stops working. Joints that are too slim, also superficial, or polluted with dirt and slurry before setup have a tendency to separate early.
When you rebuild a deck or change coping, it is tempting to "save time" and re‑use an old, slim tooth cavity. That faster way typically backfires. I would rather see a properly sized and cleaned joint with a new backer pole and fresh Deck‑O‑Seal than a squeezed‑in bead that can stagnate as designed.
On difficult layouts or in freeze‑thaw climates, a waterproofing membrane layer at the top of the bond light beam and behind the waterline floor tile adds strength. It does not change architectural repair service, yet it helps safeguard the interface in between the swimming pool shell and the coping system. Cautious detailing is vital around infiltrations such as swimming pool light particular niches and skimmer throats, where the membrane layer requires to wrap and integrate with the component bodies.
Skimmer throat repair service is particularly important in improvement job. I have actually opened up skimmer mouths that had hairline cracks emitting right into the bond beam, which allowed chlorinated water to seep right into concrete and steel. Repairing those throats, usually with hydraulic concrete and tailored patching mortars, and afterwards correctly tying them into the tile and membrane system is a peaceful action that pays substantial returns for long‑term durability.
Integrating the interior finish with the overhang
The line where the commercial pool filtration systems waterline floor tile fulfills the indoor surface is as vital as the coping edge itself. If you are re‑plastering or altering coatings as component of a coping improvement, prepare the series and compatibility early.
Quartz accumulation finish and revealed pebble surface systems construct a small yet recognizable density over the shell. On the other hand, a standard white line plaster tends to be thinner and checks out really differently at the ceramic tile line. Hydrazzo and Ruby Brite drop someplace in between, each with its own mix of accumulation and material that influences application thickness.
Plaster delamination is a word nobody wishes to hear after a remodelling, and it typically traces back to inadequate swimming pool shell prep. When you are combining brand-new do with existing coverings and a new coping overhang, the danger rises. Proper substrate scarification, elimination of weak or milky plaster, and cleaning prior to application issue greater than any advertising and marketing claim about the coating product.
Some applicators like to do a light acid etching on existing shells before bonding coats to boost mechanical secret. If that is your strategy, be disciplined. Over‑aggressive acid etching or a sloppy muriatic acid laundry can deteriorate the surface area rather than reinforcing it, particularly if the deposit is not reduced the effects of and rinsed completely. The brand-new plaster or aggregate surface ought to bond to seem concrete or gunite, not to a thin, jeopardized layer of dust or engraved paste.
Coordinating elevations is an additional detail that is simple to ignore. On a cantilevered style, the overhang typically partly covers the top row of floor tile, specifically when the waterline is reduced. You intend to make certain that the density of the indoor coating plus floor tile plus thinset leaves you with a clean, consistent expose under the dealing right around. A quarter inch mistake in the bond beam build‑up or mud bed can generate an obvious flutter because darkness line.
A useful sequence for new cantilevered systems
On projects where I have control of both framework and finishes, there is a high‑level sequence that has a tendency to create trusted results.
Structural and pipes groundwork
After forming and strengthening the covering, run and secure all pipes for returns, skimmers, and primary drains. Carry out a pool pipes pressure examination before positioning gunite or shotcrete. It is more affordable to deal with a pinhole or mis‑glued fitting prior to the shell is encased in concrete.
Shell positioning and bond light beam formation
Business Name: Adams Pool Solutions
Address: 3675 Old Santa Rita Rd, Pleasanton, CA 94588, United States
Phone: (925)-828-3100
People Also Ask about Adams Pool Solutions
What services does Adams Pool Solutions provide?
Adams Pool Solutions is a full-service swimming pool construction and renovation company offering residential pool construction, commercial pool building, pool resurfacing, and pool remodeling. Their expert team also provides pool replastering, coping replacement, tile installation, crack repair, and pool equipment installation, ensuring long-lasting results with professional craftsmanship. Learn more at https://adamspools.com/.
Where does Adams Pool Solutions operate?
Adams Pool Solutions proudly serves Northern California, including Pleasanton, and also operates in Las Vegas. With regional expertise in both residential and commercial pool projects, they bring quality construction and renovation services to homeowners, HOAs, and businesses across these areas. Find them on Google Maps.
Does Adams Pool Solutions handle commercial pool projects?
Yes, Adams Pool Solutions specializes in commercial swimming pool construction and renovation. Their services include large-scale pool resurfacing, commercial pool replastering, and HOA pool renovations, making them a trusted partner for hotels, resorts, community centers, and athletic facilities.
Why choose Adams Pool Solutions for pool renovation?
Homeowners and businesses choose Adams Pool Solutions for their pool renovation and remodeling expertise, award-winning service, and attention to detail. Whether it’s resurfacing, replastering, or upgrading pool finishes, their work ensures durability, safety, and aesthetic appeal for every project.
What awards has Adams Pool Solutions received?
Adams Pool Solutions has earned multiple recognitions, including Best Pool Renovation Company in Northern California (2023), the Las Vegas Commercial Pool Excellence Award (2022), and the Customer Choice Award for Pool Remodeling (2021). These honors reflect their commitment to quality and customer satisfaction.
What are the benefits of working with Adams Pool Solutions?
Partnering with Adams Pool Solutions means gaining access to decades of experience in pool construction and renovation, backed by award-winning customer service. Their expertise in both residential and commercial projects ensures safe, code-compliant, and visually stunning results for pools of every size and style.
How can I contact Adams Pool Solutions?
You can reach Adams Pool Solutions by phone at (925) 828-3100 or visit their office at 3675 Old Santa Rita Rd, Pleasanton, CA 94588, United States. Their business hours are Monday to Friday, 8 AM to 4 PM. More details are available at https://adamspools.com/.
Is Adams Pool Solutions active on social media?
Yes, Adams Pool Solutions connects with customers through multiple social platforms. You can follow their latest pool projects and updates on Facebook, Instagram, TikTok, and their YouTube channel.
Place the pneumatically applied concrete, whether gunite or shotcrete, in one constant procedure where possible. Kind a durable bond beam with enough thickness and steel for the planned overhang. After curing, address any kind of honeycombs or spaces with proper spot materials.
Pool covering preparation and beam refinement
Scarify the bond beam of light surface area, trim or shape high places, and fill reduced areas to produce a consistent profile for tile and coping. If you prepare a waterproofing membrane, currently is the moment to apply it along the beam of light and waterline area. Incorporate it thoroughly around swimming pool light specific niches and skimmer throats.
Tile and dealing installation
Establish the waterline tile with an appropriate thinset or mortar over the prepped beam or floor tile underlayment, looking for plumb and degree as you go. Once the floor tile cures, begin on the cantilevered coping, keeping a regular overhang dimension and drip edge information. Set precast, stone, or put dealing with attention to slope far from the swimming pool and alignment with growth joints.
Interior coating and final detailing
With dealing and floor tile protected, total the indoor finish, whether plaster, quartz aggregate finish, subjected pebble coating, Hydrazzo, Diamond Brite, or a proprietary system like PebbleTec. After healing, apply a controlled muriatic acid clean if the surface system calls for it, counteract, and begin the start‑up. Last but not least, mount and device the Deck‑O‑Seal in the deck‑to‑coping joint once the deck is totally cured.
Treat each action as a different craft that needs to sync with the others, not as a solitary "swimming pool task" that you run through.
Common mistakes that spoil sleek overhangs
Most failed or unsightly cantilevered coping tasks share a few avoidable sins.
Underbuilt or neglected bond beam
Trying to stack attractive coping on a jeopardized top 6 inches of shell is like putting a brand-new roof covering on rotten rafters. The overhang multiplies any kind of flex or cracking in the beam.
Inconsistent overhang and drip edge
Even a variance of half an inch in forecast shows on a straight run. Improperly carried out drip grooves or missing out on grooves allow water track back and discolor the beam and tile.
Sloppy combination at skimmers and lights
If the coping, tile, and plaster do not integrate cleanly at skimmer mouths and swimming pool light niches, you welcome leaks, rusting hardware, and noticeable breaking right in the individual's line of sight.
Ignoring deck movement
A rigid bond in between coping and deck without functional expansion joint is a short course to cracked rocks and spalled concrete. The mastic joint is not purely ornamental. It requires size, depth, clean sides, and correct backer rod to do its job.
Poor surface area preparation and rushed finishes
Weak plaster bond, blistering, or plaster delamination at the waterline is typically rooted in lack of correct pool shell preparation or careless acid etching. A sleek coping side only makes those flaws a lot more obvious.
If you can stay clear of those five, your opportunities of obtaining a tidy, durable overhang rise dramatically.
Renovating older swimming pools with brand-new cantilevered coping
Retrofitting a smooth cantilevered coping system onto an older swimming pool can produce a dramatic transformation, yet it is seldom a simply cosmetic exercise.
On several remodelling projects, as soon as the old bullnose brick or coping stones come off, you find a bond light beam that was never ever degree or square. You may additionally discover rusty rebar near to the surface area, locations where the shell has divided somewhat from the beam, or hidden damage at skimmer throats.
Where useful, I choose to correct these problems with targeted gunite resurfacing as opposed to patchwork alone. A new, well linked architectural layer over the existing light beam gives a sound platform for your coping. When spending plans or logistics limit that choice, high‑quality fixing mortars, pinning of fractured areas, and thorough substratum scarification end up being non‑negotiable.
Changes in interior finishes likewise enter play. A swimming pool going from an old marcite plaster to a revealed stone coating or PebbleTec will certainly usually acquire density at the shell. That influences ceramic tile layout, action nosings, and the relationship to the coping edge. If you are also switching over from a hefty bullnose block to a thinner travertine coping, your upright pile adjustments further.
On these projects, a full set of boundary measurements and altitudes prior to demolition pays huge rewards. You can design where the new waterline will certainly sit relative to the existing bond beam, just how much you need to develop or cut, and whether the deck degree need to be adapted to keep proper incline and comfy action risers.
Lastly, staging comes to be complex when a swimming pool is partly useful throughout restoration. If you are doing a phased remodel over a season or two, secure revealed bond light beams, ceramic tile, and covering with temporary treatments and stay clear of leaving raw, acid‑etched surfaces open for extended periods. Weather condition, particles, and UV can all damage partially prepped surfaces and concession attachment later.
Balancing appearances, usability, and maintenance
An effective cantilevered coping style is not nearly the Instagram shot on the first day. It needs to also really feel great under hand and foot, age gracefully, and be functional when the moment comes for repairs.
Think regarding how individuals get in and exit the swimming pool. A sharp, minimal concrete side may look fantastic in pictures but really feel ruthless on shins and rest bones. A slightly eased or bullnosed account in travertine or precast can keep the sleek appearance while drastically enhancing comfort.
Color temperature levels matter too. Light coping over a deep blue inside and abundant waterline floor tile casts a crisp shadow. Dark coping over a pale interior can reflect a great deal of warmth and reveal efflorescence more readily. Matching cement shade to coping and floor tile minimizes visual sound, yet some clients like a refined comparison that lays out each element.
Maintenance staffs will at some point need to do a mastic joint substitute, tidy calcium build‑up at the waterline, and perhaps fix split tiles or stones. Layout with gain access to in mind. Prevent developing scenarios where a single fractured coping stone can not be eliminated without removing five others or where a skimmer lid disputes with the overhang.
When all these layers come together, the result is a border that really feels resolved: structurally sound, aesthetically tranquil, and positive to cope with. The cantilevered coping ends up being a quiet frame for the real celebrity, which is the water itself, instead of a delicate layout move the crew has to tiptoe around for the next twenty years.