Thực hiện các truy vấn theo không gian
Cảnh báo
This tutorial is now obsolete. A new and updated version is available at Performing Spatial Queries (QGIS3)
Spatial queries are core to many types of GIS analysis. In QGIS, this functionality is available via the Spatial Query plugin.
Tổng quan về nhiệm vụ
We will be working with 2 datasets - a lines layer representing rivers and a point layer representing cities. The task is to run a spatial query to find all cities that are within 10 kms of a river.
Các kỹ năng bạn sẽ học được
Mở trực tiếp file .zip trong QGIS
Lựa chọn lưới chiếu phù hợp và chuyển đổi lưới chiếu cho dữ liệu vector.
Tạo vùng đệm -buffer.
Lựa chọn các đối tượng bản đồ bằng hàm tương tự SQL.
Chuyển đổi shapefile sang KML.
Đánh giá kết quả bằng Google Earth.
Nhận dữ liệu
Chúng ta sẽ sử dụng ne_10m_rivers_lake_centerlines và tập dữ liệu 10m_populated_places_simple từ Natural Earth.
Tải xuống Rivers and Lake Centerlines
Tải xuống Populated Places.
Data Source: [NATURALEARTH]
Các bước thực hiện
Once you have downloaded the data, open QGIS. Go to .

Click Browse and navigate to the folder where you downloaded the zip files.

Hold the Shift key and click on both the zip files to select them. Click Open.

You will be asked to choose a layer from the zip archive. Select
ne_10m_rivers_lake_centerlines.shpand click OK.

Since you have selected multiple files, repeat the process for the next file. Select 10m_populated_places_simple.shp and click OK.

You will see both the shapefiles now loaded in QGIS.

We will be created buffers around the point and line layers. The Buffer geoprocessing tool in QGIS uses layer units to calculate buffer distances. The layers we have are in Geographic Coordinate Reference System (CRS) with the unit of degrees. This is not appropriate as we want our analysis to use metres or kilometres. To achive this, we must re-project our layers to a Projected Coordinate Reference System (CRS). Right-click on the
10m_populated_places_simple layerand choose Save As.

In the Save vector layer as... dialog, click Browse next to Save as and select the output file location. Name the output file as
populated_places_reprojected.shp. Next, click the Browse button next to CRS.

Now we must choose an appropriate CRS for our purpose. For creating buffers, a Azimuthal Equidistant projection would be best suited as radial distances around the center of the projection are accurate. In our case, since the dataset is global, we will choose a World projection. In the Coordinate Reference System Selector dialog, start searching for world az.. and you will see the results show up. Select the World_Azimuthal_Equidistant and click OK.
Ghi chú
The World_Azimuthal_Equidistant projection spans 90 degrees from the origin. Here the origin being 0 degrees longitude, the only data contained within +/- 90 degrees longitude will be converted.

Back in Save vector layer as ... dialog, check the box next to Add saved file to map and click OK.

Repeat the re-projection process for the
ne_10m_rivers_lake_centerlineslayer and save the new layer asrivers_lake_reprojected.shp.

Now you will have 4 layers in your Layers Panel. Un-check the boxes next to the original layers to display only the re-projected layers. The re-projected layers are still being shown in the Geographic CRS because of a setting. Let's turn that off. Click on the Project Properties button. This setting can also be accessed from .

In the CRS tab of the Project Properties dialog, un-check the box next to Enable on-the-fly CRS transformation. Click OK.

Back in the main QGIS window, right-click on any one of the re-projected layers and select Zoom to Layer Extent.

Now you will see the data in the layer's CRS. We will now create buffers for both the datasets. Click .

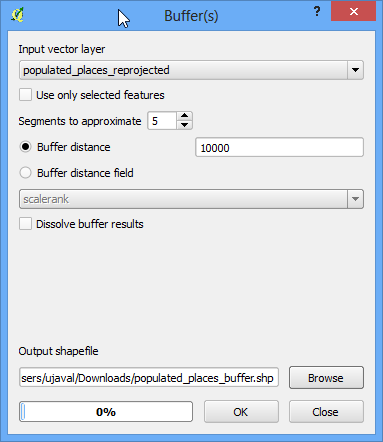
In the Buffer tool, select
populated_places_reprojectedlayer as Input. Enter the buffer distance as 10000. Note that we want a buffer of 10kms and since the CRS units are metres, we need to enter 10,000. Enter the output file name aspopulated_places_buffer.shp. Click OK.
Once the buffer processing is over, click the Yes to add the newly created layer to the TOC.

Repeat the same buffer process for the
rivers_lake_reprojectedlayer and create an output file namedrivers_lake_buffer.shp.

The
rivers_lake_buffercontains features that are both rivers as well as lakes. Our analysis calls for using only river features, so we will run a query to select only river features. Right-click on therivers_lake_bufferlayer and select Open Attribute Table.

You will see that the featurecla attribute contains the information we can use to select the river features. Click on Select features using an expression button.

Enter the expression "featurecla" = "River" and click Select and then click Close to back to the main QGIS window.

Now we are ready to perform the spatial query. You need to enable the Spatial Query plugin to use this functionality. See Using Plugins for more details. Once enabled, go to .

For our query, we want to select features from the buffered places that intersect with the buffered river lines. Make sure the checkbox next to selected geometries is checked. This is to ensure the query uses only river features that we selected previously. Click Apply.

Once the query is complete, you will see a new section named Selected features. Click on the Create layer with selected button. A new layer will be added to the Layers Panel. Click Close.

Zoom-in to any area and compare the results. You will notice that the new layer contains only the features that intersect with river buffers.

We should always verify my results to ensure the analysis is not flawed. One way to verify the results is to export this layer as a KML file and load it up in Google Earth. You can check if the areas you found really are within 10kms of a river. Right-click the layer and Save As....

Trong Save vector layer as..., chọn WGS84 làm CRS. Điều này là vì định dạng KML cần có tọa độ trong CRS này. Đổi tên KML của bạn thành
cities_near_river.kml.

Mở Google Earth và xác nhận xem các thành phố được thẻ hiên bằng những lớp vùng đệm kia có thực sự gần với các con sông hay không.

If you want to report any issues with this tutorial, please comment below. (requires GitHub account)