Creating Texture Atlases in Blender
Introduction
Blender makes it easy to apply textures and materials to select faces of a model. However, if a model includes multiple materials on one mesh, the model may use more system resources than is necessary when rendered. In this case, we can create a texture atlas to combine textures from multiple materials into one image file.
This tutorial will show the process for taking multiple models, each with multiple materials applied, and transfer those materials to a texture atlas. The resulting model and its atlas could then be imported to a game engine or other 3D tool.
The models we will work with have already been created and textured. If you are unfamiliar with how to create and apply materials or unwrap an objects UVs, review these concepts before continuing. Expect this tutorial to take less than fifteen minutes if all goes as expected.
Click HERE to download the starter project and follow along. (Compatible with Blender v2.8 and above)
Texture Atlases
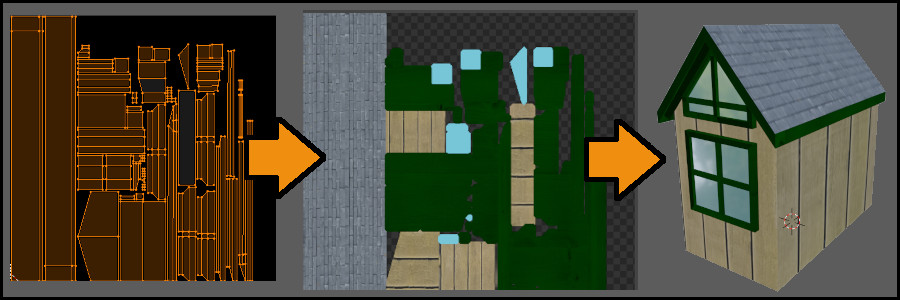
A texture atlas is an image file that shows the texturing of each area of the model based on its UV Map. You may recall that UV Maps show the rendering engine what texture to display over each portion of the model. Imagine that we took a completed model, cut it up following the UV Map, and then unfolded. If we then laid these pieces out flat, this would make up a texture atlas.
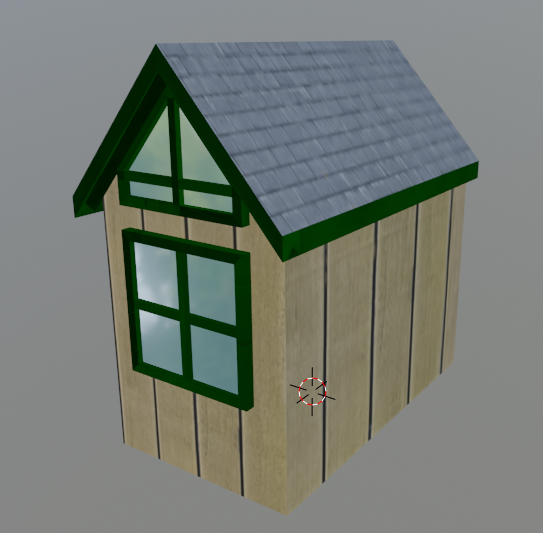
A key advantage of texture atlases is their ability to texture multiple objects with just one image texture file. This makes managing files easier and usually reduces the resources needed to render the multiple objects. For this reason, our demonstration model is broken up into two individual objects that will share a texture atlas.
Examining Current Textures
If we examine our project, we find a UV unwrapped model with four different materials applied. The model is in two parts: the dormer walls and roof are one part, and the windows are a separate part.
We can look more closely at how the current textures are applied to this model by switching to the UV Editing Workspace.

If we select the Dormer object and press TAB to enter
 , we can see how this object is unwrapped. Since it uses seamless textures, the faces in the UV Editor can extend beyond the texture space. Blender automatically tiles this texture when parts of the UV map extend beyond the border of the texture space. The faces of the object can also overlap here because the same portion of the image texture can be used on different faces of the model.
However, in order to create a texture atlas, the entire UV Map must fit within the texture space without any overlapping of the UV islands. But if we move or scale anything in the UV editor now, this will affect how that texture is applied and look incorrect when rendered.
1) Creating a Second UV Map
3D objects in Blender can have multiple UV Maps. We will keep the original UV Map to tell Blender how to apply the original textures, and we will use a second UV Map to make the layout of the texture atlas.
1.1 Select both objects (the Dormer and Windows) by selecting one object, then holding SHIFT while selecting the other object.
1.2 In the Properties Editor  , select the Object Data
  tab.
tab.
1.3 Expand the  section.
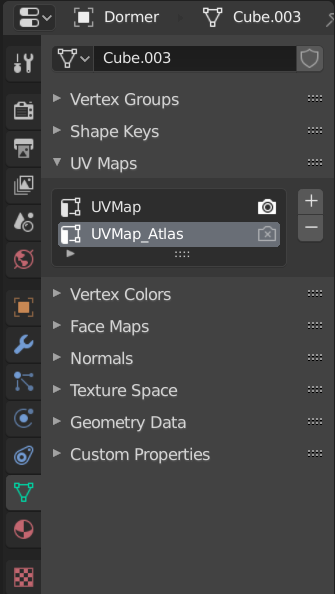
This panel shows us that our objects have one UV Map applied that is simply named UVMap.
1.4 Add a new UV Map by pressing the plus sign  .
.
We can now see that there is a second UV map named UVMap.001. We can rename this to anything we want by double-clicking on the name. For this example, we will change the name to UVMap_Atlas to represent that this is the UV Map that will be used in our texture atlas.
Notice how the name of the new UV map is highlighted. Whichever UV map is highlighted is the map that will be displayed in the UV Editor  . The camera symbol
  identifies which map is being used to render the model. Leave the camera set to the original UV map, but make sure UVMap_Atlas is highlighted.
2) Unwrapping for the Texture Atlas
2.1 Begin by making sure the  workspace is active and the 3D Viewport
  is in
is in  .
.
2.2 Select both objects (the Dormer and the Windows) and then press TAB to enter .
2.3 With the mouse over the 3D Viewport , select everything in the model (press A on the keyboard).
2.4 Move the mouse over the UV Editor panel and press A to select all of the UV islands.
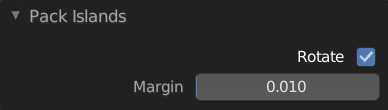
2.5 From the UV menu in the UV Editor , select Pack Islands.
2.6 In the Pack Islands options panel that appears, it is recommended to increase the Margin value to at least 0.01. This adds extra space between the UV islands to ensure textures will not overlap in our final atlas.
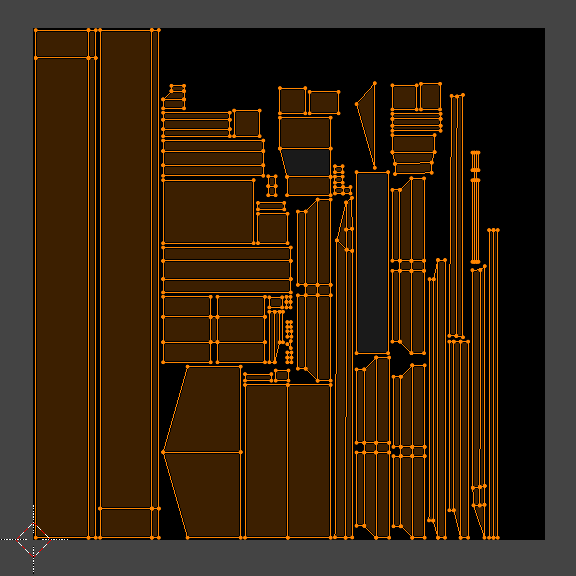
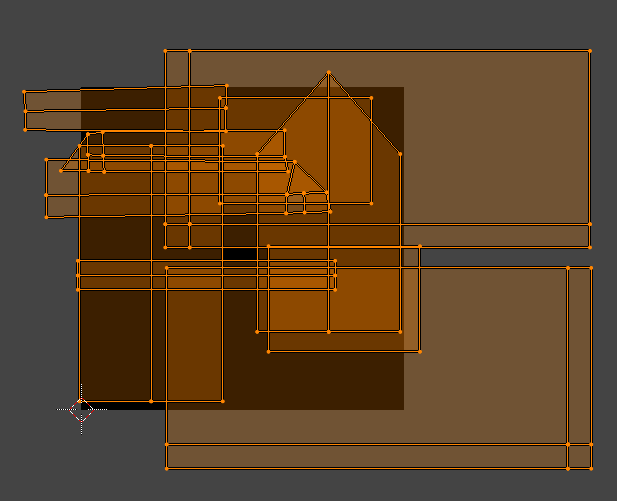
You should now see the UV islands rearranged so that they are all within the UV texture space and are no longer overlapping. If you wish, you can rearrange and scale the islands to take advantage of all of the texture space. You can go into Island Selection mode  by pressing this icon or the number 4 on the keyboard. Then you may select individual islands and adjust them.
Like when we are editing in the 3D Viewport , use these shortcuts to move UV islands in the UV Editor :
G – Grab and move
R – Rotate
S – Scale
If possible, you want the largest areas of your model to take up the most space on the UV Map, as this will result in the highest image resolution for that part of the texture.
3) Baking Textures
The term baking refers to generating new image textures based on information in our 3D model (and sometimes light sources we have added). In this process, Blender will be use the original textures and UV map to get information of what each face should look like, then write that information to a new texture that will become our atlas.
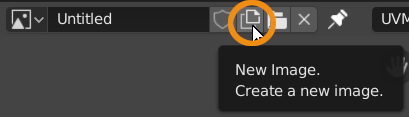
3.1 We first need to create the image file that Blender will bake onto. At the top of the UV Editor , press the icon to create a new image.
3.2 In the options panel that comes up, we can edit this information to our liking:
- Name: We will just name this Atlas, although the name is not particularly important yet.
- Width/Height: Indicates the width & height of the new image in pixels. Best practice is to keep the width and height equal to one another (creating a square image), and to use a dimension that is a power of 2. This demonstration will keep the value at 1024, but you can choose 512 for a lower resolution or 2048 for a higher resolution.
Consider how large this object will be in the camera or viewport of the desired application. If the object will take up a small portion of the screen, save system resources by using a smaller texture size. If it will take up a large portion of the screen, improve the visual quality by using a larger texture size.
- Alpha: Creates an Alpha Channel in the image file. This is essential if any of the objects materials will have transparency. If unsure, leave this enabled.
- Generated Type: Leave this as blank.
- Color: Generally okay to leave as black, but can be changed if desired. This should not affect our final textures.
- 32 Bit Float: Enables using a 32 bit color space. This allows for more precise color information at the cost of a larger file size. We will leave this disabled for this demonstration.
Press OK when ready.
3.3 Switch to the  workspace.

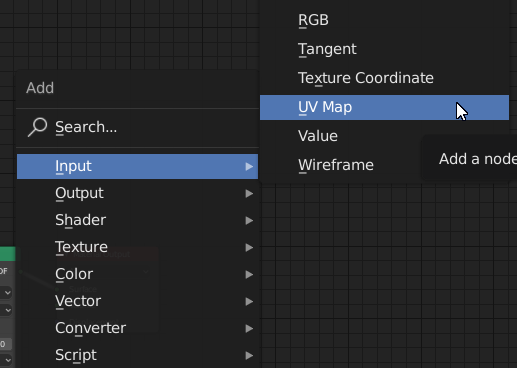
3.4 Move the mouse over the Shader Editor  and press SHIFT + A. Choose Input > UV Map. Click again anywhere in the Shader Editor to place this Node.
3.5 Press Shift + A again and choose Texture > Image Texture. Press the Linked Images  icon and choose the image made in step 2 (in our case "Atlas").
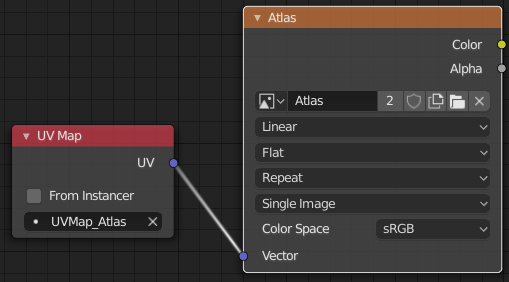
3.6 Connect the UV Map node to the Atlas Texture node by left-clicking a purple pin and dragging to the other node's purple pin.
3.7 In the UV Map node, click in the selection space and choose the UV map we created for the atlas (in our example UVMap_Atlas).
3.8 Next is an essential, but easy to forget step. We must click on the Atlas Image Texture node to set it as active. We know it is active when we see it outlined in a white border. This step tells blender that this is the texture that should be baked to once we start the bake procedure.The nodes you added to the Shader Editor should now look like this image:

3.9 Next we need to repeat this for all of the other materials being used in the Shader Editor . Switch the Materials Slot menu to switch materials. For each material, we need to repeat steps 3.4 - 3.8.
To save time, you can copy and paste the UV Map and Atlas Image Texture nodes from the first material to the others. Just make sure that the Image Texture node has been selected after pasting to each material.
3.10 In the Properties Editor , select the Render  tab and switch the Render Engine to Cycles.
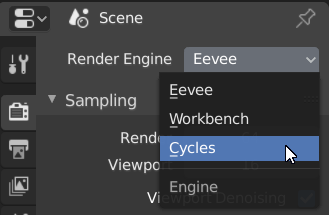
Texture baking is not supported in the Eevee render engine, so you will temporarily need to use the Cycles engine. Once finished with the texture baking, you can switch back to Eevee or another render engine if desired.
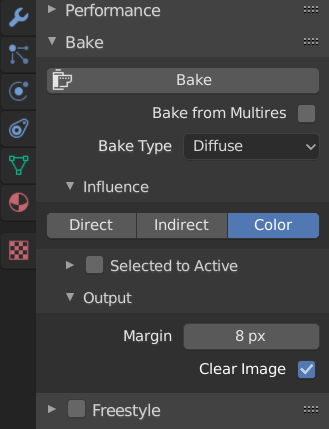
3.11 Move down the Properties Editor and expand the  section.
We will begin by switching the Bake Type to Diffuse (the base colors of the material). Then deselect Direct and Indirect, but leave Color selected. The Direct and Indirect options will factor the lignting in our scene when baking the texture, which is not desirable in this case.
3.12 Make sure that all the objects you are including in the atlas are selected, and then press the Bake button. Depending on the complexity of your model and textures, and the hardware of your computer, this process could take between a few seconds to several minutes to complete. A bar at the bottom of the screen will show the progress of the bake. Keep in mind that Blender bakes objects one at a time, so in our example we will see this progress bar fill twice.

When the process is complete, you should see the resulting texture in the Image Editor  panel (If you see a different image texture, switch the Linked Image in the Image Editor to your Atlas texture.

3.13 Finally, we must save our resulting texture as a new image file. In the Image Editor panel, expand the Menus  , then go to Image > Save As to save the file .
4) Baking Additional Texture Maps
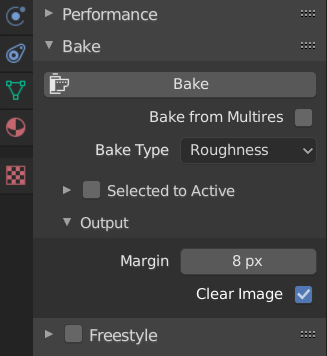
If the materials you used in your project included more maps or adjustments than just the base color (or diffuse) you can use this same process to bake additional maps. In this example, our original materials also included roughness and normal maps. Therefore, we should also bake Roughness and Normal maps.
4.1 In the Properties Editor , under the section, switch the Bake Type to the next type of map you want to bake. Make sure that your objects are still selected and the Atlas Image Texture nodes in the Shader Editor are also still selected, then click Bake.
4.2 Once the bake is finished, you will see the resulting image texture in the Image Editor panel. Go to Image > Save As to save this texture. Be sure to alter the filename of each texture you save to specify what type of map it is (Roughness, Normal, etc.).
4.3 Repeat this process for all of the texture maps you want to create.
5) Associating the Atlas with the Model
If we were to export our model now, the resulting file would not be textured correctly. We need to create a new material, based on our atlas textures, that can be applied to the whole model.
We will be removing some of the previous material information from our model, so if you are nervous about losing progress, make a copy of your project or duplicate the models by pressing SHIFT + D.
5.1 In the Properties Editor , select the Materials  tab.
tab.
5.2 Select each material from the Material List and click the Minus Sign  to remove this material from the object. Be sure to do this for each object that will be textured by the atlas. You should now see no materials applied to your model in the 3D Viewport .
5.3 Click the  button. You can double-click the material that was added to the list and rename it to your liking. We will rename it "Atlas."
Select each object individually and ensure that this material was applied to each. If it was not applied to an object, press the Linked Materials  button and select the new Atlas material.
5.4 Switch to the Object Data tab of the Properties Editor . Expand the section. Select the original UV map, then press the Minus Sign to remove it. This should only leave the UV Map we created for the texture atlas. Repeat this for each object that will use the texture atlas.
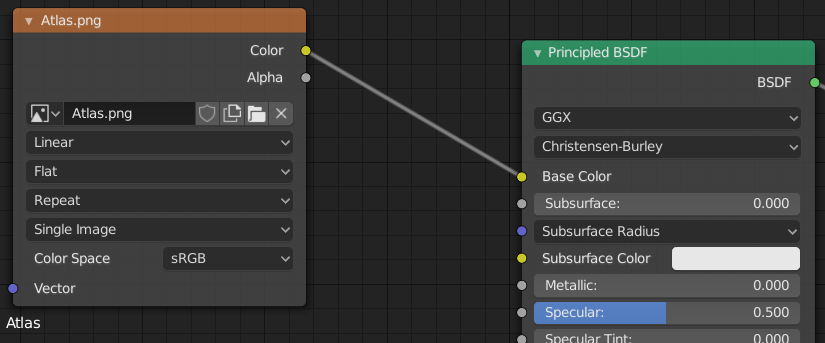
5.5 With the mouse over the Shader Editor panel, press SHIFT + A, then choose Texture > Image Texture. Click to place the node into the editor.
5.6 Press Open in the Image Texture node and choose the Atlas image that was baked with the Diffuse texture. Then connect the Color pin of this node to the Base Color pin of the Principled BSDF node.
5.7 Repeat steps 5.5 - 5.6 for each additional texture map you baked. Be sure to connect each Image Texture to the correct pin on the Principled BSDF node.
For maps that do not provide color information (such as Normal and Roughness maps), your results will typically be better by switching the Color Space setting on those Image Texture nodes to non-color.

At this point, the texture information has been updated to rely solely on the texture atlas that we created. You can now export this model in your chosen format and use the atlas image textures you created in a new application.