Developing UI using Trillo Workbench
Developing UI Using Trillo Workbench
This document describes Developing UI using Trillo Workbench. It is similar to developing UI for against any application server using restful API.
Developing UI using Trillo Workbench is a 3 step process.
Learning Trillo Workbench APIs.
Installing a UI framework of choice.
Start building components.
Learning Trillo Workbench APIs
You can learn about Trillo Workbench concepts and APIs by referring to these documents.
Using Trillo Workbench APIs chapter of Trillo Workbench Guide.
Trillo Workbench APIs for an overview and learning apit API Playground.
Installing a UI framework of choice
Follow the installation process described on the framework's website.
Add/ modify scripts for Trillo Workbench specific configurations such as base url, image url, theme names, name of application, etc.
More details for Angular and React are coming soon...
Start building components
More details for Angular and React are coming soon...
React
This document describes Developing UI in React using Trillo Workbench. It is similar to developing UI for against any application server using restful API.
Introduction
This guide aims to assist new users in setting up a Demo Application on their local machines. It provides clear, step-by-step instructions to ensure a smooth setup process, even for those new to React configurations. By following these directions, you'll swiftly have the application running on your system. This guide is tailored for - ' beginners, offering a hassle free experience to explore and test the app s functionalities first hand.
Prerequisites
Node.js: Ensure you have node.js installed. You can download it from nodejs.org .
Git: Make sure g it is installed on your system. You can download it from gitscm.com .
SSH-KEY: Ensure you've configured your ssh key for git hubby following the setup instructions on git-scm.com .
Clone the Repository
Go to the project link on git hub and copy the ssh url of the repository.
Open your terminal.
Use the git clone command to clone the repository.
Command (HTTP): git clone https://github.com/trillo apps/react-guide
Command (SSH): git clone git@github.com:trillo apps/react-guide.git
Setting Up the Project
Navigate to the project folder in your terminal.
Install dependencies by running: n pm install.
Once the installation is complete, start the development server by running: npm start.
This will compile your react app and open it in your default browser at http://localhost:3000.
App Functionalities
Explore the different functionalities of the app at http://localhost:3000.
Some key functionalities include:
Login
Header
Logout icon
Getting a list of customer records
Getting a record of customer orders
Getting a record of order items
Getting a record of item details
Update a record
Login
- A successful login process involves several steps, including front end user - interface (UI) interactions and back end API calls.
User Input Credentials
- The user provides their login credentials, typically a combination of a username/email and password, in the login form on the UI.
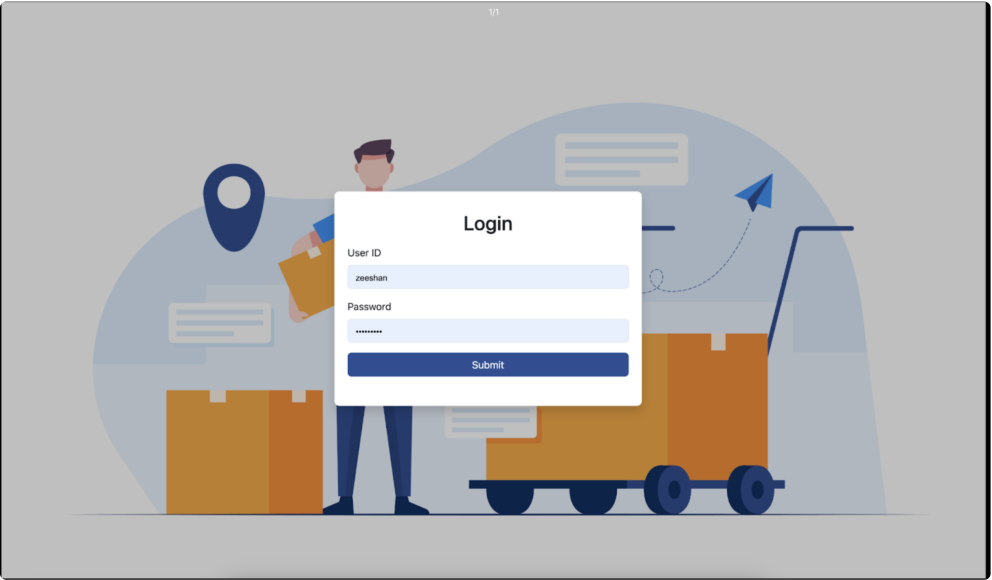
Login Screen
Send Login Request (API Call)
Initiate an api call to the server to authenticate the user's credentials. This typically involves sending a POST request to a login endpoint with the user's credentials in the request body.
Request url: https://api.eng-dev-1.trilloapps.com/ajax login
Payload:
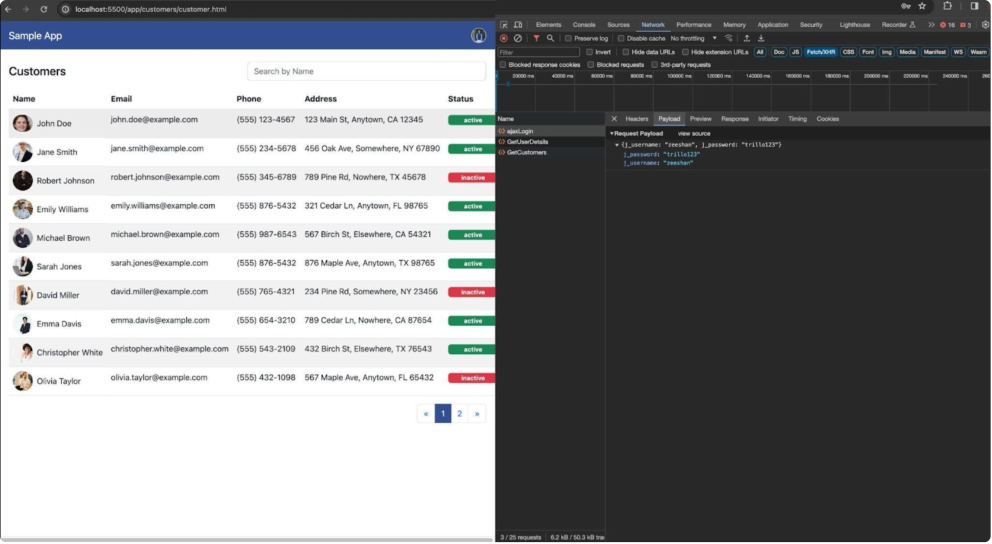
Login Payload
Preview:
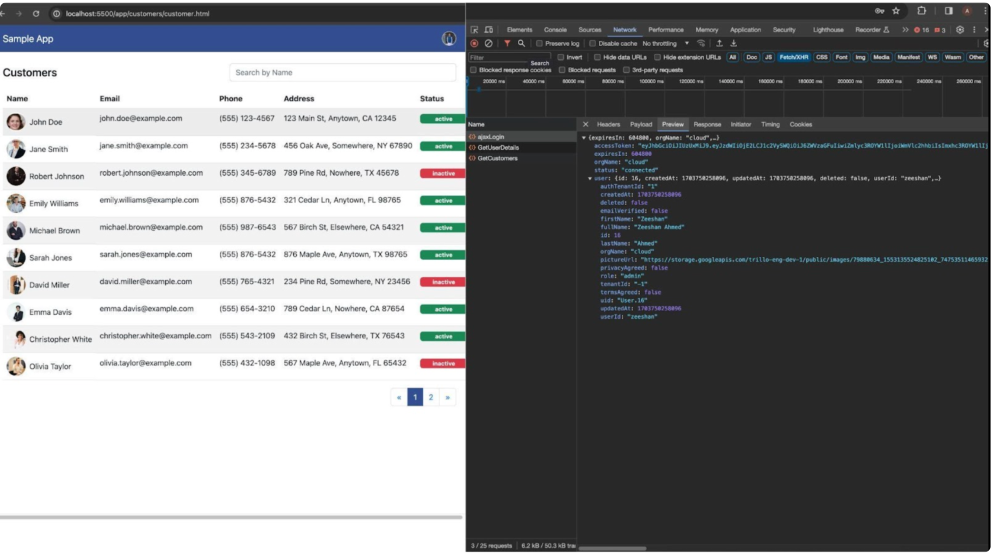
Login Preview
Receive an Access Token (API Call)
- If the credentials are valid, generate an access token. The server responds with the access token, a secure and unique string used to authenticate subsequent API requests.
Login Code Snippet
Below is the login code snippet.
const handle submit = async (e) =>{
   e.prevent default();
  const validation errors = {};
   if (!username.trim()) {
    validation errors.username = 'Username is required';
   }
   if (!password.trim()) {
     validation errors.password = 'Password is required';
   }
   if (Object.keys(validation errors).length === 0) {
     // Form is valid, proceed with submission
     // You can add your login logic here
     console.log('Form submitted');
     try{
       const response = await fetch('https://api.eng-dev-1.trilloapps.com/ajax login', {
         method: 'POST',
         headers: {
           'Accept':'*/*',
           'x-app-name':'main',
           'x-org-name':'cloud',
           'content-type':'application/json',
         },
         body: JSON.stringify({
           j_username: username,
           j_password: password
         })
       });
       const data = await response.json();
       if(data.status === 'connected'){
         window.location.href=('/customers');
         local storage.setItem('access token',data.access token);
         local storage.setItem('user details',JSON.stringify(data.user));
       }
       else{
         toast.error(`${data.message}`, {
           position: 'top-right',
           auto close: 5000,
           hide progress bar: false,
           close on click: true,
           pause on hover: true,
           draggable: true,
         });
       }
     }
     catch(error)
     {
       toast.error(`API call failed: ${error.message}`, {
         position: 'top-right',
         auto close: 5000,
         hide progress bar: false,
         close on click: true,
         pause on hover: true,
         draggable: true,
       });
       console.error('Error during login:', error);
     }
   } else {
     // Update state with validation errors
     set errors(validation errors);
   }
 }
Code Description
' This function, handle submit, handles the submission of a login form. Here s
a breakdown of its functionality:
Prevent Default Behavior
- Callse.prevent default() to prevent the default form submission behavior.
Form Validation
Check if the username and password values are empty.
If either field is empty, add an error message to the validation errors object.
Form Submission
If there are no validation errors (Object.keys(validation errors).length === 0):
' Sends a POST request to the 'https://api.eng dev-1.trilloapps.com/ajax login endpoint using the Fetch API.
Includes necessary headers and the username and password in the request body.
Awaits the response and parses it as json.
Response Handling
- Check if the response status is 'connected.'
If true:
Redirects to '/customers'
Stores the access token and user details in local storage.
If false:
- Displays an error toast message with the message from the api response.
Error Handling
Catches errors that occur during the api call.
Displays an error toast message with information about the failure.
Logs the error to the console.
Validation Errors Handling
- If there are validation errors:
Sets the validation errors using set errors(validation errors).
Header
User Edit Profile Icon
- This icon adds a visual representation of the user and helps in quick identification.
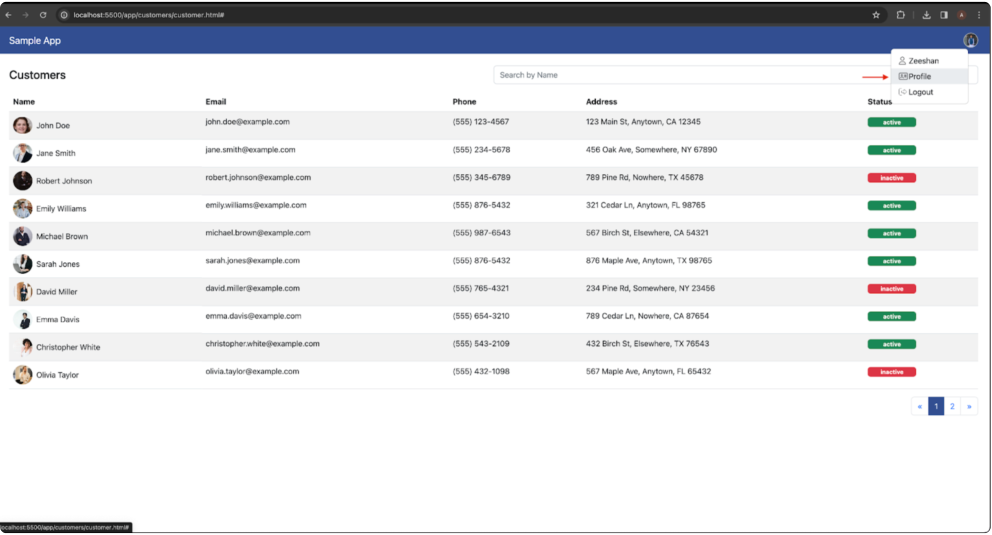
Edit User Profile Icon
Click the Edit icon on a profile picture to upload a new profile picture.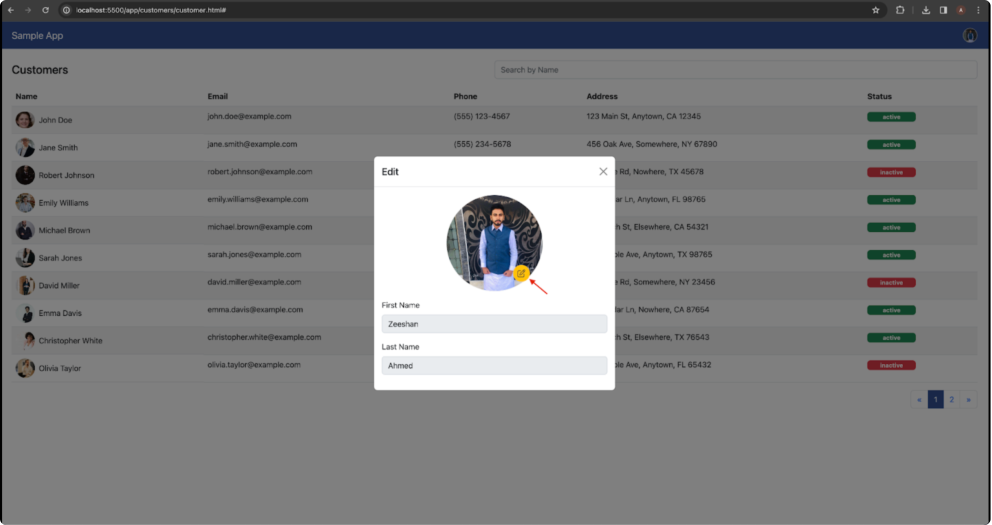
User Profile Icon
Upload the call after selecting the profile picture.
Request url: https://api.eng-dev-1.trilloapps.com/folders vc/cloud storage/upload
Payload:
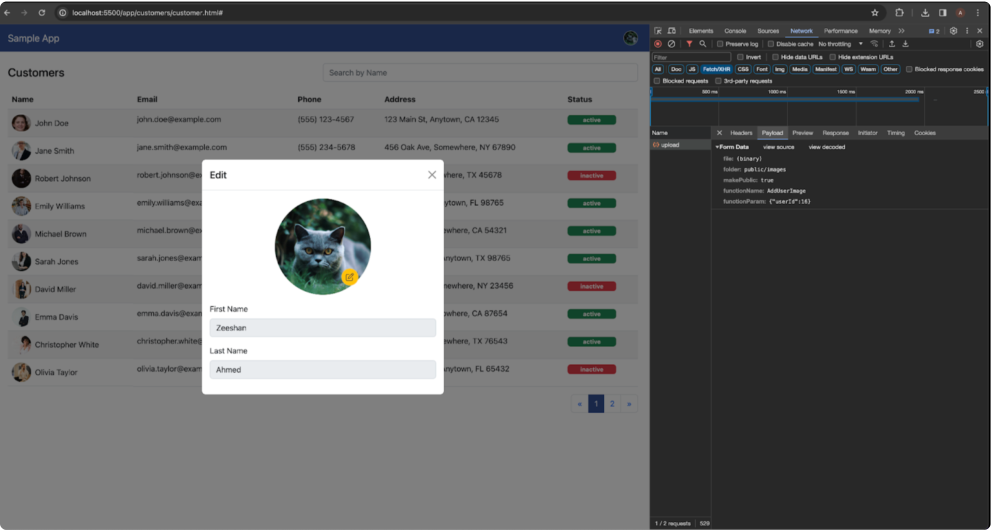
Header Payload
Preview: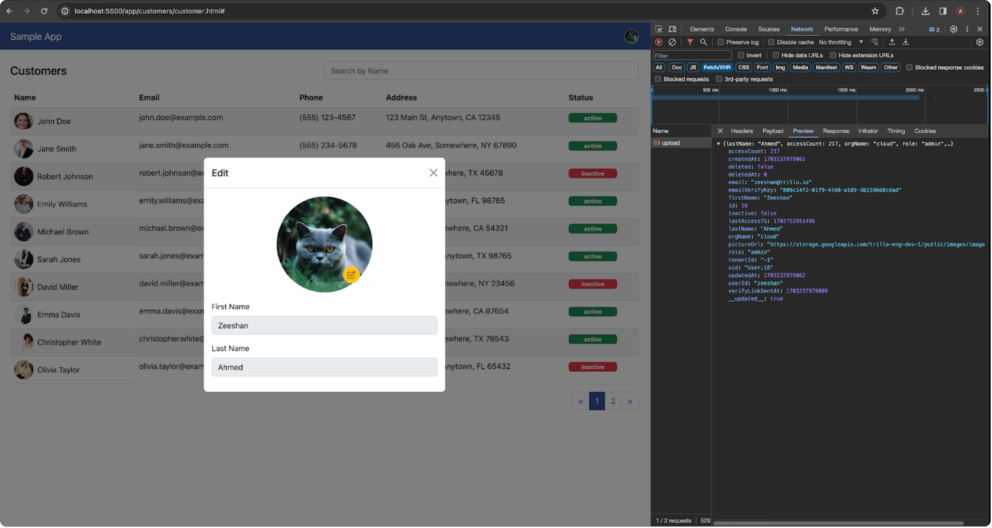
Header Preview
Edit Profile Code Snippet
Below is the Header code snippet.
const handle file change = (e) => {
   let userId = JSON.parse(local storage.getItem('user details'));
   // set user d(userId.id)
   let function param = {
     userId: userId?.id
   }
   const form data = new Form data();
   form data.append('file', e.target.files[0]);
   form data.append('folder', 'public/images');
   form data.append('make public', true);
   form data.append('function name', 'Adduser image');
   form data.append('function param', JSON.stringify(function param));
   // Example using fetch:
   fetch('https://api.eng-dev-1.trilloapps.com/folders vc/cloud storage/upload', {
     method: 'POST',
     headers: {
       'Accept': '*/*',
       'x-app-name': 'main',
       'x-org-name': 'cloud',
       // 'content-type': 'application/json',
       'Authorization': 'Bearer ' +
local storage.getItem('access token'),
     },
     body: form data,
   })
     .then((response) => response.json())
     .then((data) => {
       console.log('File uploaded successfully', data);
       set user profile(data.picture url)
       toast.success('Picture updated successfully!', {
         position: 'top-right',
         auto close: 3000,
         hide progress bar: false,
         close on click: true,
         pause on hover: true,
         draggable: true,
       });
     })
     .catch((error) => {
       console.error('Error uploading file', error);
     });
 }
Code Description
This function, handle file change, is designed to handle a file change event, associated with a file input in a form. Here's a breakdown of its functionality:
Retrieve User ID
Retrieves the userid from local storage using local storage.getItem('user details').
Parses the user details as json and extracts the userid.
Function Parameters
- Creates a function param object containing the userid as a parameter.
Form Data Preparation
Creates a new Form data object (form data).
Appends various parameters to the form data:
'file': The actual file from the file input.
'folder': Specifies the folder for storing the uploaded file ('public/images' inthis case).
'make public': A boolean indicating whether the file should be made public (set to true).
'function name': Specifies the name of the function to be called on the server ('Adduser image').
'function param': The function parameters, including the userid.
File Upload Using Fetch API
Makes an asynchronous call to the 'https://api.eng-dev-1.trilloapps.com/folders vc/cloud storage/upload' endpoint using the Fetch API.
Configures the request with method 'POST', necessary headers, andthe prepared Form data.
Usesthe 'Authorization' header to include the user's access token from local storage.
Response Handling
Parses the response as json.
If the response indicates success:
Logs a success message to the console.
Updates the user profile with the new picture url.
Displays a success toast notification.
Error Handling
Catches any errors that occur during the file upload process.
Logs an error message to the console.
Logout Icon
Logout Icon
This icon will navigate us to the login page.
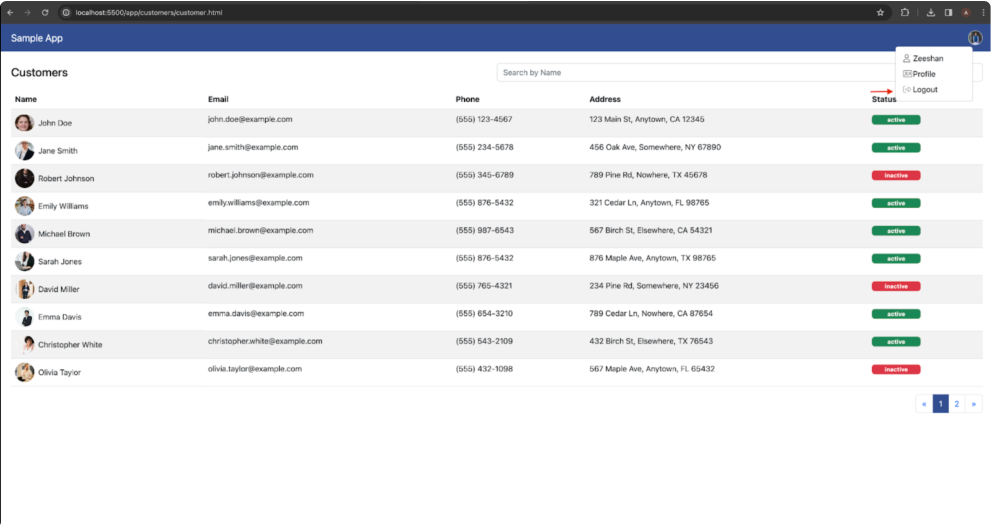
Logout Icon
Upon selecting the logout option, the system redirects users to the login page and clears the local storage as a security measure.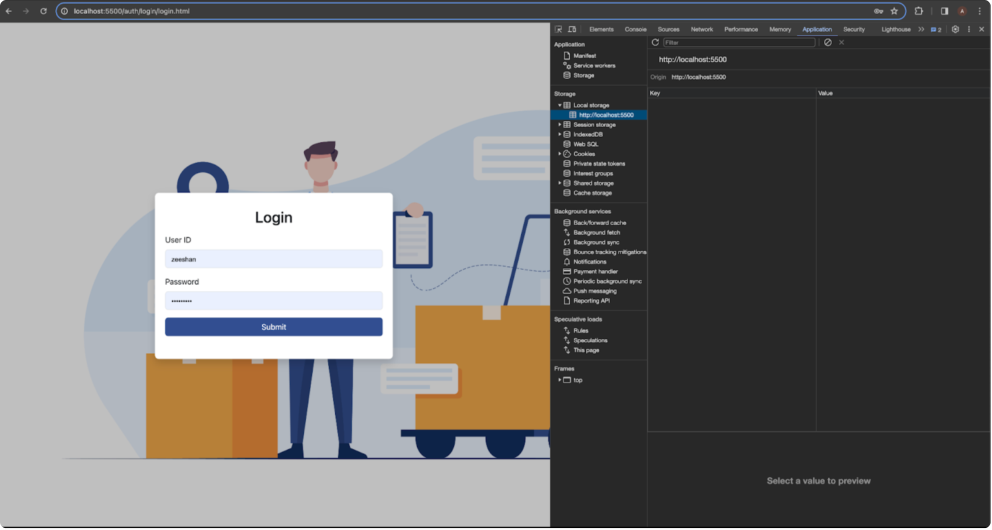
Login Page
Logout Code Snippet
Below is the Logout code snippet
const handle logout = () => {
   local storage.clear()
   navigate('/')
 };
Code Description
' This function, handle logout, is designed to handle the logout functionality. Here s a breakdown of its functionality:
Clearing Local Storage
- Calls local storage.clear() to remove all key-value pairs stored in the local storage.
Navigation
- Uses the navigate function (which is often associated with routing in a web application, possibly provided by a library like React Router or Reach Router) to navigate to the root path ('/').
Getting a List of Customer Records
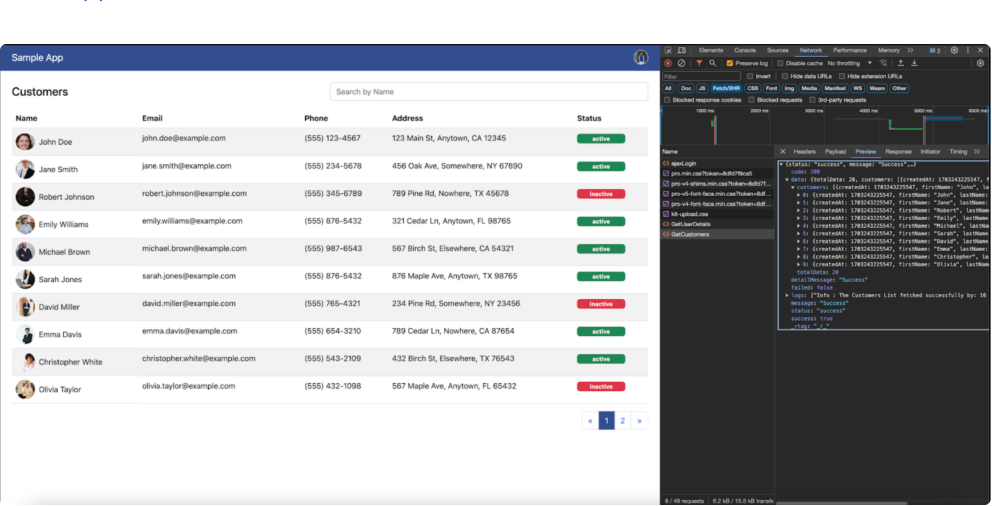
If the access token is obtained successfully, redirect the user to the Customers ' screen of the application. When the customer s page is loaded, call the GET_CUSTOMERS API to get a list of all the customers.
Request URL: https://api.eng-dev-1.trilloapps.com/ds/function/shared/Get customers
Customer Records
Customer Record Overview
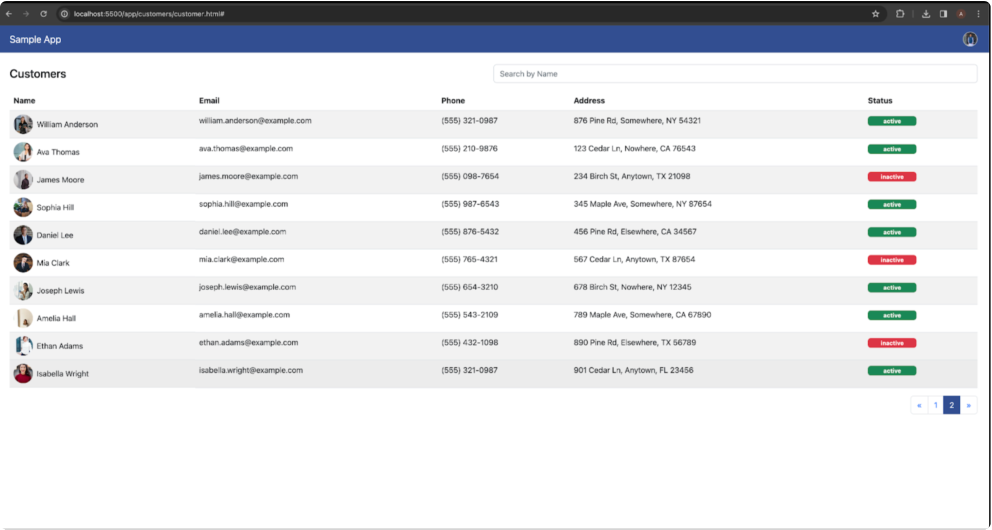
Showing customer records on the screen involves creating a user friendly and secure experience. Below are key points to consider when implementing a "Customer Records" screen:
Design the customer record screen to provide a concise and organized overview. Include key information, such as:
Customer names
Email, Phone
Address
Status (Active, Inactive)
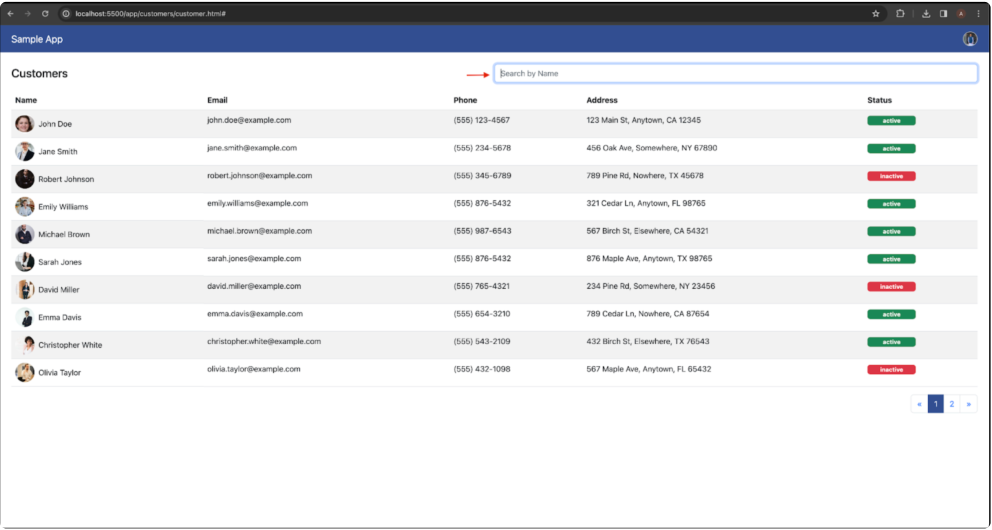
Search Customer By Name
- Implement search options to help users quickly find specific customer records based on customer names.
Search Customer
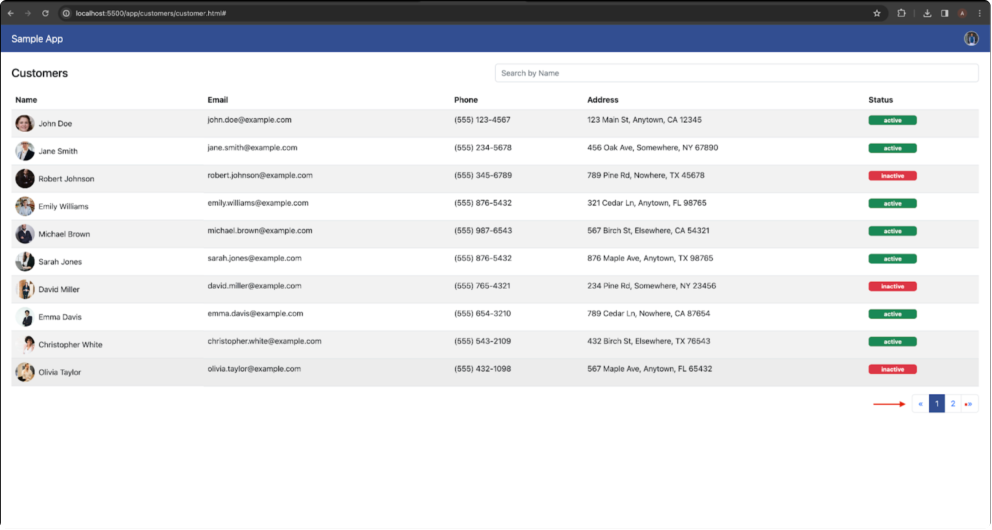
Pagination
- If the customer record list is extensive, pagination is implemented to display records in smaller, more manageable chunks.
Pagination
Pagination
Customer Record Code Snippet
const fetch customers = async (page) => {
   try {
     set loading(true)
     const response = await fetch(API_URL, {
       method: 'POST',
       headers: headers,
       body: JSON.stringify({
         start: (page - 1) * items per page + 1,
         size: items per page,
       }),
     });
     if (!response.ok) {
       throw new Error('Network response was not ok');
     }
     const data = await response.json();
     const total data = data.data.total data;
     set customers(data.data.customers);
     set total pages(Math.ceil(total data / items per page));
   } catch (error) {
     console.error('Error during fetch:', error);
   }
   finally{
     set loading(false);
   }
 };
Code Description
This function, fetch customers, is designed to asynchronously fetch a list of
customers from a specified API endpoint using the Fetch API. Here's a breakdown of its functionality:
Loading State
- Calls set loading(true) to indicate that data is currently being fetched.
API Request
Uses the fetch api to send a post request to the specified api_URL.
Includes custom headers in the request, likely defined in the headers variable.
The request body is a json string containing parameters such as start and size based on the provided page and items per page.
Response Handling
Check if the response is successful using response.ok. Ifnot, throw an error.
If successful, parses the json response using response.json() and assigns it to the data variable.
Extracts the total number of data points (total data) from the response and sets '
the customer s data using set customers(data.data.customers).
Calculates the total number of pages (total pages) based on the total data and items per page, then sets it using set total pages.
Error Handling
- In the catch block:
Logs the error to the console using console.error.
This block handles errors during the API request or JSON parsing.
Finally Block
Calls set loading(false) in the finally block to ensure that the loading state is set to false, whether the request is successful or encounters an error.
Getting a Record of Customer Orders
Upon clicking a customer record, smoothly transition the user to a dedicated section or page displaying the order records associated with that customer.
Request URL:
https://api.eng-dev-1.trilloapps.com/ds/function/shared/Get customer orders
Payload:
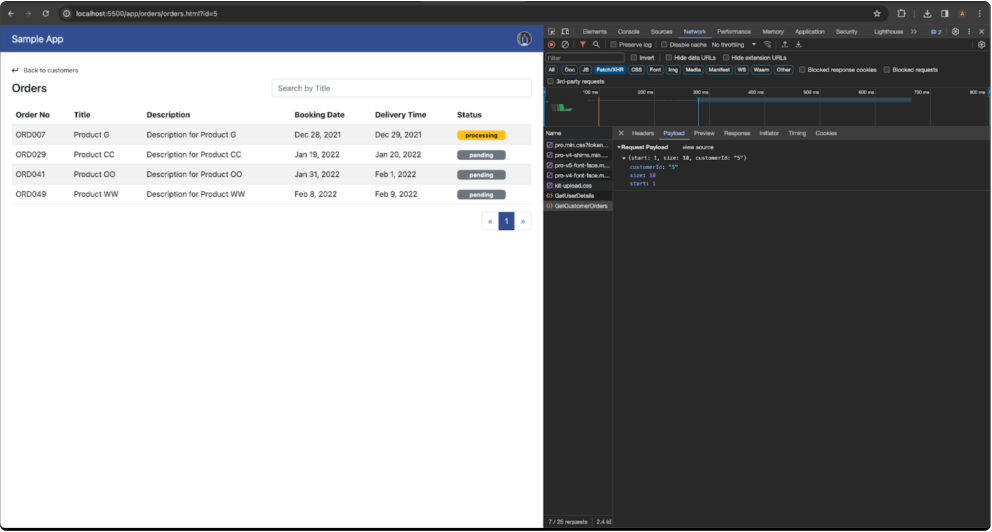
Customer Orders Payload
Preview: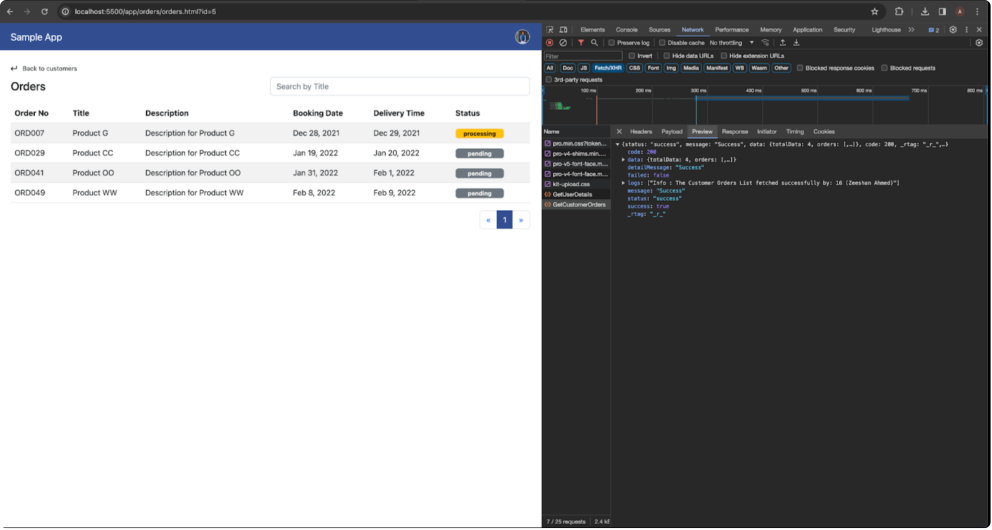
Customer Orders Preview
Order Record Overview
Design the order record screen to provide a concise overview. Include key information, such as:
OrderNo
Title
Description
Booking date
Delivery time
Status (Pending, Processing, Shipped, Delivered)
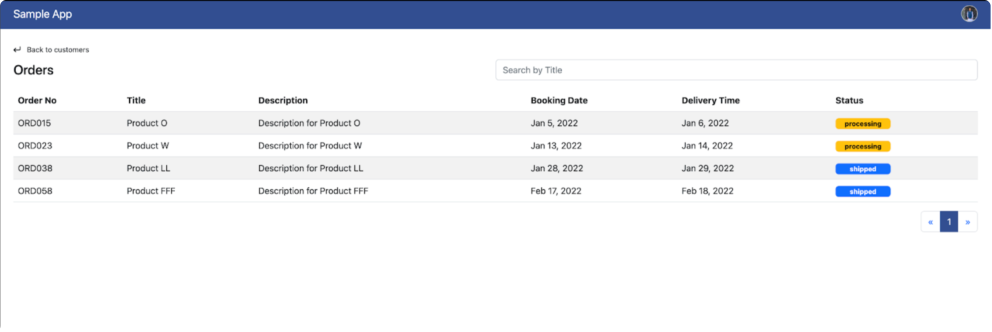
Order Record Overview
Back To Customer Record Button
Maintain a clear and easily navigable path back to the customer records screen, allowing users to switch between customer and order records effortlessly.
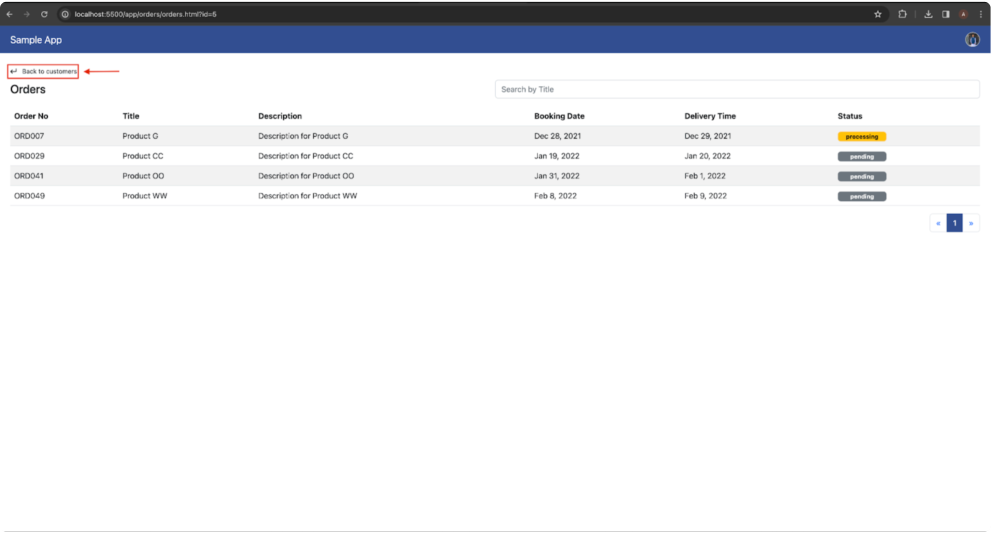
Back To Customer Record Button
Search Order By Title
Implement search options to help users quickly find specific order records based on their titles.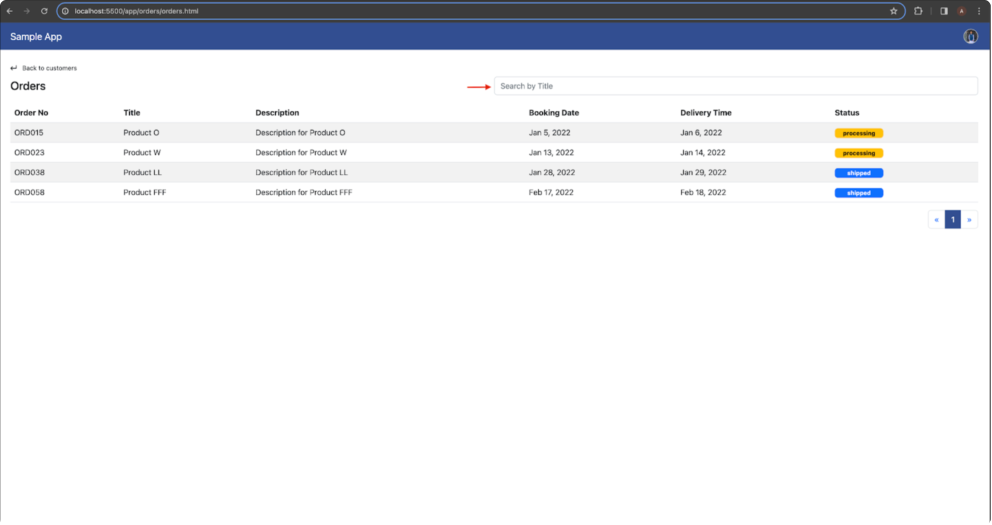
Order Record Code Snippet
const fetch orders = async (page) => {
   try {
     set loading(true);
     const response = await fetch(API_URL, {
       method: 'POST',
       headers: headers,
       body: JSON.stringify({
         customerId: param value,
         start: (page - 1) * items per page + 1,
         size: items per page,
       }),
     });
     if (!response.ok) {
       throw new Error('Network response was not ok');
     }
     const data = await response.json();
     const total data = data.data.total data;
     set orders data(data.data.orders);
     set total pages(Math.ceil(total data / items per page));
   } catch (error) {
     console.error('Error during fetch:', error);
   }
   finally{
     set loading(false);
   }
 };
Code Description
This function, fetch orders, is designed to asynchronously fetch a list of orders based on a customer ID from a specified API endpoint using the Fetch API. Here's a breakdown of its functionality:
Loading State
- Calls set loading(true) to indicate that data is currently being fetched.
API Request
Uses the fetch api to send a post request to the specified api_URL.
Includes custom headers in the request, likely defined in the headers variable.
The request body is a json string containing parameters such as customerid, start, and size based on the provided param value, page, and items per page.
Response Handling
Check if the response is successful using response.ok. Ifnot, throw an error.
If successful, parses the json response using response.json() and assigns it to the data variable.
Extracts the total number of data points (total data) from the response and sets the orders data using set orders data(data.data.orders).
Calculates the total number of pages (total pages) based on the total data and items per page, then sets it using set total pages.
Error Handling
- In the catch block:
Logs the error to the console using console.error.
This block handles errors during the API request or JSON parsing.
Finally Block
Calls set loading(false) in the final block to ensure that the loading state is set to false, whether the request is successful or encounters an error.
Getting a Record of Order Items
Upon clicking an order record, smoothly transition the user to a dedicated section or page displaying the order records associated with that order.
Request URL: https://api.eng-dev-1.trilloapps.com/ds/function/shared/Get order items
Payload:
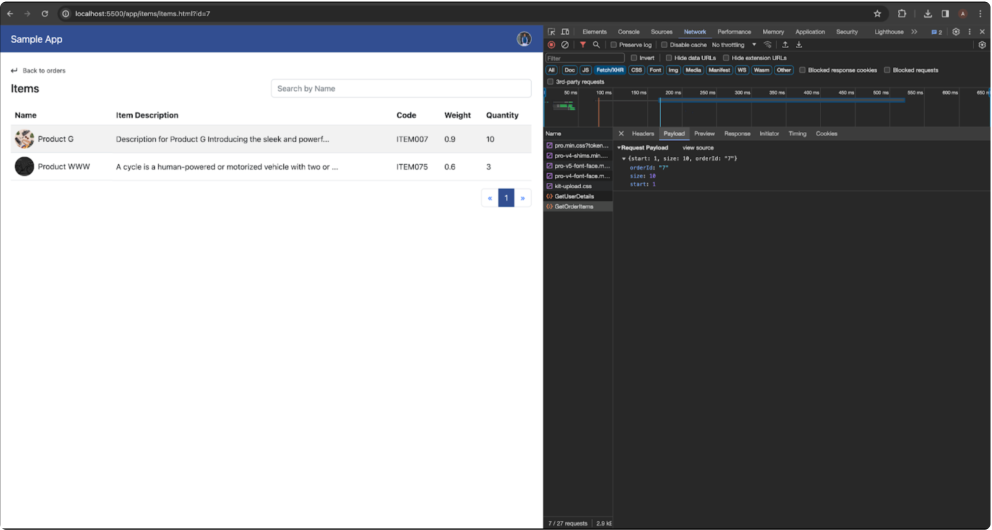
Order Items Payload
Preview: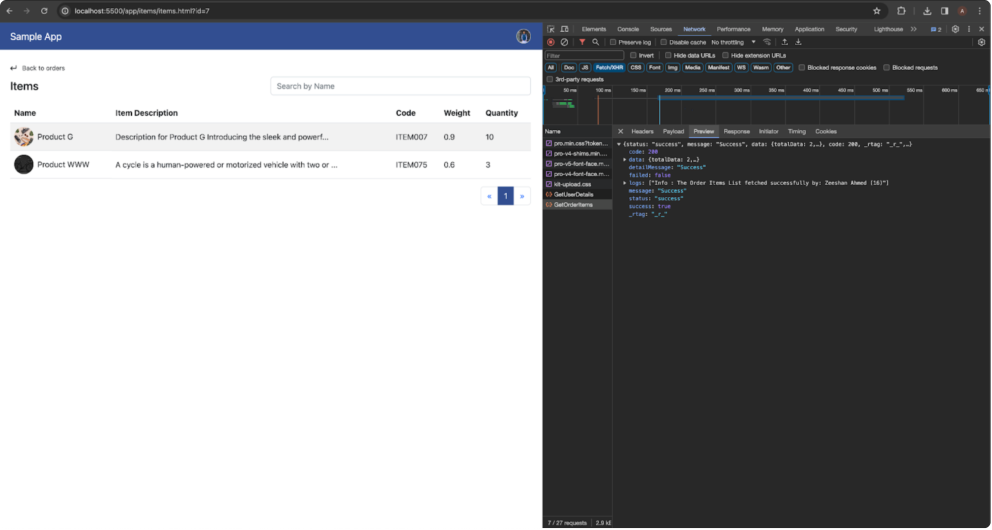
Order Items Preview
Item Record Overview
Design the item record screen to provide a concise overview. Include key information, such as:
Name
Item description
Code
Weight
Quantity
Back To Order Record Button
- Maintain a clear and easily navigable path back to the order records screen, allowing users to switch between order and item records effortlessly.
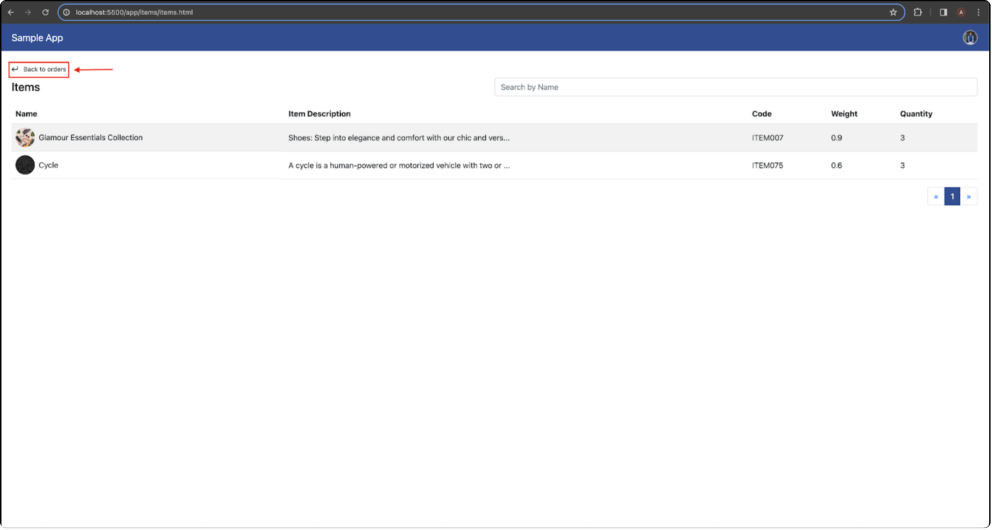
Back To Order Record Button
Search Order Item By Name
Implement search options to help users quickly find specific item records based on item names.
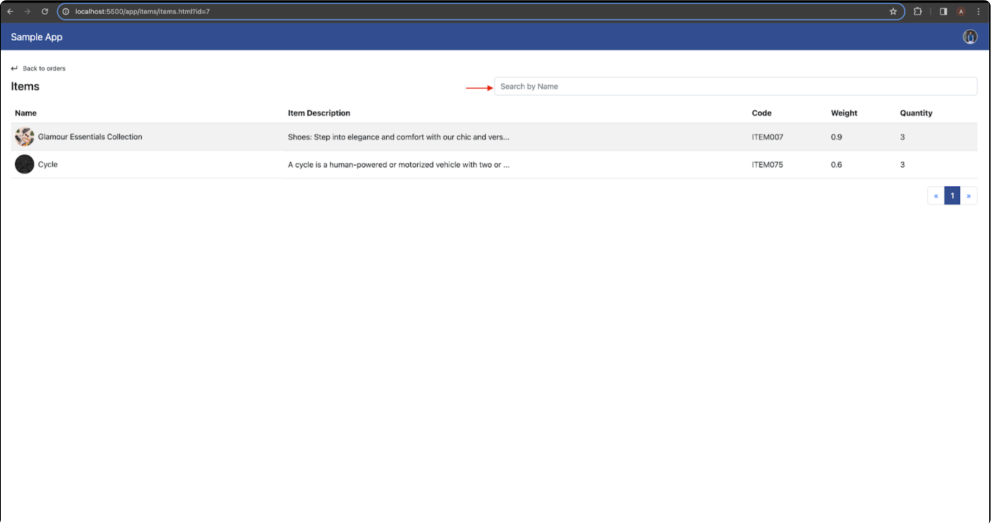
Search Order Item By Name
Item Record Code Snippet
use effect(() => {
       const fetch item details = async () => {
         try {
           if (itemId) {
             // Make an API call
             set loading(true)
             const response = await fetch(GET_DETAILS_API_URL, {
               method: 'POST',
               headers: headers,
               body: JSON.stringify({ "itemId": itemId }),
             });
             const data = await response.json();
             set item data(data.data);
             set quantity(data.data.quantity)
           }
         } catch (error) {
           console.error('Error fetching item details:', error);
         }
         finally{
           set loading(false)
         }
       };
       // Call the fetch item details function only if itemId has changed
       if (itemId !== null) {
         fetch item details();
       }
     }, [itemId]);
Code Description
This function, fetch item details, is an asynchronous function designed to fetch details for a specific item based on its ID (itemId). Here's a breakdown of its functionality:
Check for Valid itemId
- Check if itemid is truth y (not null or undefined) before making the api call. This ensures that the API call is made only if itemId has a valid value.
API Request
If itemid is valid, set the loading state to true using set loading(true).
Makes a post request to the specified get_DETAILS_API_Url using the fetch API.
Includes the provided headers and a request body containing the itemid in the form of a JSON string.
Response Handling
Parses the json response from the api call using a wait response.json().
Updates the component's state using set item data(data.data) to set the entire item data and set quantity(data.data.quantity) to set the quantity specifically.
Error Handling
- Catches and logs any errors that may occur during the api call using console.error.
Finally Block
Regardless of success or failure, set the loading state to false using set loading(false). This ensures that the loading state is updated after the API call.
Getting a Record of Item Details
Upon clicking an item record, smoothly transition the user to a dedicated section or ' page displaying the order records associated with that item s details.
Request URL: https://api.eng-dev-1.trilloapps.com/ds/function/shared/Get item details

Payload:
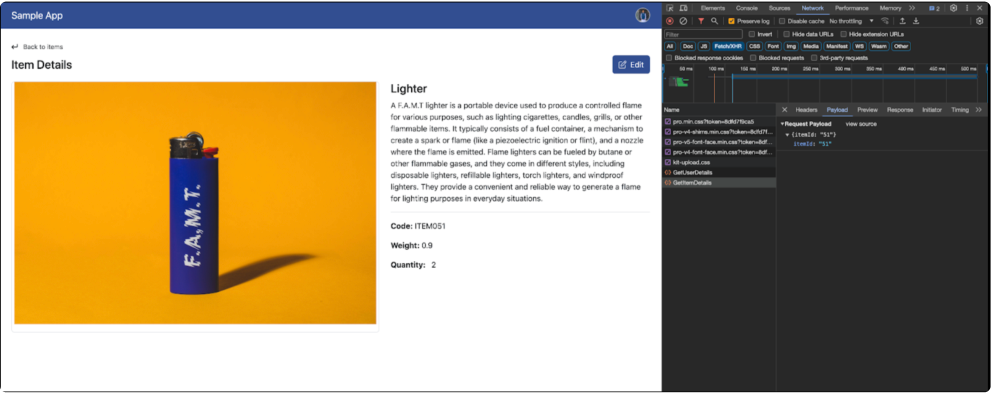
Item Details Payload
Preview: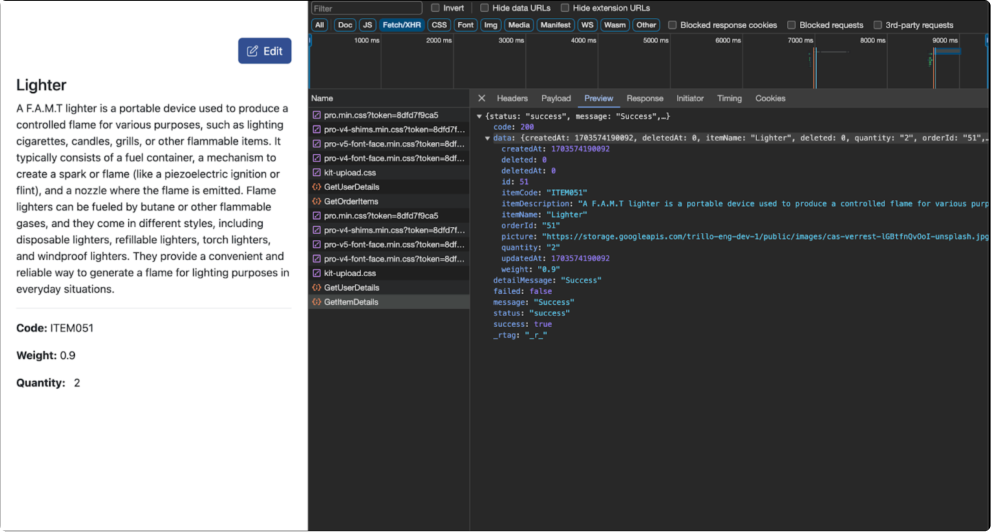
Item Details Preview
Item Details Overview
Present a summarized view of item records on the screen, which includes:
Item name
Item description
Item code
Item weight
Item quantity
Back To Item Record Button
- Maintain a clear and easily navigable path back to the item records screen, allowing users to switch between item and item detail records effortlessly.
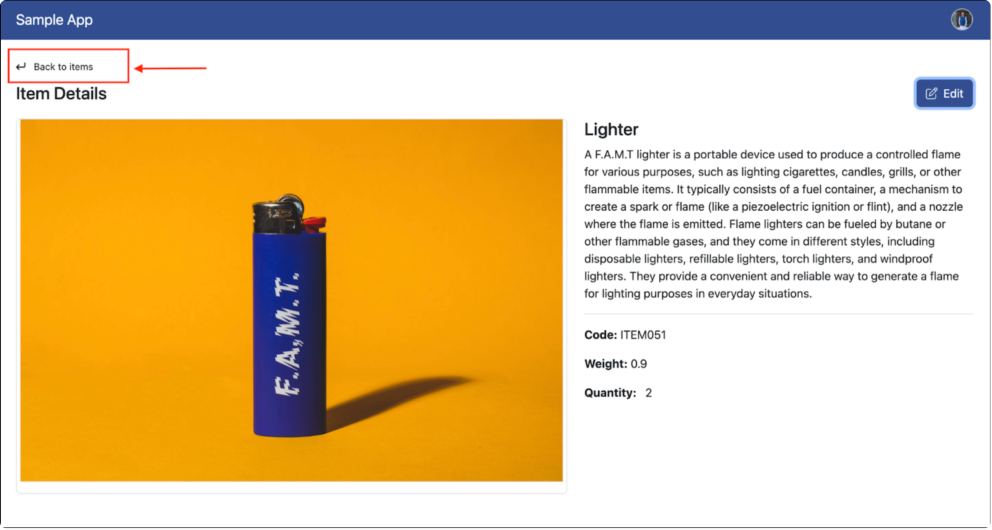
Back To Item Record Button
Item Details Code Snippet
use effect(() => {
       const fetch item details = async () => {
         try {
           if (itemId) {
             // Make an API call
             set loading(true)
             const response = await fetch(GET_DETAILS_API_URL, {
               method: 'POST',
               headers: headers,
               body: JSON.stringify({ "itemId": itemId }),
             });
             const data = await response.json();
             set item data(data.data);
             set quantity(data.data.quantity)
           }
         } catch (error) {
           console.error('Error fetching item details:', error);
         }
         finally{
           set loading(false)
         }
       };
       // Call the fetch item details function only if itemId has changed
       if (itemId !== null) {
         fetch item details();
       }
     }, [itemId]);
Code Description
This function, fetch item details, is an asynchronous function designed to fetch details for a specific item based on its ID (itemId). Here's a breakdown of its functionality:
Check for Valid itemId
- Check if itemid is truth y (not null or undefined) before making the api call. This ensures that the API call is made only if itemId has a valid value.
API Request
If itemid is valid, set the loading state to true using set loading(true).
Makes a post request to the specified get_DETAILS_API_Url using the fetch API.
Includes the provided headers and a request body containing the itemid in the form of a JSON string.
Response Handling
Parses the json response from the api call using a wait response.json().
Updates the component's state using set item data(data.data) to set the entire item data and set quantity(data.data.quantity) to set the quantity specifically.
Error Handling
- Catches and logs any errors that may occur during the api call using console.error.
Finally Block
Regardless of success or failure, set the loading state to false using set loading(false). This ensures that the loading state is updated after the API call.
Update a Record
Edit Button Interaction
- Include an "Edit" button within the item details screen, giving users a clear and distinct call-to-action to initiate the editing process.
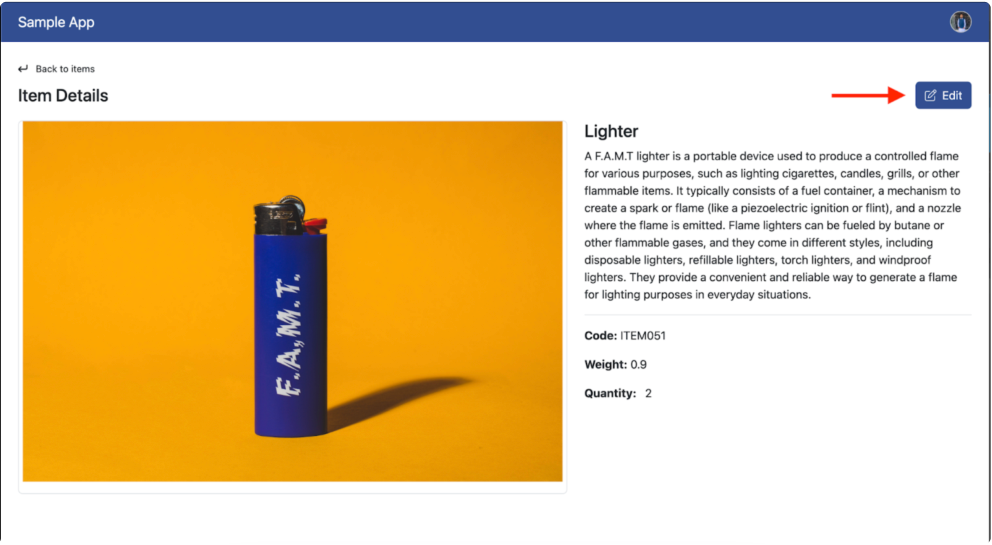
Edit Button Interaction
Editable Fields
- Clearly indicate which fields are editable. Typically, the quantity field is editable.
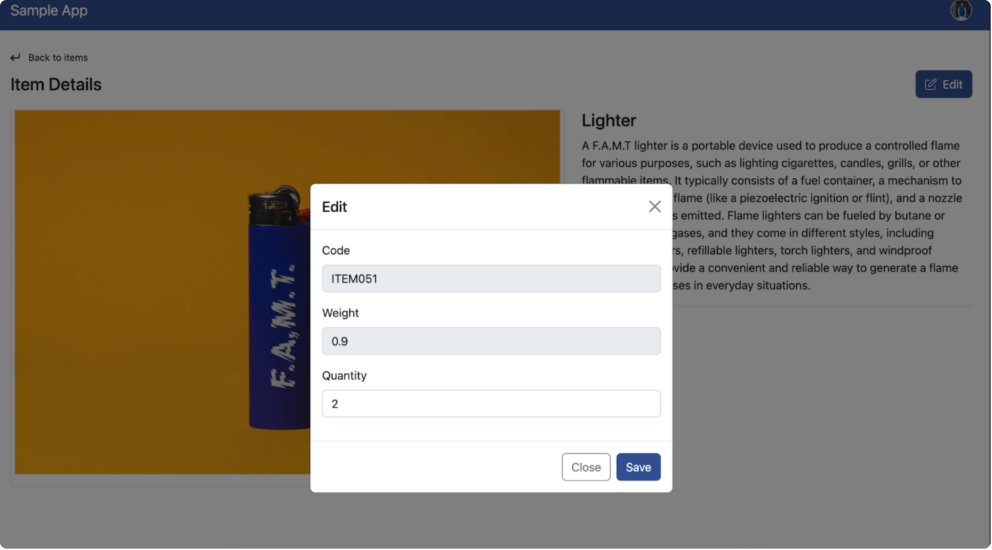
Editable Fields
Save Changes Button
Include a "Save" button to allow users to confirm their edits.
Upon clicking "Save" trigger an api(Edit line item) request to update the item details on the server.
Request URL: https://api.eng-dev-1.trilloapps.com/ds/function/shared/Edit line item
Payload:
Save Button Payload
Preview: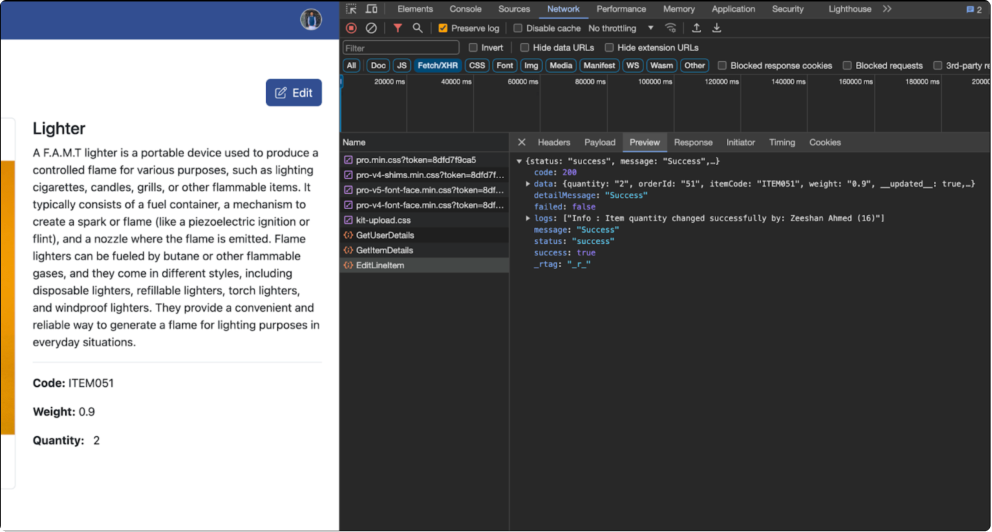
Save Button Preview
Update Record Code Snippet
const handle quantity = async (e) =>{
   e.prevent default();
   try{
     const response = await fetch(EDIT_API_URL, {
       method: 'POST',
       headers: headers,
       body: JSON.stringify({
         "line itemid": itemId,
         "quantity": quantity
       })
     });
     const data = await response.json();
     if(data.status === 'success'){
       toast.success('Quantity updated successfully!', {
         position: 'top-right',
         auto close: 3000,
         hide progress bar: false,
         close on click: true,
         pause on hover: true,
         draggable: true,
       });
     }
     set item data(data.data)
     console.log(data);
     handle close()
   }
   catch(error)
   {
     console.error('Error during login:', error);
   }
 }
Code Description
This function, handle quantity, is designed to handle the updating of the quantity for a specific item through a POST request to the EDIT_API_URL. Here's a breakdown of its functionality:
Prevent Default Behavior
- Callse.prevent default() to prevent the default form submission behavior.
API Request to Edit Quantity
Makes an asynchronous call to the specified edit_API_Url using the fetch api.
Uses the post method and includes custom headers (headers).
The request body is a json string containing the line itemid and quantity based on the provided itemId and quantity variables.
Response Handling
Parses the json response using a wait response.json().
Check if the response status is 'success'.
If successful, display a success toast notification using the toast.success function.
Updates the component's state with the data from the response using set item data(data.data).
Logs the entire response data to the console using console.log.
Closes any relevant modal or dialog using the handle close function.
Error Handling
Catches and logs any errors that may occur during the api call using console.error.
It's worth noting that the error message indicates "Error during login," which might be a placeholder or a copy-paste oversight.
Javascript
This document describes Developing UI in Javascript using Trillo Workbench. It is similar to developing UI for against any application server using restful API.
Introduction
This document outlines the process of constructing a user interface (UI) using Trillo Workbench APIs, following similar procedures as with any other server. It provides guidance on creating UI elements through examples using CURL commands (referencing a Postman collection) and includes snippets of JavaScript code for implementation.
Prerequisites
Node.js: Ensure you have node.js installed. You can download it from nodejs.org .
Git: Make sure g it is installed on your system. You can download it from gitscm.com .
SSH-KEY: Make sure you've configured your ssh key for git hubby following the setup instructions available on git-scm.com .
Clone the Repository
First, navigate to your repository on git hub or your preferred platform.
Copy the ssh link for your repository.
Open your terminal on your local machine.
Use the following command to clone the repository
Command (HTTPS): git clone https://github.com/trillo apps/javascript-guide
Command (SSH): git clone git@github.com:trillo apps/javascript-guide.git
Setting Up the Project
Run the Application
Open the integrated terminal in visual studio code. You can do this by selecting View > Terminal or by pressing Ctrl + ` (backtick).
Use the cd command to navigate to the directory where your javascript project is located.
- For example: cd path/to/your/project
Install http-server globally (only needed once)
- n pm install -ghttp-server
If it encounters issues due to permission restrictions, attempt the following.
- sud on pm install -ghttp-server
Start the server in the current directory
- Http-server
This will start a server, and it will provide you with a URL (usually http://localhost:8080). Open this URL in your web browser.
App Functionalities
- ' Explore an in depth exploration of the application s functionalities hosted on http://localhost. Investigate key features, particularly those related to customer management, order processing, and item data. Examine the seamless interaction between customers, orders, and items, focusing on data retrieval, input mechanisms, and system responses. This examination aims to ensure the effective performance of critical features within the application
Some key functionalities include:
Login api
Header
Logout icon
Getting a list of customer records
Getting a record of customer orders
Getting a record of order items
Getting a record of item details
Update a record
Login API
- A successful login process involves several steps, including front end user - interface (UI) interactions and back end API calls.
User Input Credentials
- The user provides their login credentials, typically a combination of a username/email and password, in the login form on the UI.
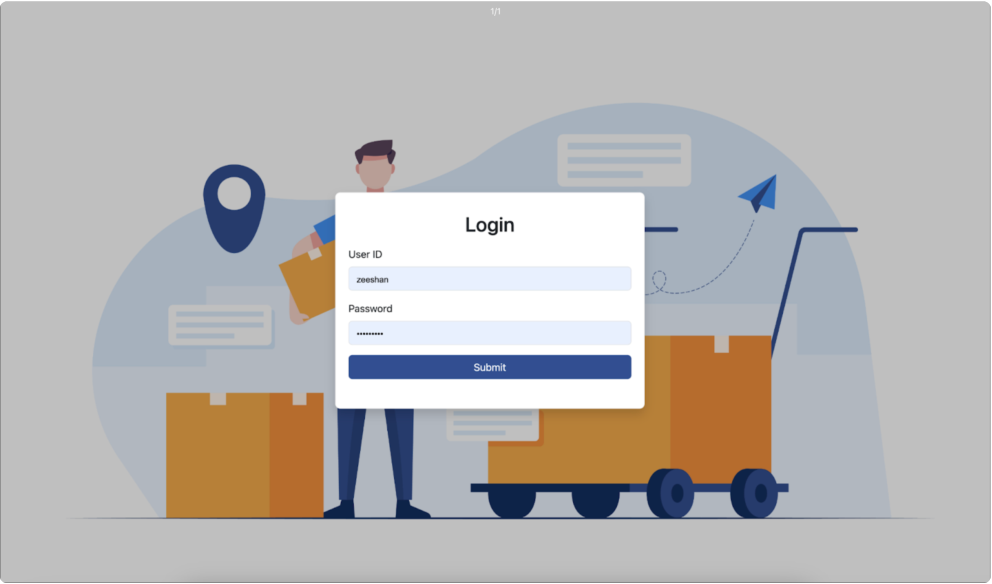
Login Screen
Send Login Request (API Call)
Initiate an api call to the server to authenticate the user's credentials. This typically involves sending a POST request to a login endpoint with the user's credentials in the request body.
Request url: https://api.eng-dev-1.trilloapps.com/ajax login
Payload:
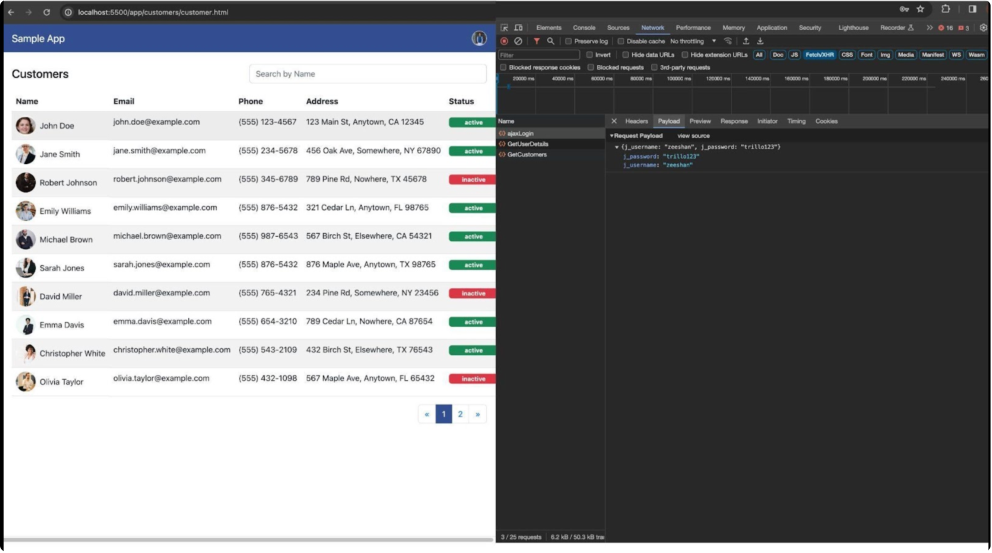
Login Payload
Preview:
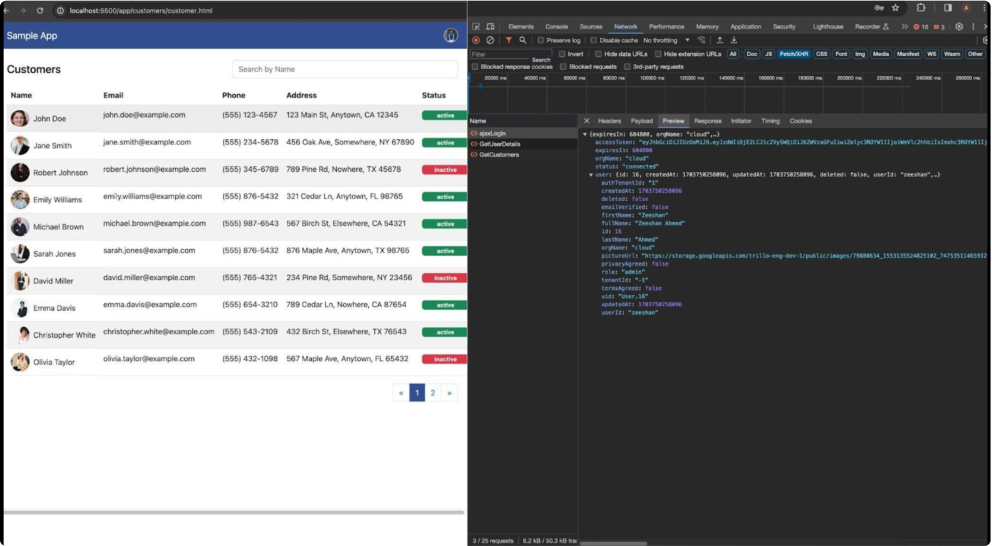
Login Preview
Receive an Access Token (API Call)
- If the credentials are valid, generate an access token. The server responds with the access token, a secure and unique string used to authenticate subsequent API requests.
Login Code Snippet
// Function to handle form submission
function Login submit form() {
 // Validate inputs before making API call
 if (validate inputs()) {
     const userId = userid input.value;
     const password = password input.value;
     // Call the login API
     api service.login(userId, password)
         .then(response => {
             if (response.status == 'connected') {
                 // Store user details and access token in local
storage
                 local storage service.setItem('user detail',
JSON.stringify(response.user));
                 local storage service.setItem('access token',
response.access token);
                 // Redirect to customer page on successful login
                 window.location.href = '/app/customers/customer.html';
             } else {
                 // Display error message and toast on login failure
                 console.log(response.message);
                 show toast(response.message, 'danger');
             }
         })
         .catch(error => {
             // Display error toast on API call failure
             show toast(error.message, 'danger');
         });
 }
}
Code Description
The function Login submit form, facilitates secure user authentication. Upon submission, it triggers an API call to verify credentials, enhancing login security and enabling seamless integration with backend authentication services.
Input Validation
It begins by calling the validate inputs function to ensure that the required user inputs (presumably a userId and password) are valid.
API Call
If the inputs are validated successfully, it retrieves the userid and password from the respective input fields (userid input and password input).
It then invokes the api service.login method, passing the userid and password as parameters. This method is assumed to make an asynchronous API call to a login endpoint.
Handling API Response
Upon receiving the API response, it checks if the status in the response is 'connected'. If it is, the login is considered successful.
In the case of a successful login:
User details and an access token are stored in the local storage using local storage service.
The page is redirected to '/app/customers/customer.html'.
If the login is not successful,
It logs the error message received from the api response and displays it as a toast with a danger alert.
Error Handling
If there's an error during the API call, it catches the error and displays an error toast.
Header
User Edit Profile Icon
- This icon adds a visual representation of the user and helps in quick identification.
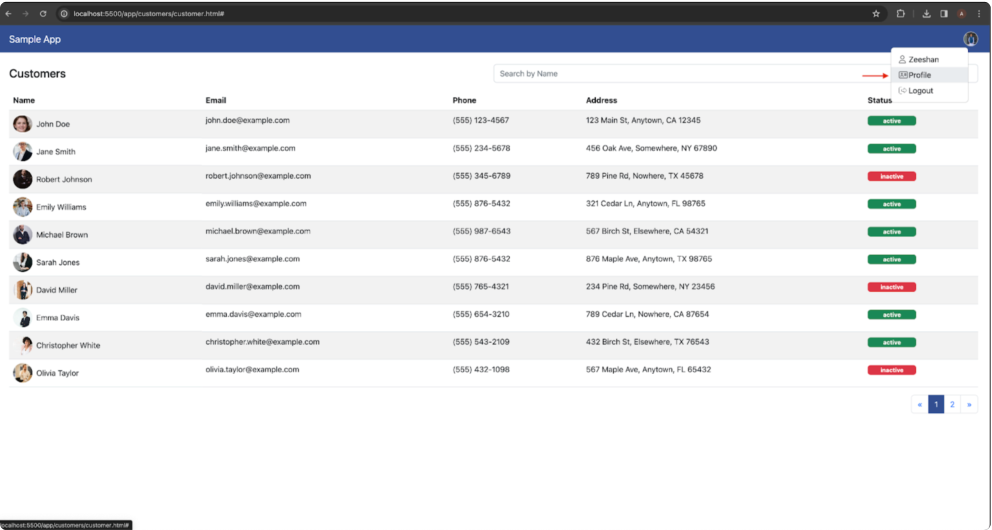
User Edit Profile Icon
- Click the edit icon on a profile picture to upload a new profile picture
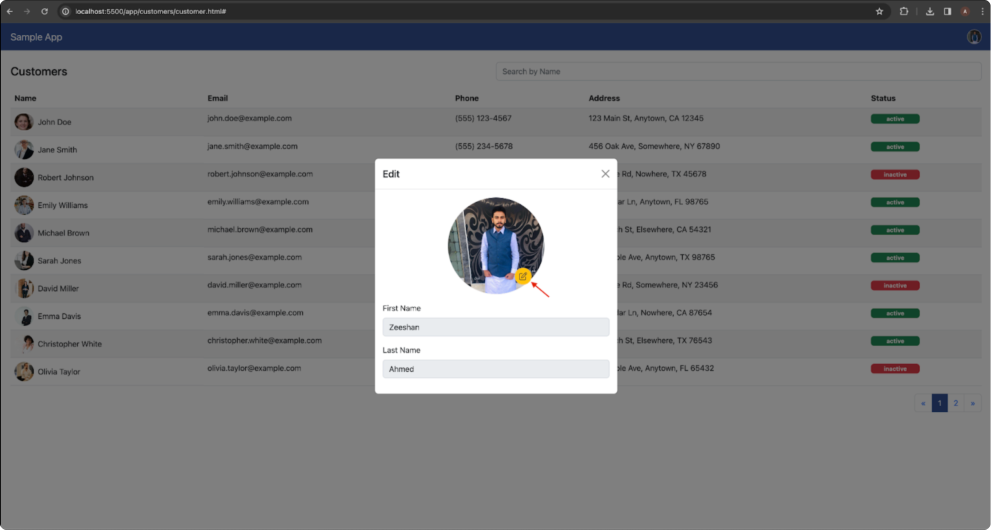
User Profile Icon
upload call after selecting the profile picture
Request url: https://api.eng-dev-1.trilloapps.com/folders vc/cloud storage/upload
Payload:
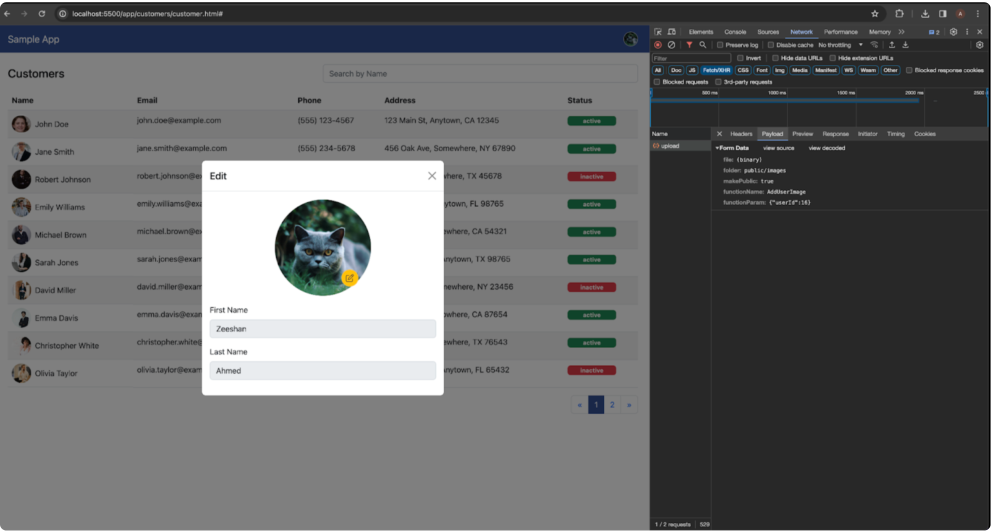
Header Payload
Preview: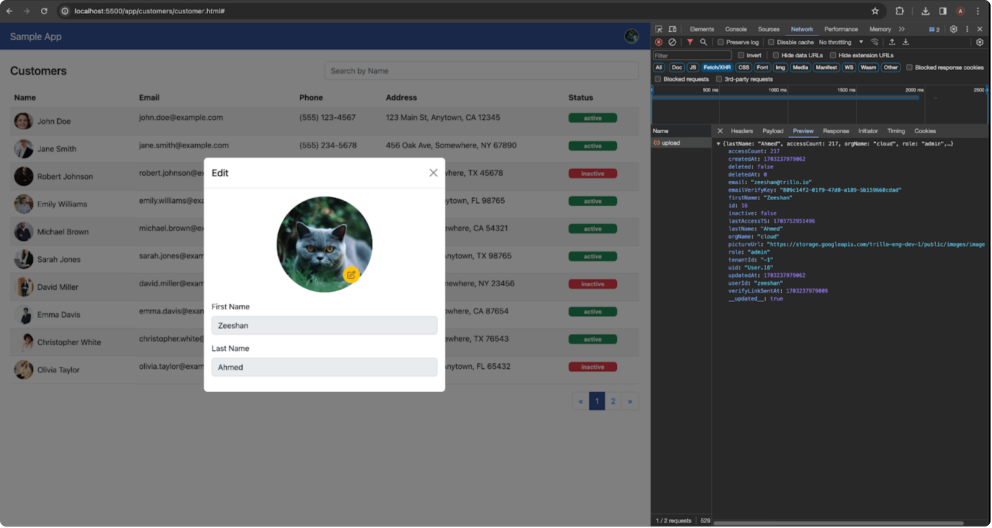
Header Preview
Edit Profile Code Snippet
// Function to handle file upload
async function handle file upload(e) {
   const file input = e.target;
   const function param = {
       userId: user details.id
   };
   const form data = new Form data();
   form data.append('file', file input.files[0]);
   form data.append('folder', 'public/images');
   form data.append('make public', true);
   form data.append('function name', 'Adduser image');
   form data.append('function param', JSON.stringify(function param));
   try {
       const response = await api service.upload image(form data);
       if (response) {
           update profile pictures(response);
       } else {
           show toast(response.message, 'danger');
       }
   } catch (error) {
       show toast(error.message, 'danger');
   }
}
Code Description
This async JavaScript function, handle file upload manages the uploading of files in an application environment. It processes file submissions, ensures secure handling, and may involve interactions with a server for storage or further processing.
Event Handling
The function is triggered by an event, presumably a file input change event (e).
User Details
Retrieves the user details.id to associate the file upload with a specific user.
Prepare Form Data
Creates a Form data object, form data, to handle the file upload.
Appends various parameters to the form data:
'file': The actual file from the file input.
'folder': Specifies the folder for storing the uploaded file ('public/images' inthis case).
'make public': A boolean indicating whether the file should be made public (set to true).
'function name': Specifies the name of the function to be called on the server ('Adduser image').
'function param': The function parameters, including the userid.
Upload image:
Makes an asynchronous call to api service.upload image with the prepared form data.
The await keyword is used to wait for the asynchronous operation to complete.
Handle API Response
If the upload is successful (the response is truthy), it calls the update profile pictures ' function, presumably to update the user s profile pictures.
If there's an issue with the upload, it displays an error toast using show toast with a danger alert.
Error Handling
Catches any errors that occur during the API call and displays an error toast.
Logout Icon
- This icon will navigate us to the login page.
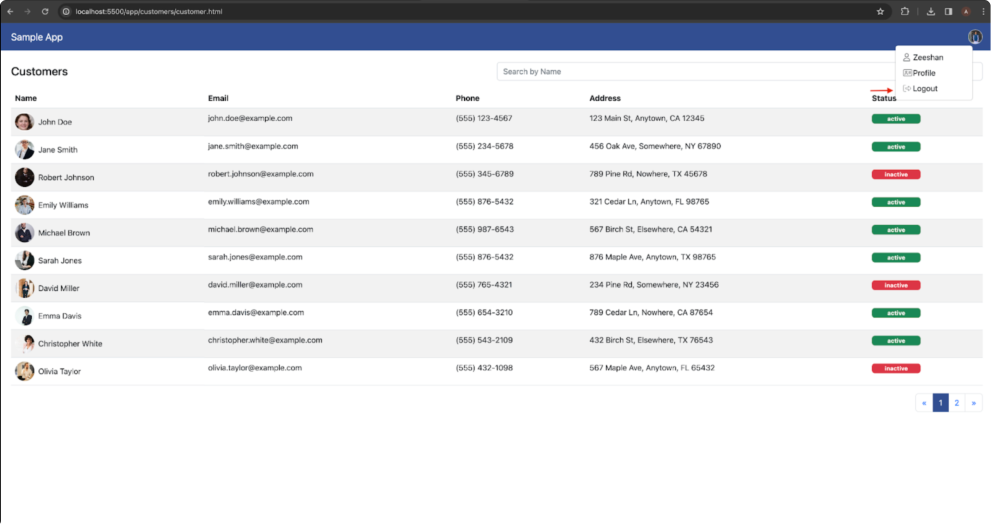
Logout Icon
Upon selecting the logout option, the system redirects users to the login page and clears the local storage as a security measure.
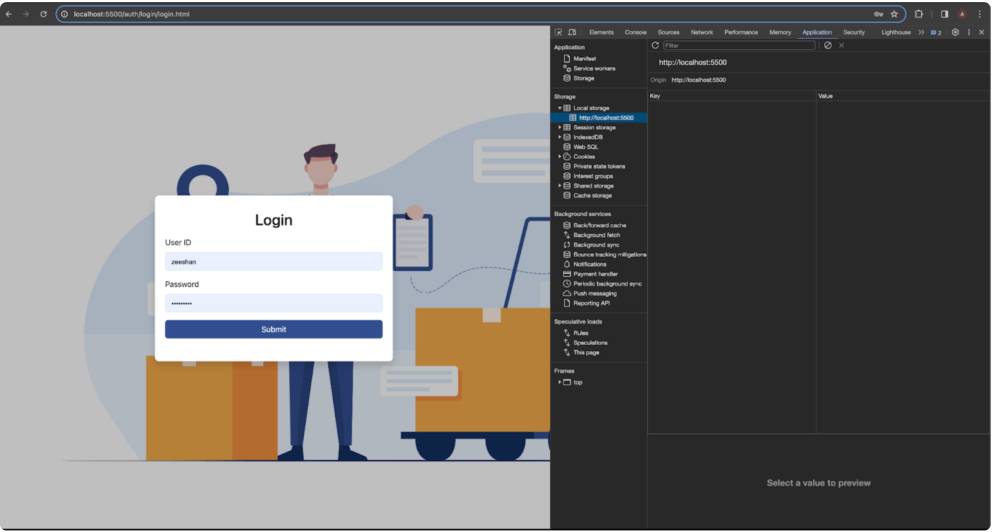
Login Page
Logout Code Snippet
function logout() {
   local storage.clear(); // Clear local storage
   window.location.href = '/auth/login/login.html'; // Redirect to
login page
}
Code description
The logout function performs the following actions:
Clear Local Storage
- Invokes local storage.clear() to remove all key value pairs stored in the local storage. This typically includes user-related data, tokens, or any other information ' stored during the user s session.
Redirect to Login Page
Uses window.location.href to redirect the user to the login page ('/auth/login/login.html'). After clearing local storage, redirecting to the login page ensures that the user is logged out and can initiate a new login session.
Getting a List of Customer Records
If the access token is obtained successfully, redirect the user to the Customers screen of the application. When the customers page is loaded, call the GET_CUSTOMERS api to get a list of all the customers
Request URL: https://api.eng-dev-1.trilloapps.com/ds/function/shared/Get customers
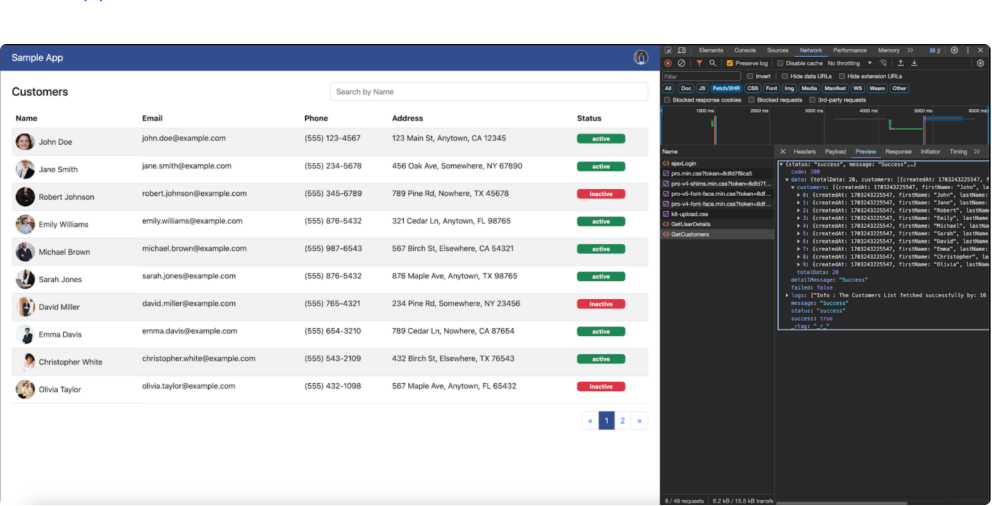
Customer Records
Customer Record Overview
Showing customer records on the screen involves creating a user friendly and secure experience. Below are key points to consider when implementing a "Customer Records" screen:
Design the customer record screen to provide a concise and organized overview. Include key information, such as:
Customer names
Email, Phone
Address
Status (Active, Inactive)
Search Customer By Name
- Implement search options to help users quickly find specific customer records based on customer names.
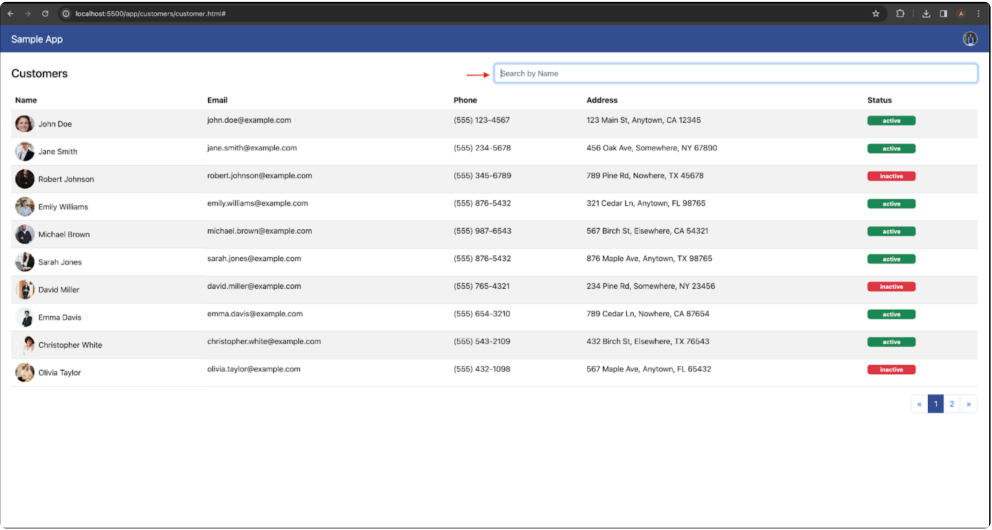
Search Customer
Pagination
- If the customer record list is extensive, pagination is implemented to display records in smaller, more manageable chunks.
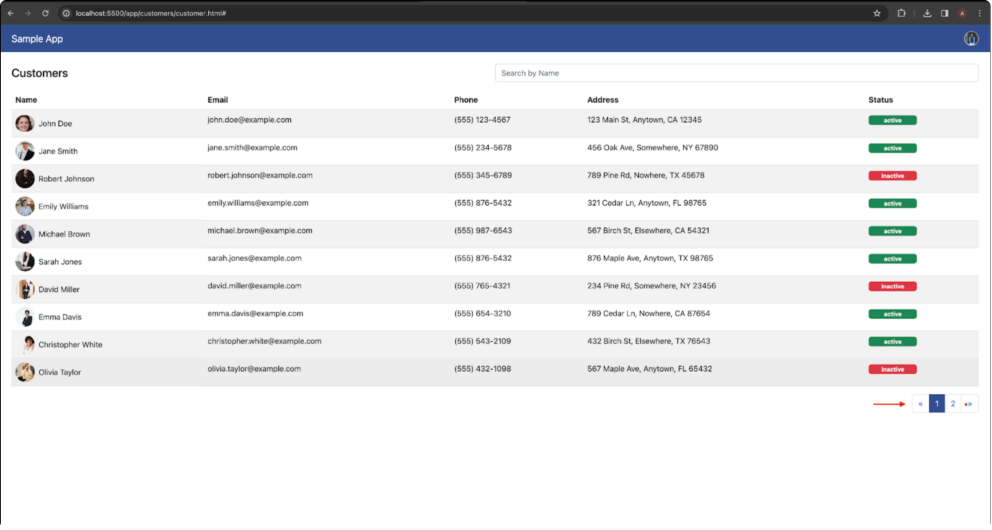
Pagination
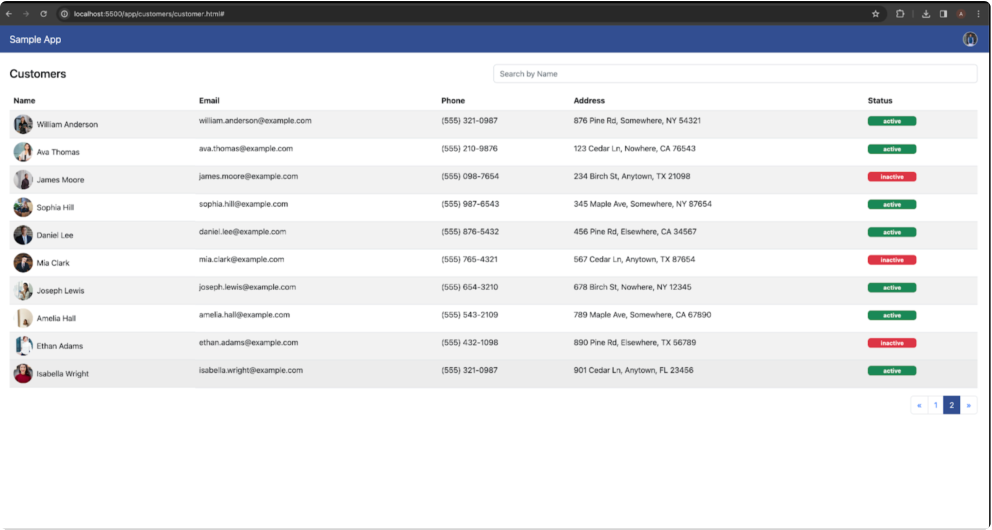
Pagination
Customer Record Code Snippet
function get customers data() {
   api service.get customers(start, size)
       .then(response => {
           if (response.status == 'failed') {
               console.log(response.message);
               show toast(response.message, 'danger');
           } else {
               // Update global customer data list and calculate total
pages
               customer data list = response.data.customers;
               total pages = Math.ceil(response.data.total data /
items per page);
               // Populate table and generate pagination links
               populate table();
               generate pagination();
           }
       })
       .catch(error => {
           show toast(error.message, 'danger');
       });
}
Code Description
' The get customers data retrieves customer information from a database. It s a function designed to fetch and provide relevant data about customers, facilitating personalized services or analytics in various applications.
API Request
Invokes the api service.get customers(start, size) method to make an asynchronous request to the server to fetch customer data. The start and size parameters likely control the pagination of the data.
Handling API Response
Uses the then method to handle the response from the api request asynchronously.
Check if the response status is 'failed', log the error message to the console, and display a danger toast with the error message.
Update Global Data
If the response status is ‘not failed', update the global customer data list with the customer data received from the response.
Calculates the total number of pages (total pages) based on the total data count and the number of items per page (items per page).
Populate Table and Pagination
Calls the populate table function to update the table with the retrieved customer data.
Calls the generate pagination function to create pagination links based on the total number of pages.
Error Handling
Uses the catch block to handle any errors that may occur during the API request and displays a danger toast with the error message.
Getting a Record of Customer Orders
Upon clicking a customer record, smoothly transition the user to a dedicated section or page displaying the order records associated with that customer.
Request URL: https://api.eng-dev-1.trilloapps.com/ds/function/shared/Get customer orders

Payload:
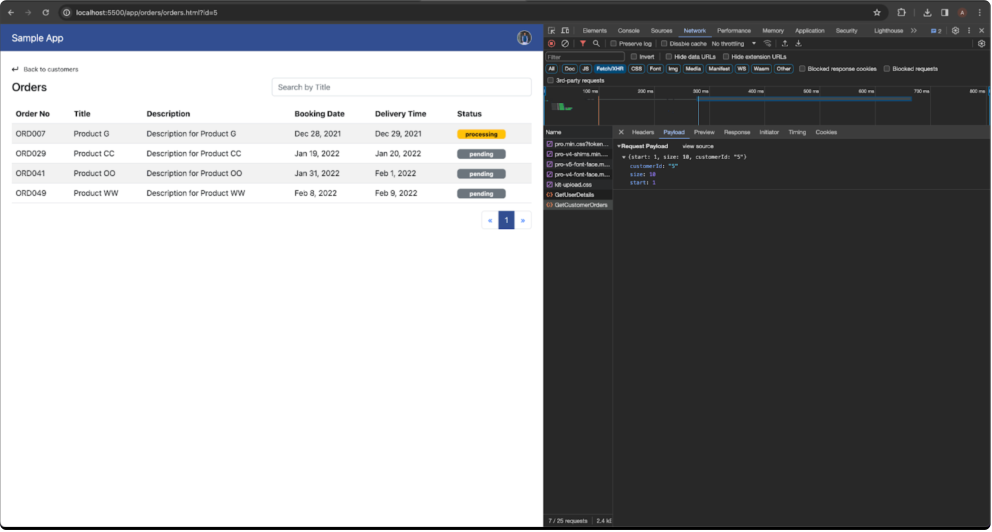
Customer Orders Payload
Preview: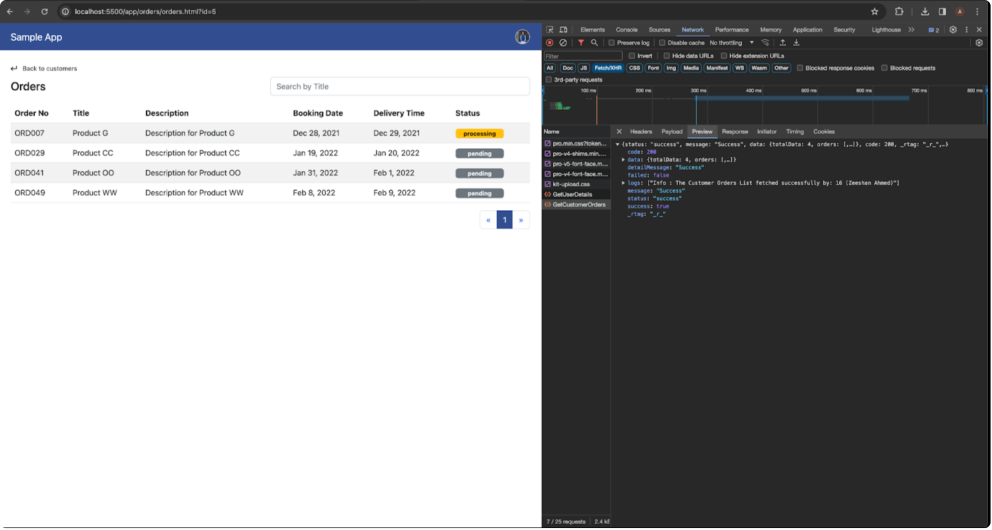
Customer Orders Preview
Order Record Overview
Design the order record screen to provide a concise overview. Include key information, such as:
OrderNo
Title
Description
Booking date
Delivery time
Status (Pending, Processing, Shipped, Delivered)
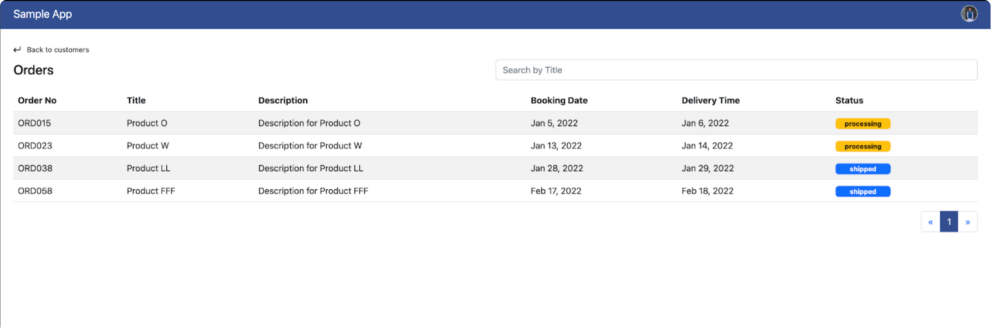
Order Record Overview
Back To Customer Record Button
- Maintain a clear and easily navigable path back to the customer records screen, allowing users to switch between customer and order records effortlessly.
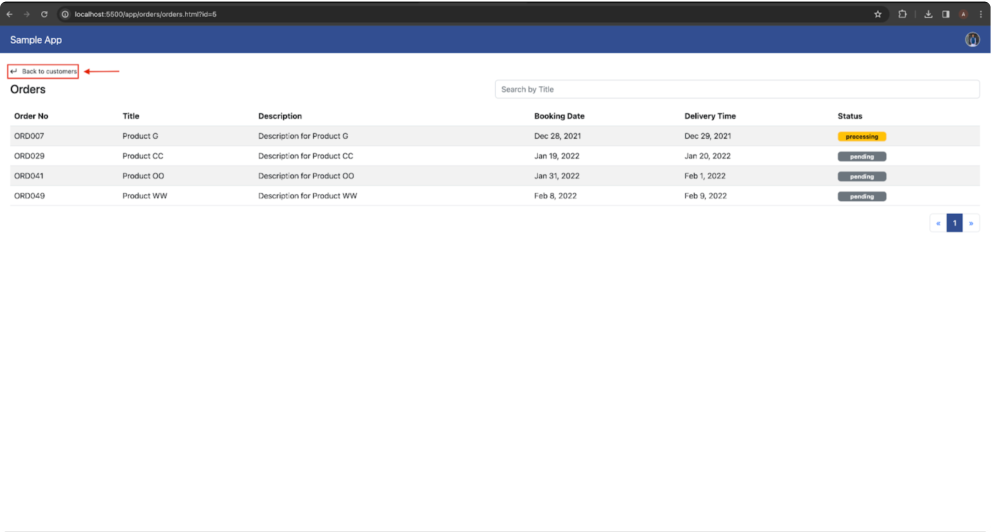
Back To Customer Record Button
Search Order By Title
- Implement search options to help users quickly find specific order records based on their titles.
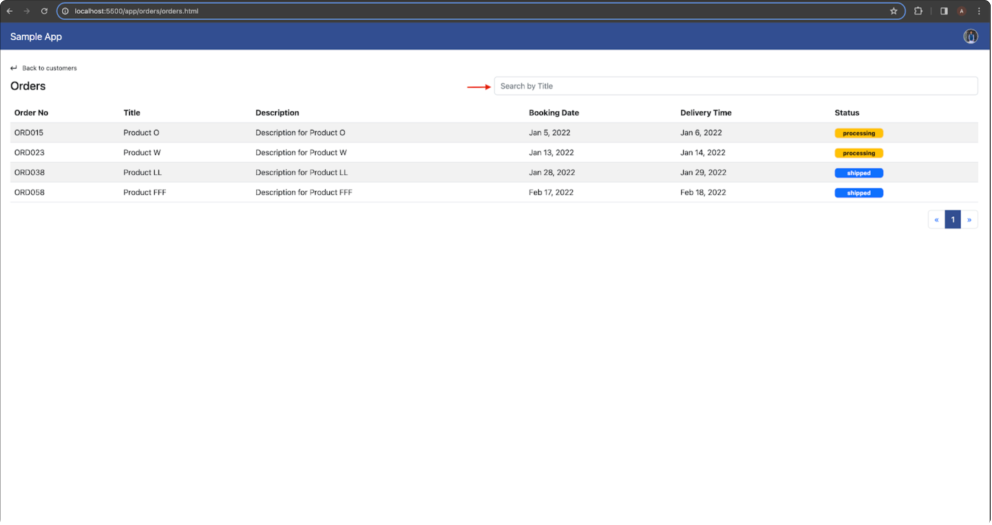
Search Order By Title
Order Record Code Snippet
// Function to get order data
function get orders data(coming id) {
   api service.get orders(start, size, coming id)
       .then(response => {
           if (response.status == 'failed') {
               console.log(response.message);
               show toast(response.message, 'danger');
           } else {
               // Update global order data list and calculate total pages
               order data list = response.data.orders;
               total pages = Math.ceil(response.data.total data /
items per page);
               // Populate table and generate pagination
               populate table();
               generate pagination();
           }
       })
       .catch(error => {
           show toast(error.message, 'danger');
       });
}
Code Description
The get orders data retrieves information about orders in a system. This function typically involves querying a database to fetch relevant data regarding customer orders, enabling effective order management and analysis.
API Request
Invokes the api service.get orders(start, size, coming id) method, making an asynchronous request to the server to fetch order data.
The start and size parameters likely control the pagination of the data, and coming id is a parameter passed to the API, possibly indicating a specific context or filter for the orders.
Handling API Response
Uses the then method to handle the response from the api request asynchronously.
Checks if the response status is 'failed, logs the error message to the console, and displays a danger toast with the error message.
Update Global Data
If the response status is ‘not failed', update the global order data list with the order data received from the response.
Calculates the total number of pages (total pages) based on the total data count and the number of items per page (items per page).
Populate Table and Pagination
Calls the populate table function to update the table with the retrieved order data.
Calls the generate pagination function to create pagination links based on the total number of pages.
Error Handling
Uses the catch block to handle any errors that may occur during the API request and displays a danger toast with the error message.
Getting a Record of Order Items
Upon clicking an order record, smoothly transition the user to a dedicated section or page displaying the order records associated with that order.
Request URL: https://api.eng-dev-1.trilloapps.com/ds/function/shared/Get order items
Payload:
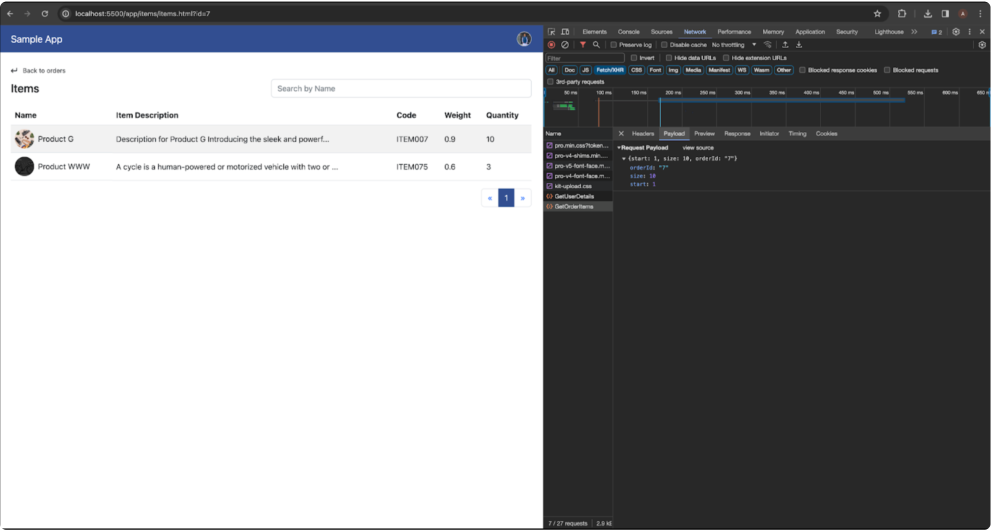
Order Items Payload
Preview: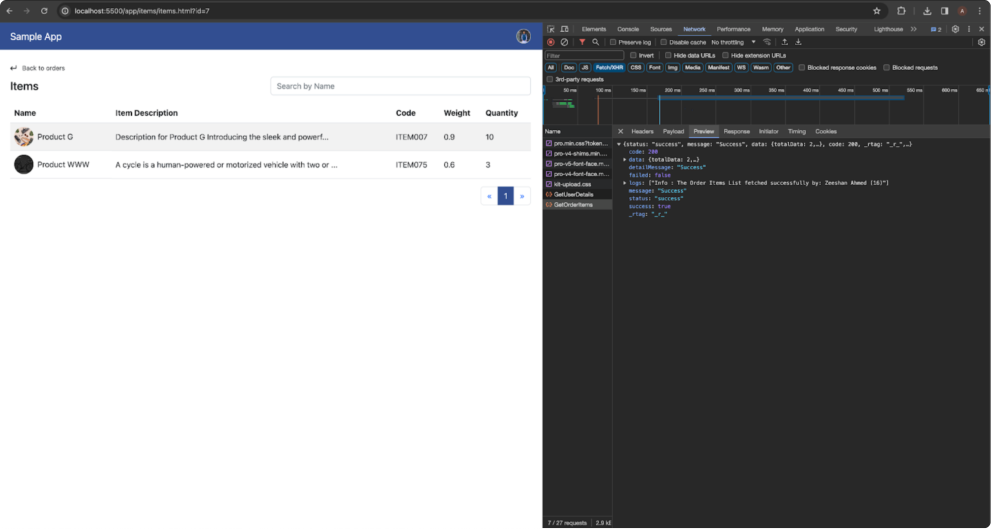
Order Items Preview
Item Record Overview
Design the item record screen to provide a concise overview. Include key information, such as:
Name
Item description
Code
Weight
Quantity
Back To Order Record Button
- Maintain a clear and easily navigable path back to the order records screen, allowing users to switch between order and item records effortlessly.
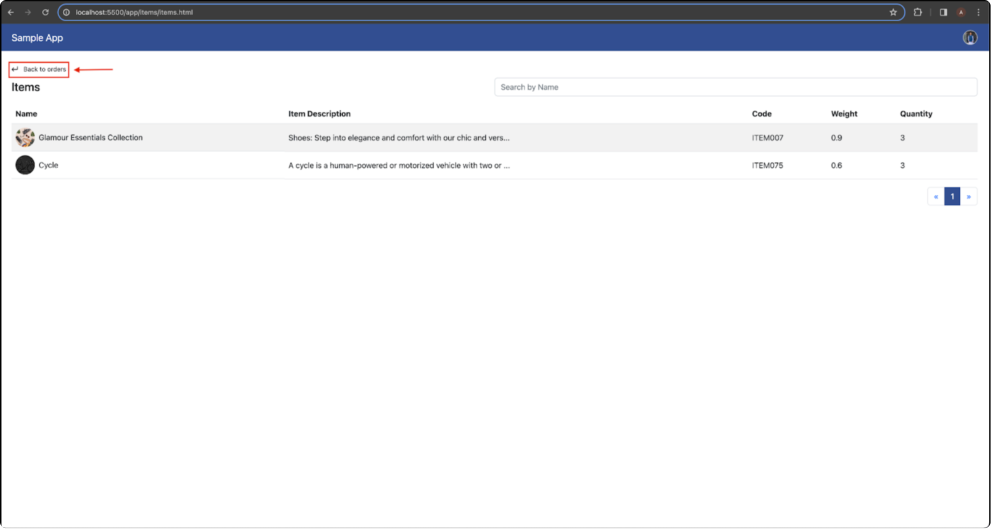
Back To Order Record Button
Search Order Item By Name
- Implement search options to help users quickly find specific item records based on item names.
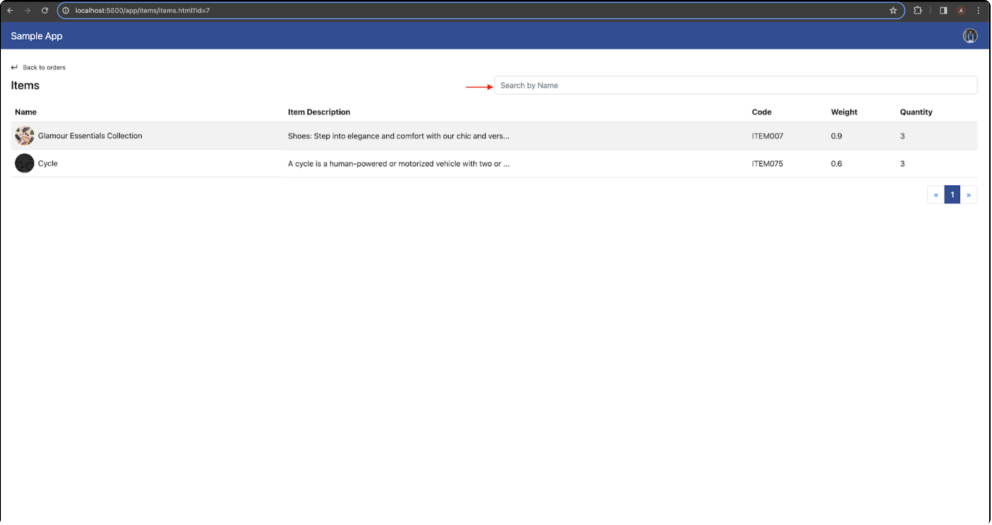
Search Order Item By Name
Item Record Code Snippet
// Function to get item data based on order or from local storage
function get items data(coming id) {
   api service.get items(start, size, coming id)
       .then(response => {
           if (response.status == 'failed') {
               console.log(response.message);
               show toast(response.message, 'danger');
           } else {
               items data list = response.data.items;
               total pages = Math.ceil(response.data.total data /
items per page);
               // Populate the table and generate pagination links
               populate table();
               generate pagination();
           }
       })
       .catch(error => {
           show toast(error.message, 'danger');
       });
}
Code Description
The get items data retrieves information about items based on a specific order ID (orderId) or from local storage. This function fetches relevant data about products - associated with a particular order, enhancing order specific details and local data retrieval capabilities.
API Request
Invokes the api service.get items(start, size, coming id) method, making an asynchronous request to the server to fetch item data. The coming id parameter is likely used to specify a context or filter for the items.
Handling API Response
Uses the then method to handle the response from the api request asynchronously.
Checks if the response status is 'failed', logs the error message to the console and displays a danger toast with the error message.
Update Global Data
If the response status is ‘not failed', updates the global items data list with the item data received from the response.
Calculates the total number of pages (total pages) based on the total data count and the number of items per page (items per page).
Populate Table and Pagination
Calls the populate table function to update the table with the retrieved item data.
Calls the generate pagination function to create pagination links based on the total number of pages.
Error Handling
Uses the catch block to handle any errors that may occur during the API request and displays a danger toast with the error message.
Getting a Record of Item Details
Upon clicking an item record, smoothly transition the user to a dedicated section or ' page displaying the order records associated with that item s details.
Request URL: https://api.eng-dev-1.trilloapps.com/ds/function/shared/Get item details
Payload:
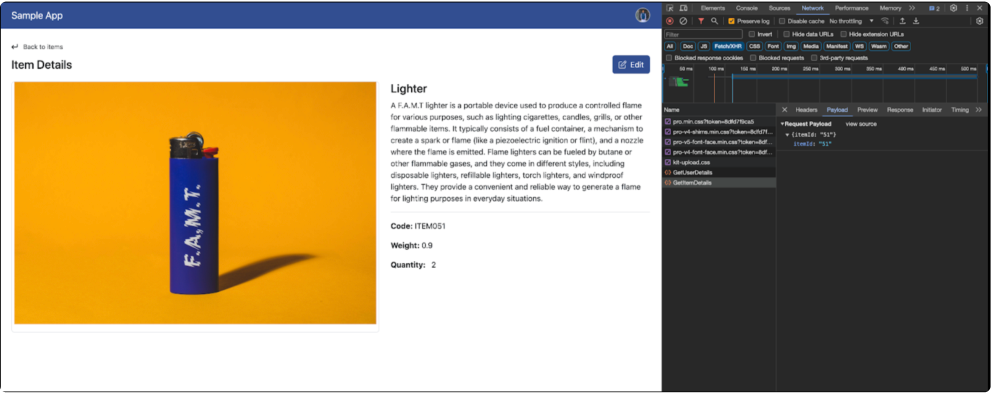
Item Details Payload
Preview: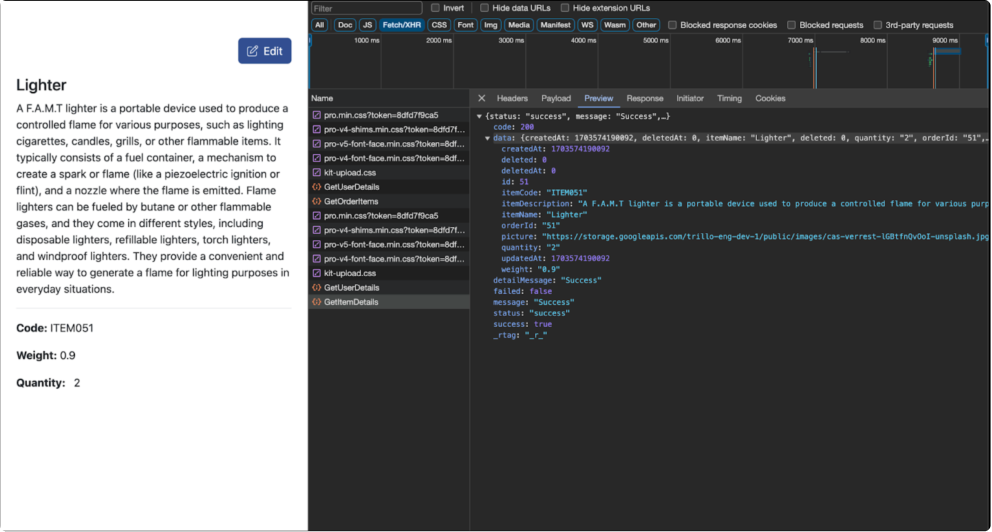
Item Details Preview
Item Details Overview
Present a summarized view of item records on the screen, which includes:
Item name
Item description
Item code
Item weight
Item quantity
Back To Item Record Button
- Maintain a clear and easily navigable path back to the item records screen, allowing users to switch between item and item detail records effortlessly.
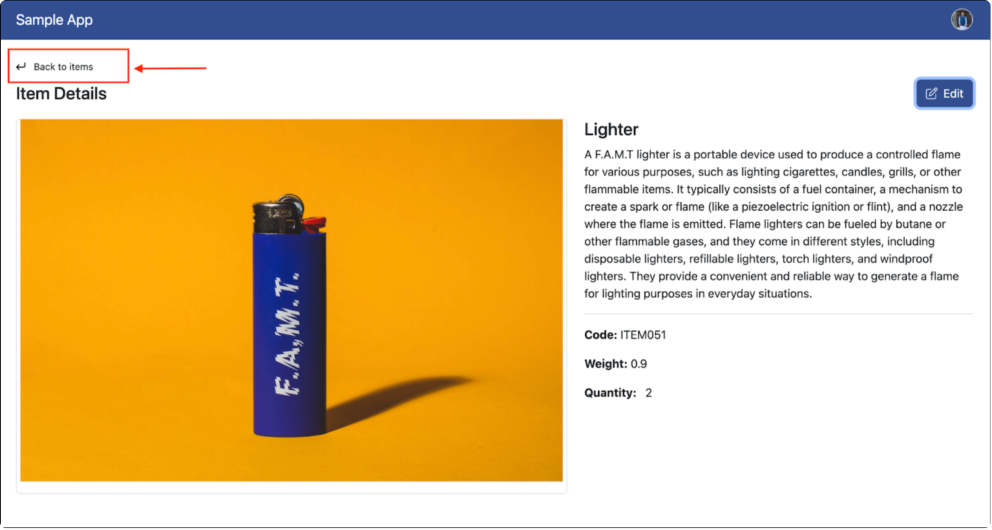
Back To Item Record Button
Item Details Code Snippet
// Function to get item details using the API service
function get items details(coming id) {
   api service.get item details(coming id)
       .then(response => {
           if (response.status == 'failed') {
               console.log(response.message);
               show toast(response.message, 'danger');
           } else {
               // Update the UI with item details
               item detail = response.data;
               document.getElementById('item name').text content =
item detail.item name;
               document.getElementById('description').text content =
item detail.item description;
               document.getElementById('item code').text content =
item detail.item code;
               document.getElementById('item weight').text content =
item detail.weight;
               document.getElementById('item quantity').text content =
item detail.quantity;
               document.getElementById('itemPic').src =
item detail.picture;
           }
       })
       .catch(error => {
           show toast(error.message, 'danger');
       });
Code Description
The get items details retrieve comprehensive information about a specific item - identified by the coming id. This function fetches detailed data, providing in depth insights into the attributes, characteristics, and relevant details of the specified item.
API Request
Invokes the api service.get item details(coming id) method, making an asynchronous request to the server to fetch detailed information about a specific item.
Handling API Response
Uses the then method to handle the response from the api request asynchronously.
Checks if the response status is 'failed', logs the error message to the console and displays a danger toast with the error message.
Update UI with Item Details
If the response status is not 'failed', updates the global variable item detail with the detailed information about the item received from the response.
Utilizes document.getelementbyid to update various html elements with the corresponding item details:
'item name'
'description'
'item code'
'item weight'
'item quantity'
'itemPic' (imagesource)
Error Handling
Uses the catch block to handle any errors that may occur during the API request and displays a danger toast with the error message.
Update a Record
Edit Button Interaction
- Include an "Edit" button within the item details screen, giving users a clear and distinct call-to-action to initiate the editing process.
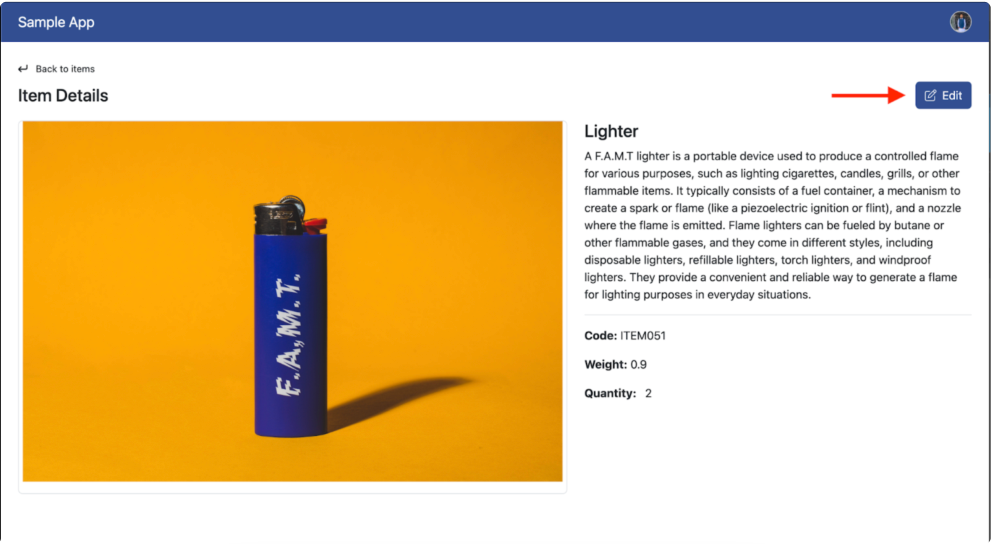
Edit Button Interaction
Editable Fields:
- Clearly indicate which fields are editable. Typically, the quantity field is editable.
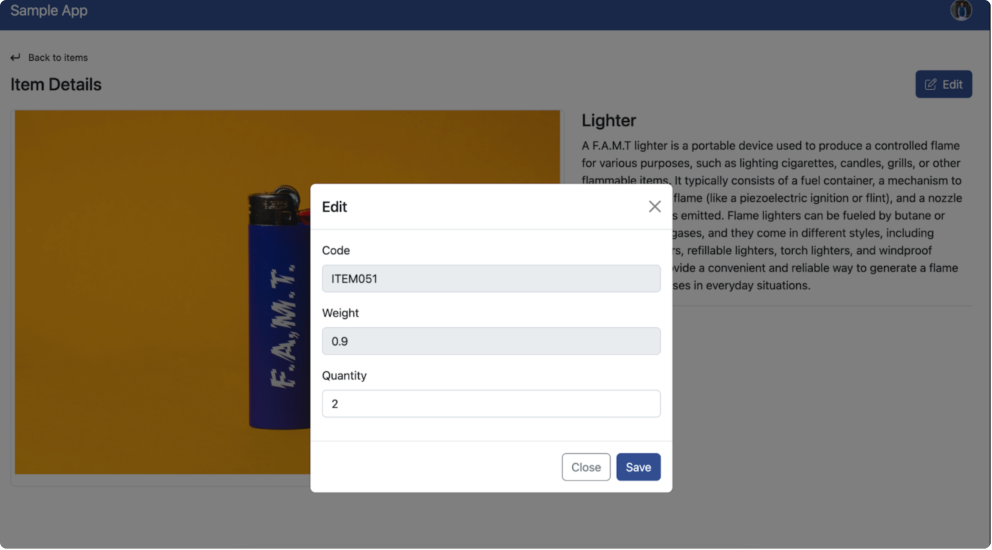
Editable Fields
Save Changes Button
Include a "Save" button to allow users to confirm their edits.
Upon clicking "Save" trigger an api(Edit line item) request to update the item details on the server.
Request URL: https://api.eng-dev-1.trilloapps.com/ds/function/shared/Edit line item
Payload: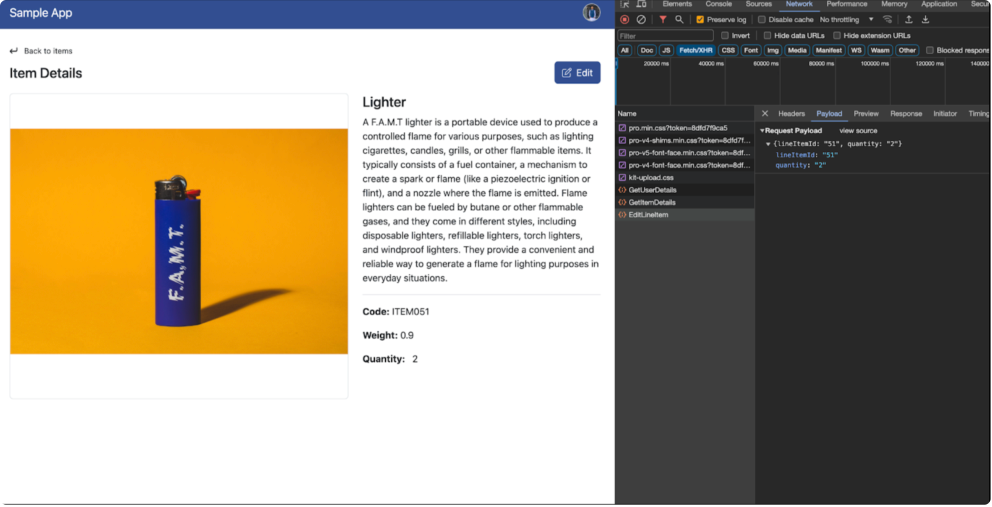
Save Button Payload
Preview:
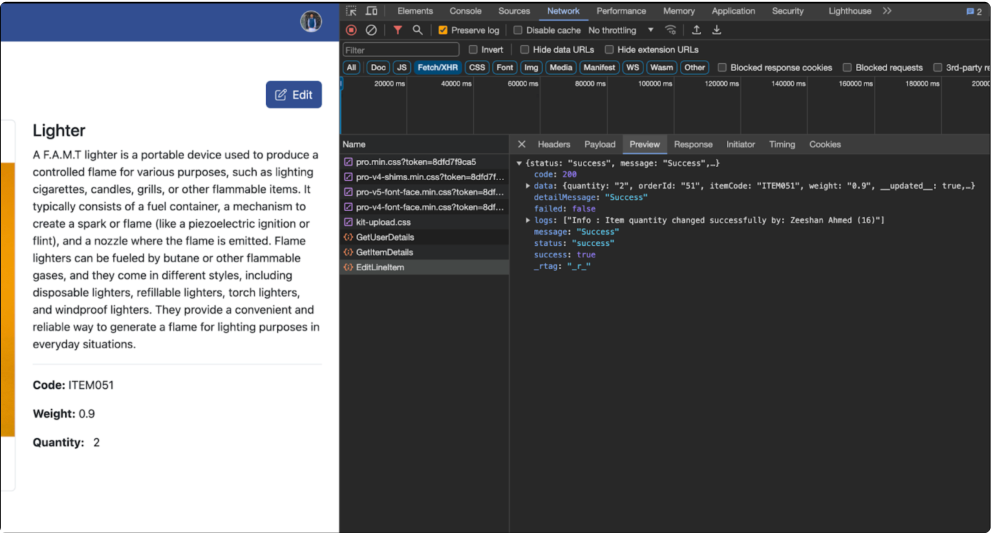
Save Button Preview
Update Record Code Snippet
// Function to handle save button click
function save item() {
   const data = {
       line itemid: item detail.id.toString(), // Replace with the actual
itemId
       quantity: document.getElementById('item quantity1').value
   };
   var quantity input = document.getElementById('item quantity1');
   var quantity error = document.getElementById('quantity error');
   if (!quantity input.value || isNaN(quantity input.value) ||
parseFloat(quantity input.value) === 0) {
       // Show a validation message for an empty or invalid quantity
       quantity error.text content = 'Quantity is required and must be a
valid number.';
       quantity error.class list.add('text-danger');
       return; // Stop execution if the quantity is not valid
   }
   // Send itemId and updated quantity to your backend or perform other
actions
   api service.edit line item(data)
       .then(response => {
           if (response.status == 'failed') {
               console.log(response.message);
               show toast(response.message, 'danger');
           } else {
               // Update the UI with the new item details
               item detail = response.data;
               document.getElementById('item name').text content =
item detail.item name;
               document.getElementById('description').text content =
item detail.item description;
               document.getElementById('item code').text content =
item detail.item code;
               document.getElementById('item weight').text content =
item detail.weight;
               document.getElementById('item quantity').text content =
item detail.quantity;
               document.getElementById('itemPic').src =
item detail.picture;
               show toast(response.message, 'success');
               close modal();
           }
       })
       .catch(error => {
           show toast(error.message, 'danger');
       });
}
Code Description
The save item is a function that typically handles the process of saving or updating information related to a specific item within a system or application. This function involves storing the item's details in a database, updating records, or performing ' necessary actions to persist the changes made to the item s information.
Construct Data Object
It constructs a data object containing the line itemid (converted to a string) and the quantity retrieved from the 'item quantity1' input field.
Validate Quantity Input
Validates the quantity input:
Checks if the quantity is not empty.
Verifies if the quantity is a valid number.
Ensures that the quantity is not equal to zero.
If the quantity input is not valid, it displays a validation message and stops further execution.
API Request
If the quantity input is valid, it proceeds to call the api service.edit line item function, passing the data object.
Handling API Response
Upon receiving the response from the API call:
If the status is 'failed', it logs the error message and displays a danger toast.
If the status is successful, it updates the UI with the new item details:
Sets various elements such as 'item name', 'description', 'item code',
- 'item weight', 'item quantity', and 'itemPic' based on the updated details.
Shows a success toast.
Closes the modal.
Error Handling
If there's an error during the API call, it displays an error toast.
Angular
This document describes Developing UI in Angular using Trillo Workbench. It is similar to developing UI for against any application server using restful API.
Introduction
This guide aims to assist new users in setting up a Demo Application on their local machines. It provides clear, step-by-step instructions to ensure a smooth setup process, even for those new to the Angular framework. By following these directions, you'll swiftly have the application running on your own system. This - guide is tailored for beginners, offering a hassle free experience to explore and test ' the app s functionalities first hand.
Prerequisites
Angular: Ensure you have angular installed. You can download it from angular.io .
Node.js: Ensure you have node.js installed. You can download it from nodejs.org .
Git: Make sure g it is installed on your system. You can download it from gitscm.com .
SSH-KEY: Make sure you've configured your ssh key for git hubby following the setup instructions available on git-scm.com .
Clone the Repository
First, navigate to your repository on git hub or your preferred platform.
Copy the ssh link for your repository.
Open your terminal on your local machine.
Use the following command to clone the repository:
Repository (HTTPS): git clone https://github.com/trillo apps/angular-guide
Command (SSH): git clone git@github.com:trillo apps/angular-guide.git
Setting Up the Project
Install Dependencies
Run the following command to install project dependencies using n pm (Node Package Manager):
Command: n pm install
Run the Application
After installing the dependencies, use the following command to run the application:
Command: ngs
This will compile your Angular app and open it in your default browser at http://localhost:.
App Functionalities
Explore the different functionalities of the app on http://localhost.
Some key functionalities include:
Login api
Header
Logout icon
Getting a list of customer records
Getting a record of customer orders
Getting a record of order items
Getting a record of item details
Update a record
Login API
- A successful login process involves several steps, including front end user - interface (UI) interactions and back end API calls.
User Input Credentials
- The user provides their login credentials, typically a combination of a username/email and password, in the login form on the UI.
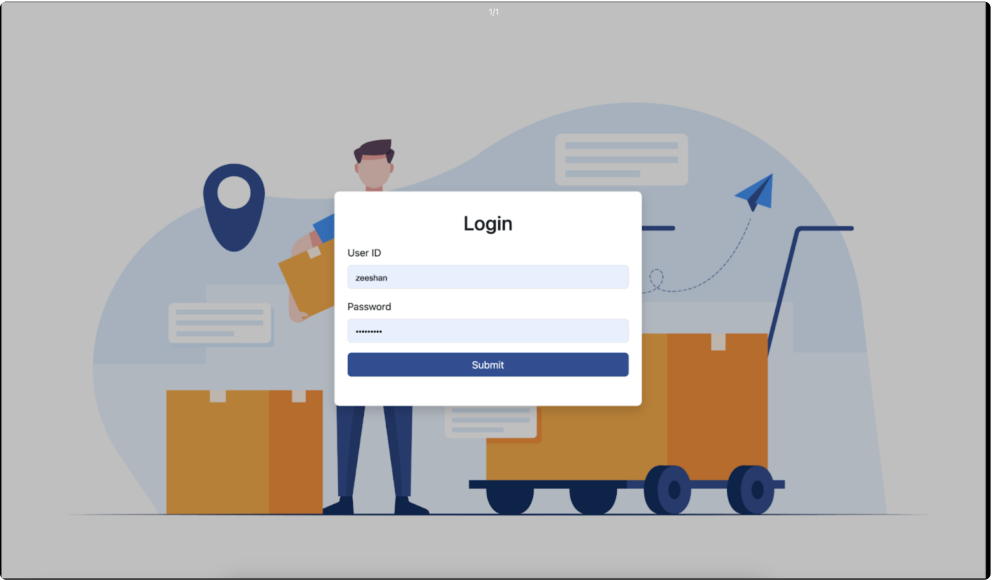
Login Screen
Send Login Request (API Call)
Initiate an api call to the server to authenticate the user's credentials. This typically involves sending a POST request to a login endpoint with the user's credentials in the request body.
Request url: https://api.eng-dev-1.trilloapps.com/ajax login
Payload:
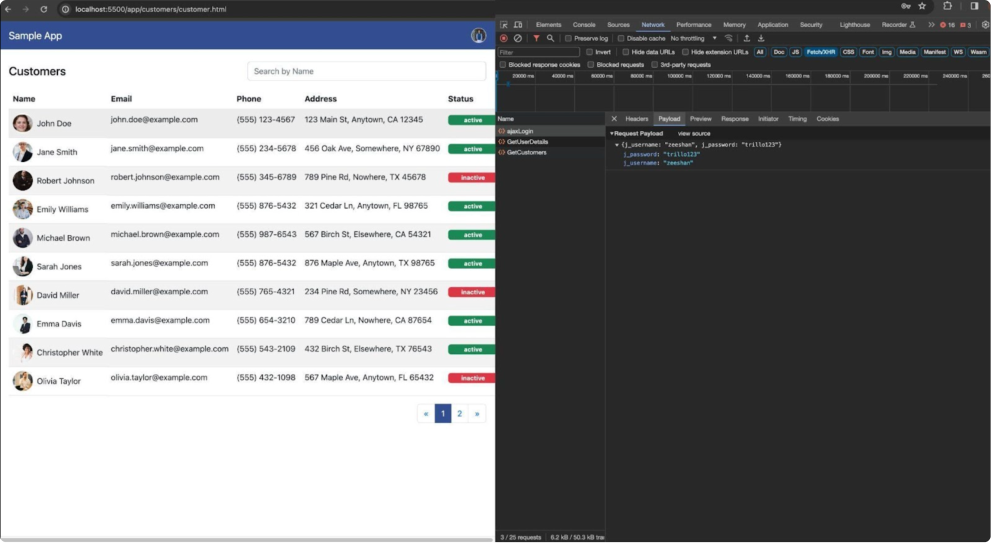
Login Payload
Preview:
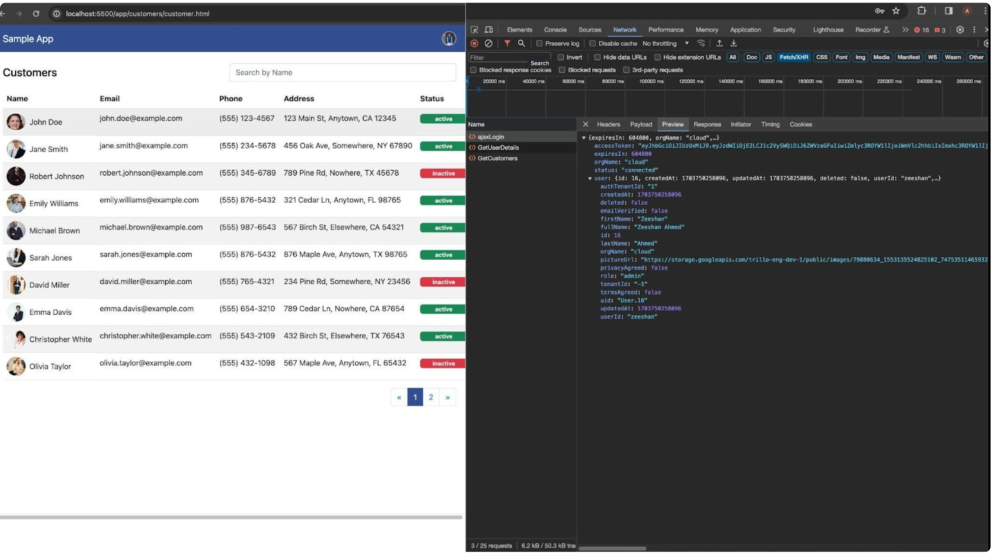
Login Preview
Receive an Access Token (API Call)
- If the credentials are valid, generate an access token. The server responds with the access token, a secure and unique string used to authenticate subsequent API requests.
Login Code Snippet
send login request() {
   if (this.login form.valid) {
     this.bLoader = true;
      this.auth service.Auth service_Login({
       j_username: this.login form.value.j_username,
       j_password: this.login form.value.j_password,
     }).subscribe({
       next: (result) => {
         if (result.status == 'connected') {
           local storage.setItem("ls sample app access token",
JSON.stringify(result.access token));
           local storage.setItem("user detail",
JSON.stringify(result.user));
           this.router.navigate by url('/app/customers');
         } else {
           console.error("Send login request: Error ===>>", result);
         }
       },
       error: (error) => {
         this.bLoader = false;
         console.error("Send login request: ERROR ===>>", error);
         this.display alert message('Bad Credentials!', 'error',
'danger');
       },
       complete: () => {
         // This block will be executed when the observable is
completed
         this.bLoader = false;
       }
     });
   } else {
     this.login form.mark all as touched();
   }
 }
Code Description
The send login request function is responsible for initiating a login request based ' on the validity of the login form. Here s an overview of its functionality:
Form Validation
- Check if the login form (this.login form) isvalid.
Loader Flag
- Sets the b loader flag to true to indicate that a login request is in progress.
API Request
Calls the auth service_Login method of the auth service service, passing the login credentials (j_username and j_password) obtained from the form.
Subscribes to the observable returned by the login service.
Handling API Response
In the next block:
Check if the response status is 'connected'. Iftrue:
Stores the access token and user details in the local storage.
Navigate to the '/app/customers' route using the angular router (this. router).
If the response status is not 'connected', log the result as an error.
Error Handling
In the error block:
Sets the b loader flag to false to indicate the completion of the login request.
Logs the error.
Displays an alert message with the text 'Bad credentials!' using the display alert message method.
Completion
In the complete block:
Sets the b loader flag to false to ensure it is updated regardless of successor failure.
Form marking:
If the login form is not valid, mark all form controls as touched.
Header
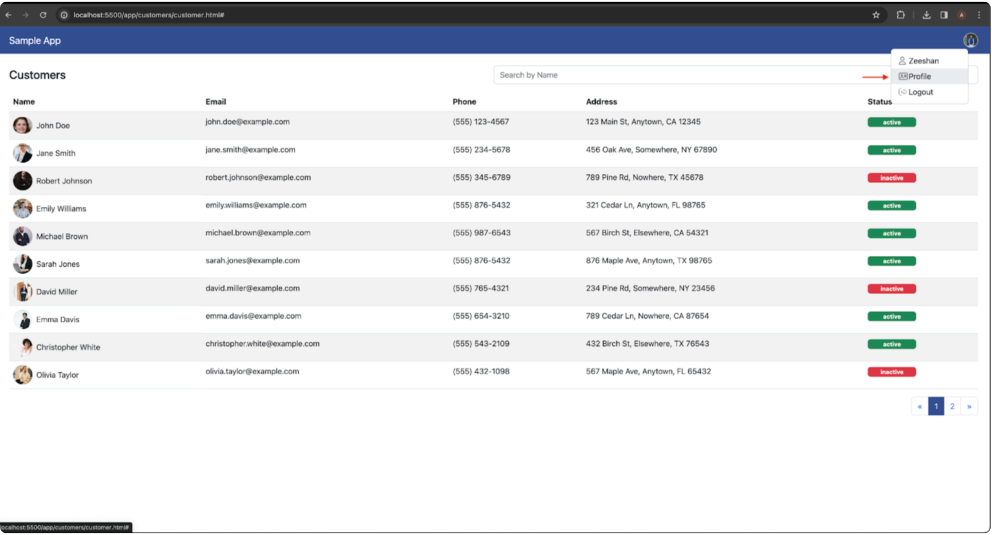
User Edit Profile Icon
- This icon adds a visual representation of the user and helps in quick identification.
User Edit Profile Icon
- Click the edit icon on a profile picture to upload a new profile picture
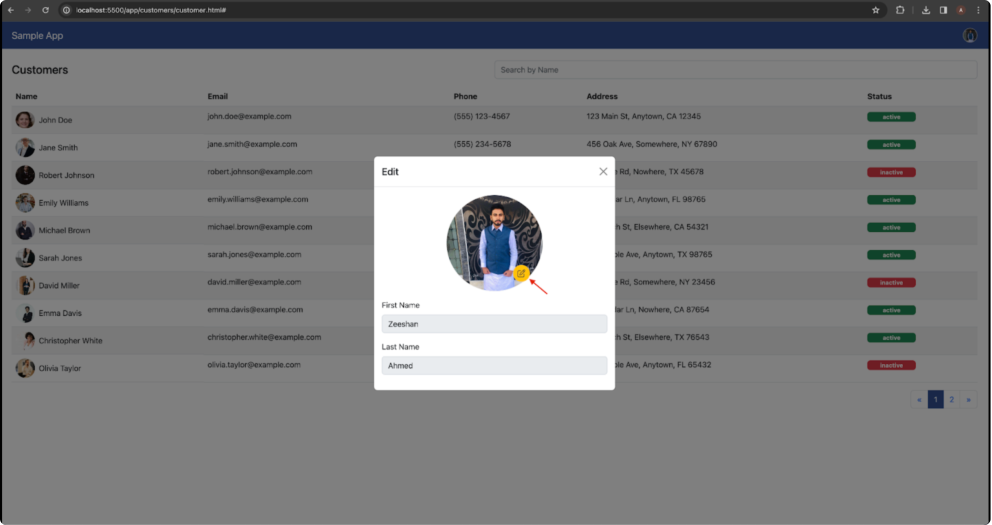
User Profile Icon
Upload call after selecting the profile picture
Request url: https://api.eng-dev-1.trilloapps.com/folders vc/cloud storage/upload
Payload:
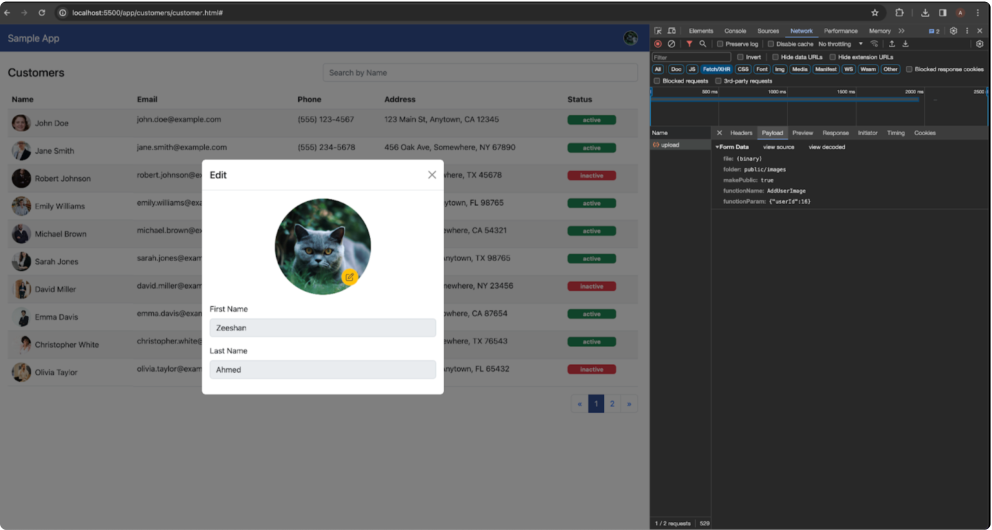
Header Payload
Preview: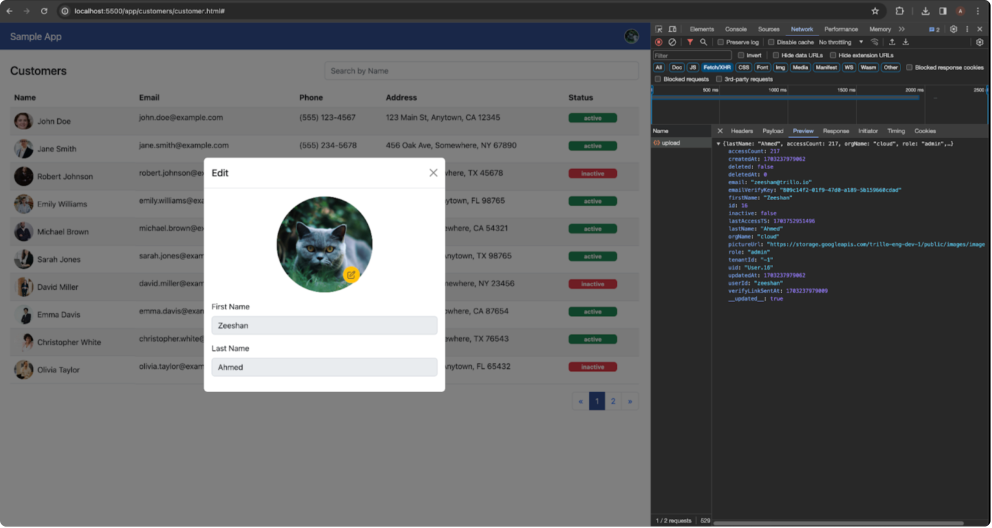
Header Preview
Edit Profile Code Snippet
on file select(event) {
   const selected files: File list = event.target.files as File list;
   const valid file types = ["image/png", "image/jpeg", "image/jpg"];
   const invalid files = Array.from(selected files).filter(
     (file) => !valid file types.includes(file.type)
   );
   this.files to upload = event.target.files;
   this.upload files();
   this.filename = "";
   if (event.target.files && event.target.files.length > 0) {
     this.file = event.target.files[0];
     this.filename = this.file.name;
   }
 }
 upload files() {
   let function param = {
     userId : this.user details.id
   }
   for (const file of this.files to upload) {
     const form data: Form data = new Form data();
     form data.append("file", file);
     form data.append("folder", "public/images");
     form data.append("make public", "true");
     form data.append("function name", "Adduser image");
     form data.append("function param", JSON.stringify(function param));
     this.Data service.Profile file upload(form data).subscribe({
       next: (response) => {
         this.user profile image= response.picture url
       },
       error: (error) => {
         console.error(error)
         console.error(error);
       },
       complete: () => { },
     });
   }
 }
Code Description
File Selection
- Captures the selected files from the input event.
File Type Validation
Checks the file types against a predefined list of valid image types
("image/png", "image/jpeg", "image/jpg").
Filters out any files with invalid types and stores them in the invalid files array.
Handling api response:
File Upload Initialization
Stores the selected files in the files to upload property.
Filename Initialization
- Resets the filename property.
Single File Handling
If files are selected
Takes the first file from the selected files.
Retrieves and stores its name in the filename property.
File Upload Execution
Invokes the upload files method to handle the actual file upload.
File Upload:
Function Parameter Preparation
Constructs a function param object containing the userId retrieved from this.user details.id.
File Iteration:
Loops through each file in this.files to upload.
Form data Preparation
Creates a Form data object and appends file-related information:
'File': Appends the file itself with the key "file".
'Folder': Specifies the target folder as "public/images".
'make public': Sets the visibility of the file as public ("make public": "true").
'function name': Specifies the intended function name as "Adduser image".
'function param': Appends the function parameters as a json string.
File Upload API Call
Calls the Profile file upload method from this.Data service with the prepared form data.
Subscribes to the observable returned by the API call.
Handling API Response
In the next block, update this.user profile image with the URL of the uploaded picture from the API response.
Error Handling
In the error block, logs and displays any errors that occur during the file upload process.
Completion:
Logout Icon
- This icon will navigate us to the login page.
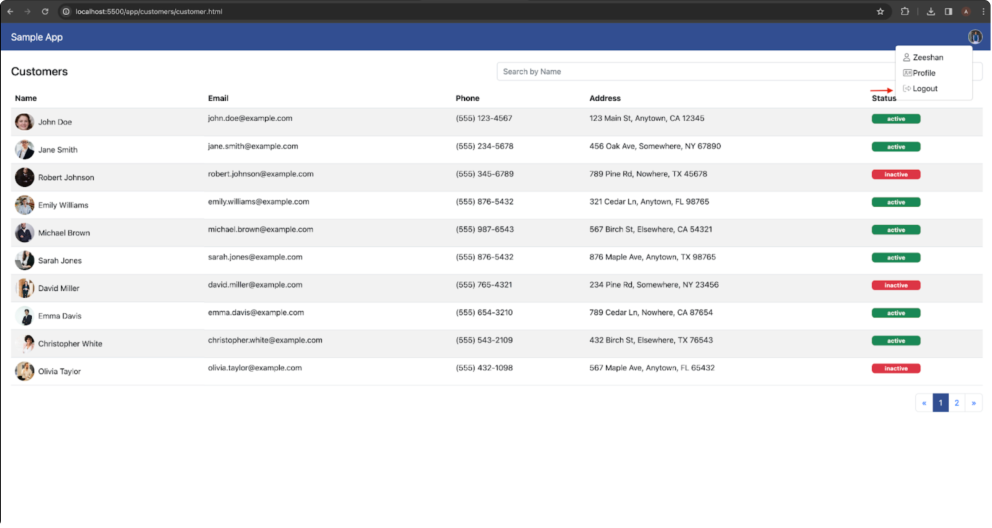
Logout Icon
Upon selecting the logout option, the system redirects users to the login page and clears the local storage as a security measure.
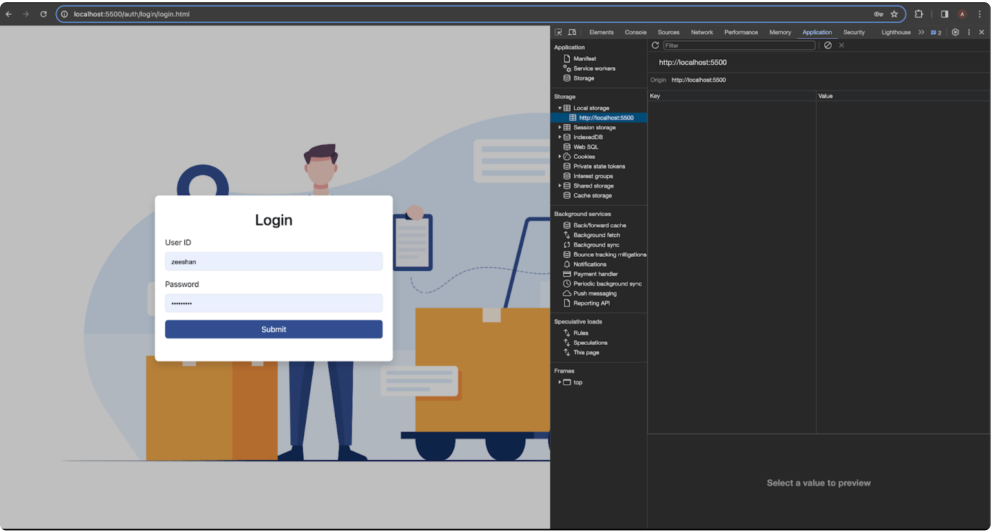
Login Page
Logout Code Snippet
 logout(){
   local storage.clear();
   this.router.navigate by url('/auth/login')
  }
Code Description
The logout function, when invoked by a user, is responsible for terminating the ' user s session. The two main actions performed by this function are:
Clearing Local Storage
- The line local storage.clear(); ensures that any data stored in the web browser's local storage, which could include information related to the user's session or authentication such as tokens or user preferences, is removed.
Navigating to the Login Page
- The subsequent line this.router.navigate by url('/auth/login'); utilizes a router service to direct the user to the '/auth/login' route. This navigation effectively redirects the user to the login page, facilitating a seamless transition after the logout process.
Getting a List of Customer Records
If the access token is obtained successfully, redirect the user to the Customers screen of the application. When the customers page is loaded, call the GET_CUSTOMERS api to get a list of all the customers.
Request URL: https://api.eng-dev-1.trilloapps.com/ds/function/shared/Get customers
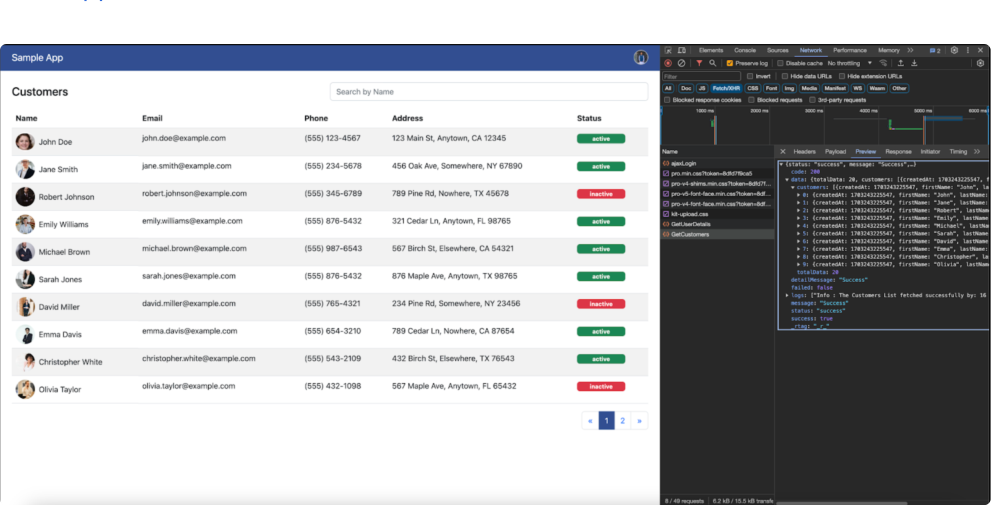
Customer Records
Customer Record Overview
Showing customer records on the screen involves creating a user friendly and secure experience. Below are key points to consider when implementing a "Customer Records" screen:
Design the customer record screen to provide a concise and organized overview. Include key information, such as:
Customer names
Email, Phone
Address
Status (Active, Inactive)
Search Customer By Name
- Implement search options to help users quickly find specific customer records based on customer names.
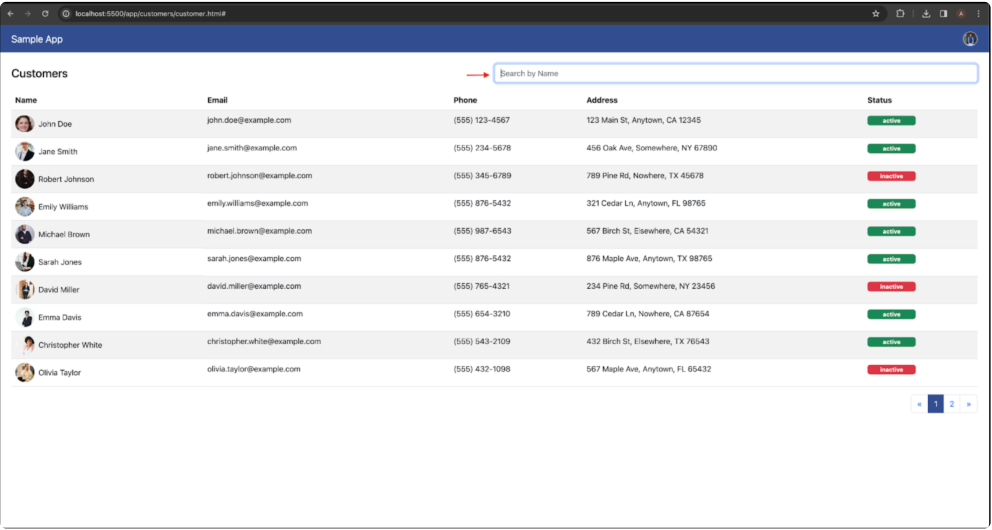
Search Customer
Pagination
- If the customer record list is extensive, pagination is implemented to display records in smaller, more manageable chunks.
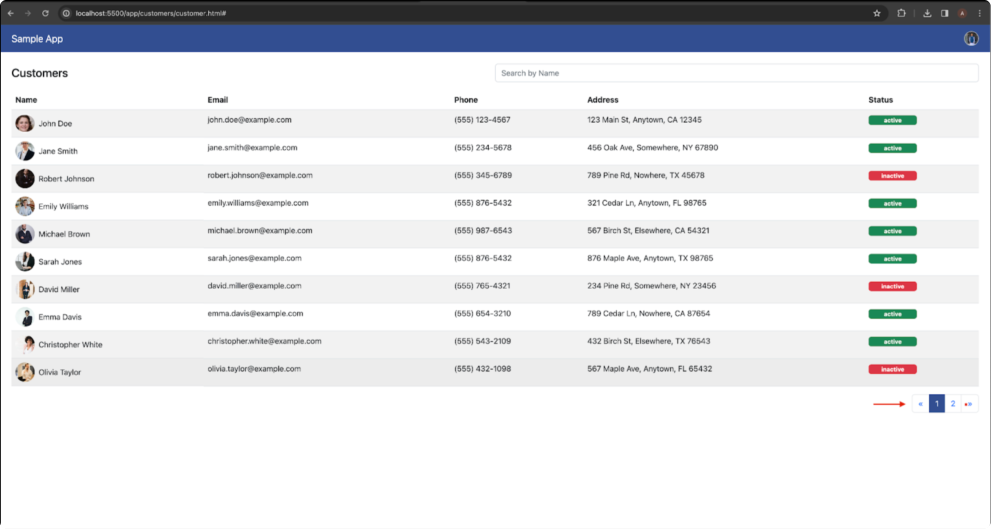
Pagination
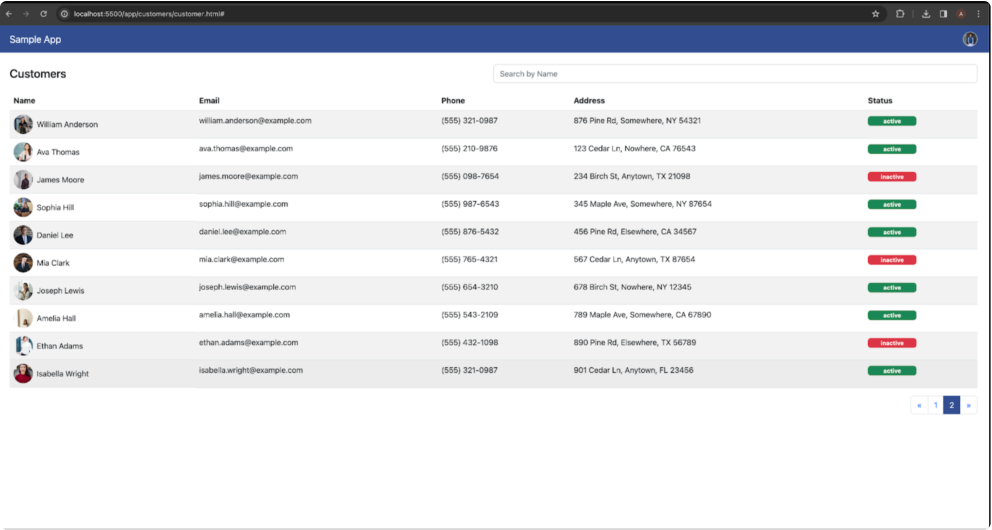
Pagination
Customer Record Code Snippet
get customer list(incomming start, incomming size) {
   this.bLoader = true;
   let body = {
     start: incomming start,
     size: incomming size
   }
   this.data service.Get customer lists(body).subscribe({
     next: (result: any) => {
       if (result.status === "success") {
         this.customers list = result.data.customers;
         this.total size = result.data.total data;
         this.temp = [...this.customers list]
         this.bLoader = false;
       }
     },
     error: (error) => {
       console.error(error);
     },
     complete: () => { },
   });
 }
Code Description
This TypeScript function, get customer list, is designed to retrieve a list of ' customers from a data service. Here s a breakdown of its functionality:
Loading Indicator
- Sets this.b loader to true, presumably to indicate that data is being loaded.
Request Body Preparation
- Creates a body object containing start and size properties based on the provided incomming start and incomming size parameters.
API Request
Calls the get customer lists method of this.data service to get a list of customers.
Subscribes to the observable returned by the get customer lists method.
Response Handling
In the next callback:
Checks if the response status is "success".
If successful, updates the local this.customers list with the customer data from the response (result.data.customers).
Sets this.total size to the total data size from the response
- (result.data.total data).
Creates a copy of the customer list in this.temp.
Sets this.b loader to false, indicating the end of the loading process.
Error Handling
In the error callback:
- Logs the error to the console using console.error.
Getting a Record of Customer Orders
Upon clicking a customer record, smoothly transition the user to a dedicated section or page displaying the order records associated with that customer.
Request URL: https://api.eng-dev-1.trilloapps.com/ds/function/shared/Get customer orders
Payload:
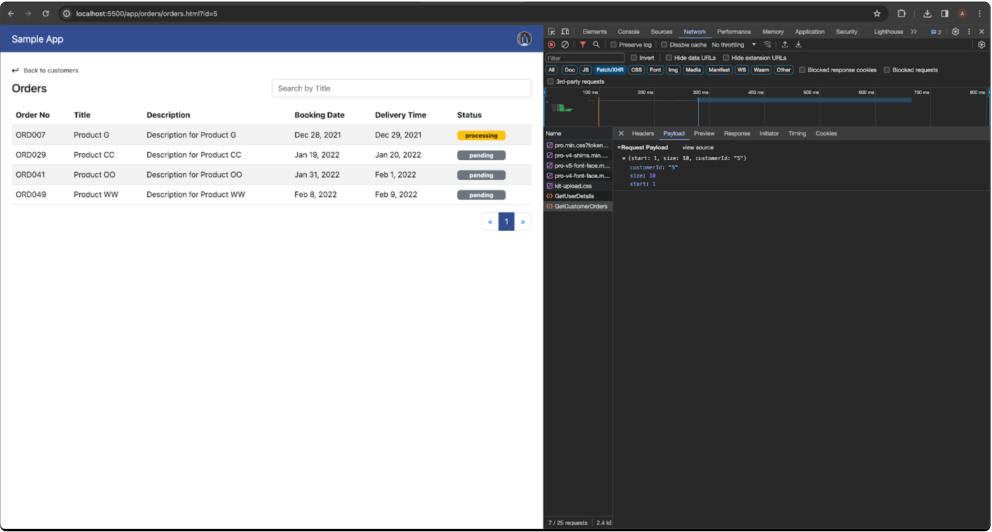
Customer Orders Payload
Preview: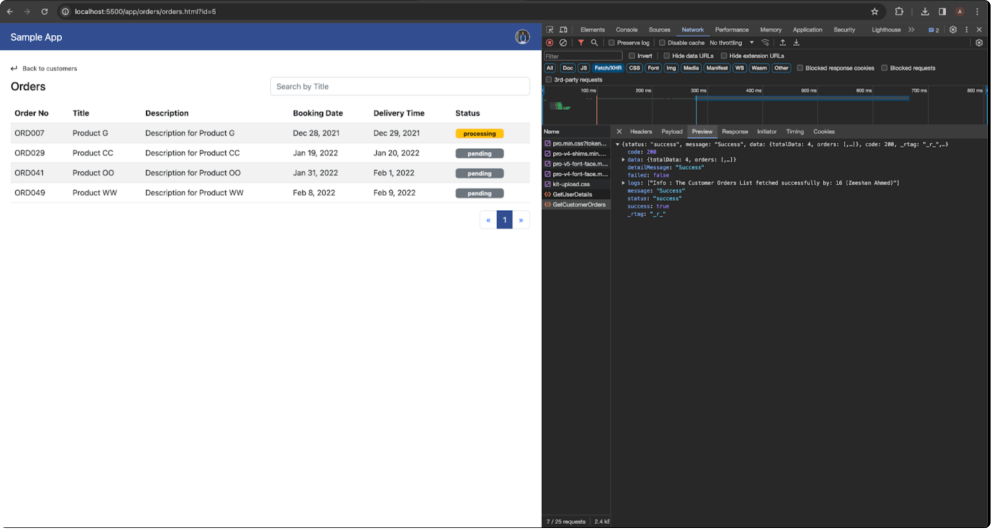
Customer Orders Preview
Order Record Overview
Design the order record screen to provide a concise overview. Include key information, such as:
OrderNo
Title
Description
Booking date
Delivery time
Status (Pending, Processing, Shipped, Delivered)
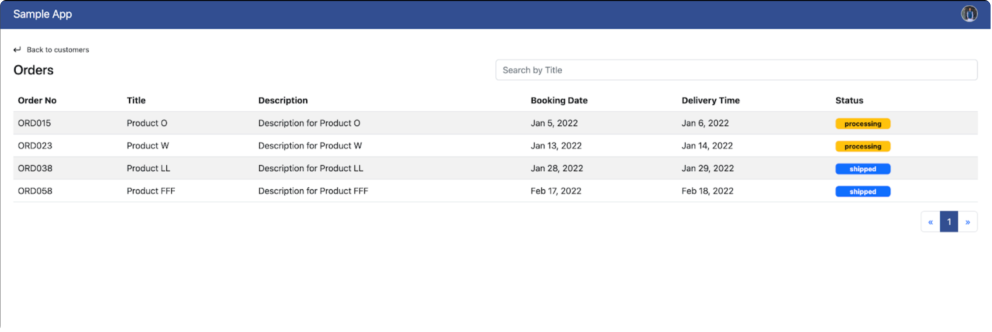
Order Record Overview
Back To Customer Record Button
- Maintain a clear and easily navigable path back to the customer records screen, allowing users to switch between customer and order records effortlessly.
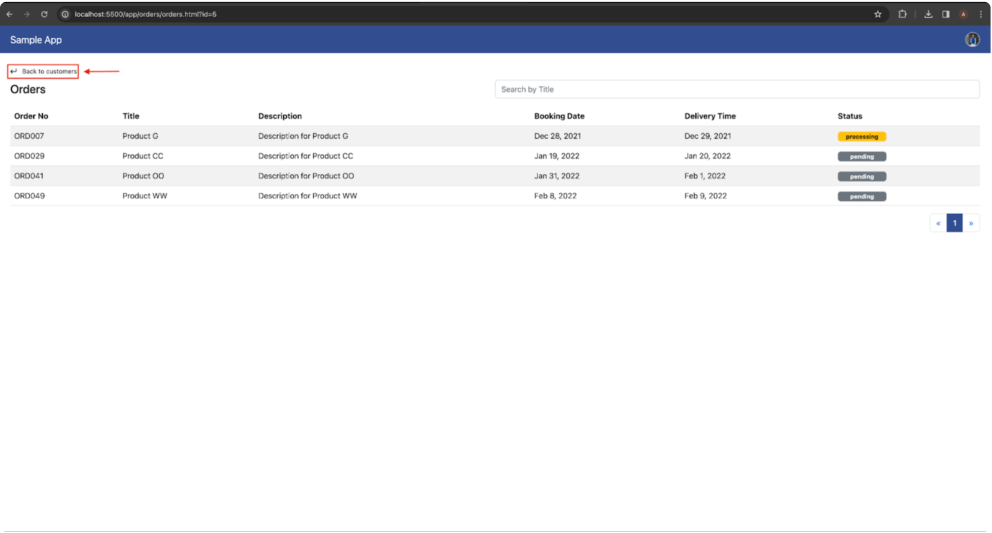
Back To Customer Record Button
Search Order By Title
- Implement search options to help users quickly find specific order records based on their titles.
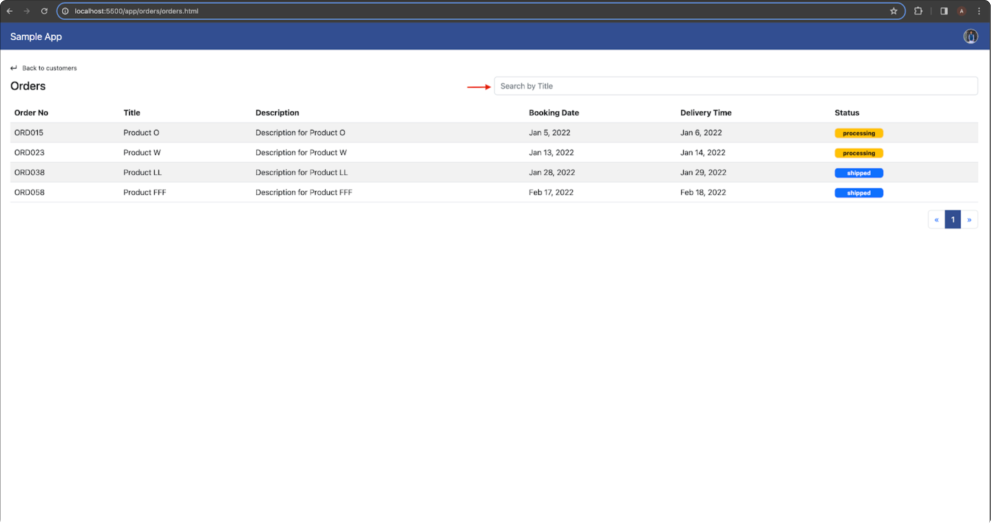
Search Order By Title
Order Record Code Snippet
get oder lists(start: number, size: number, customerId: string) {
   this.bLoader = true;
   let body = {
     customerId: customerId,
     start: start,
     size: size,
   }
   this.data service.Get oder list(body).subscribe({
     next: (result: any) => {
       console.log("error")
       if (result.status === "success") {
         this.orders = result.data.orders;
         this.total size = result.data.total data;
         this.bLoader = false;
         this.temp = [...this.orders]
       }
     },
     error: (error) => {
       console.error(" ERROR ==> ", error);
     },
     complete: () => { },
   }
   )
 }
Code Description
This TypeScript function, get oder lists, is designed to retrieve a list of orders for a ' specific customer from a data service. Here s a breakdown of its functionality:
Loading Indicator
- Sets this.b loader to true, indicating that data is being loaded.
Request Body Preparation
- Creates a body object containing customerid, start, and size properties based on the provided parameters.
API Request
Calls the get oder list method of this.data service to get a list of orders for the specified customer.
Subscribes to the observable returned by the get oder list method.
Response Handling
In the next callback
Logs "error" to the console (seems to be a debugging statement).
Checks if the response status is "success".
If successful, updates the local this.orders with the order data from the response (result.data.orders).
Sets this.total size to the total data size from the response (result.data.total data).
Sets this.b loader to false, indicating the end of the loading process.
Creates a copy of the order list in this.temp.
Error Handling
In the error callback
- Logs the error to the console using console.error.
Getting a Record of Order Items
Upon clicking an order record, smoothly transition the user to a dedicated section or page displaying the line items associated with that order.
Request URL: https://api.eng-dev-1.trilloapps.com/ds/function/shared/Get order items
Payload:
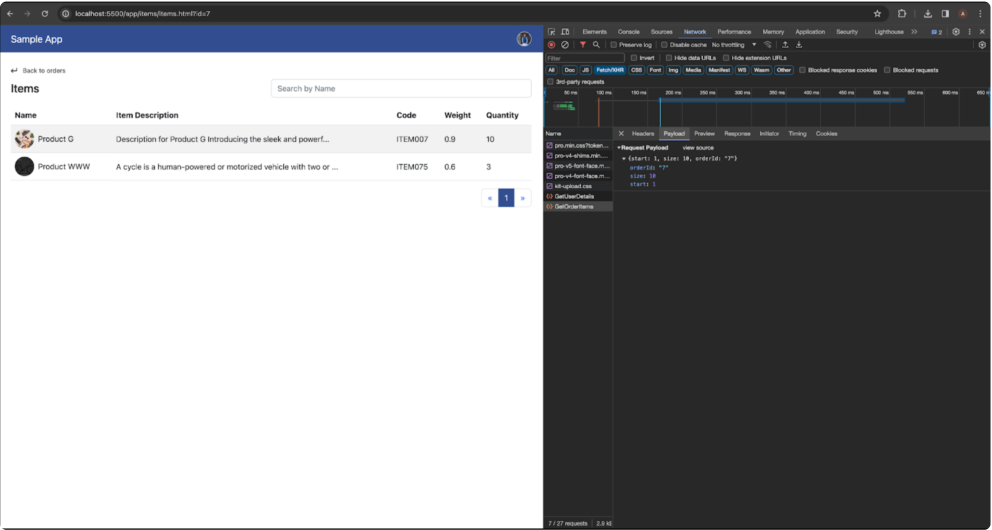
Order Items Payload
Preview: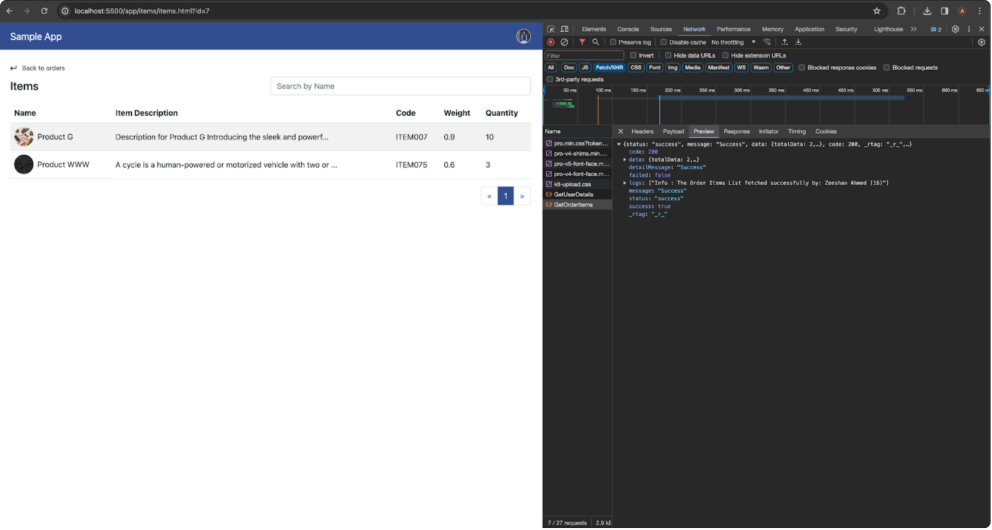
Order Items Preview
Item Record Overview
Design the item record screen to provide a concise overview. Include key information, such as:
Name
Item description
Code
Weight
Quantity
Back To Order Record Button
- Maintain a clear and easily navigable path back to the order records screen, allowing users to switch between order and item records effortlessly.
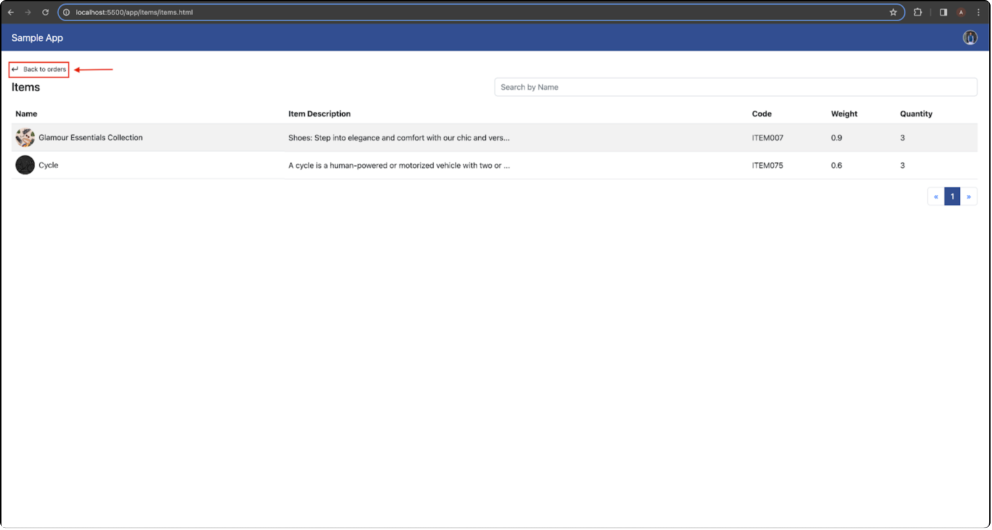
Back To Order Record Button
Search Order Item By Name
- Implement search options to help users quickly find specific item records based on item names.
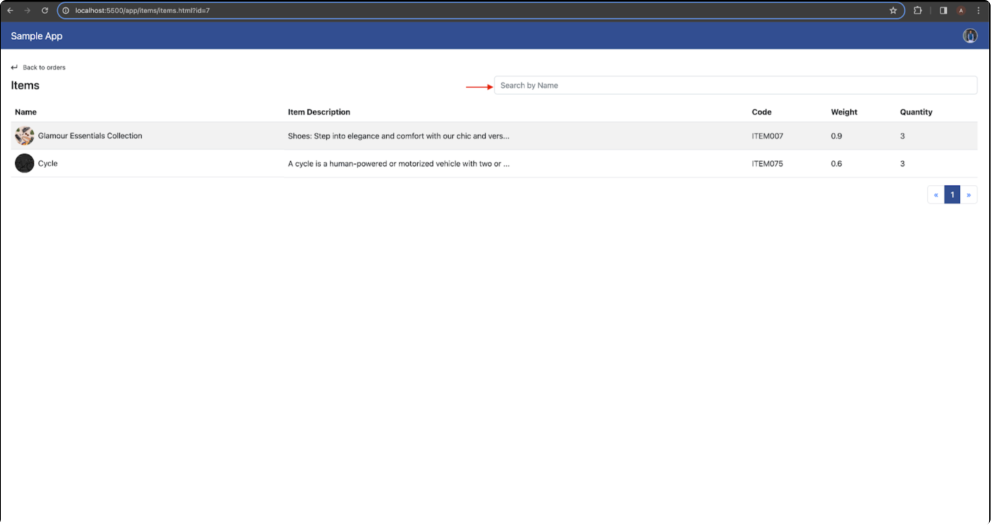
Search Order Item By Name
Item Record Code Snippet
get item lists(start: number, size: number, orderId: string) {
   this.bLoader= true;
   let body = {
     orderId: orderId,
     start: start,
     size: size,
   }
   this.data service.Get item list(body).subscribe({
     next: (result: any) => {
       console.log("error")
       if (result.status === "success") {
         this.items = result.data.items;
         this.total size = result.data.total data
         this.bLoader = false
         this.temp = [...this.items]
       }
     },
     error: (error) => {
       console.error(" ERROR ==> ", error);
     },
     complete: () => { },
   }
   )
 }
Code Description
This TypeScript function, get item lists, is designed to retrieve a list of items for a ' specific order from a data service. Here s a breakdown of its functionality:
Loading Indicator
- Sets this.b loader to true, indicating that data is being loaded.
Request Body Preparation
- Creates a body object containing orderid, start, and size properties based on the provided parameters.
API Request
Calls the get item list method of this.data service to get a list of items for the specified order.
Subscribes to the observable returned by the get item list method.
Response Handling
In the next callback:
Logs "error" to the console (seems to be a debugging statement).
Checks if the response status is "success."
If successful, updates the local this.items with the item data from the response (result.data.items).
Sets this.total size to the total data size from the response
- (result.data.total data).
Sets this.b loader to false, indicating the end of the loading process.
Creates a copy of the item list in this.temp.
Error Handling
In the error callback:
- Logs the error to the console using console.error.
Getting a Record of Item Details
Upon clicking an item record, smoothly transition the user to a dedicated section or ' page displaying the order records associated with that item s details.
Request URL: https://api.eng-dev-1.trilloapps.com/ds/function/shared/Get item details

Payload:
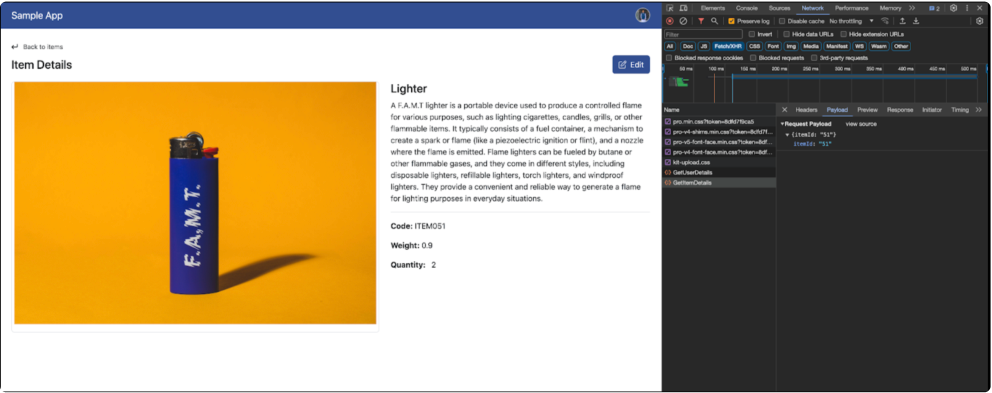
Item Details Payload
Preview: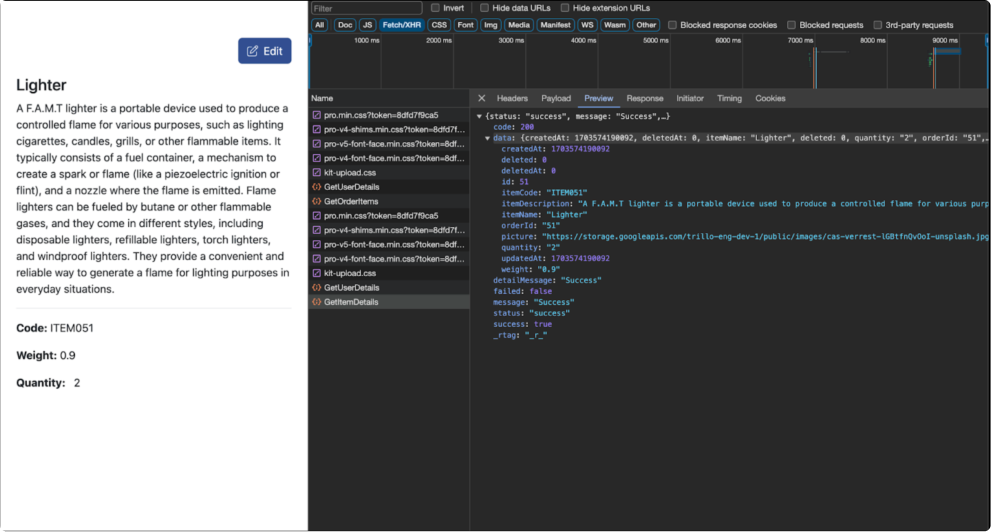
Item Details Preview
Item Details Overview
Present a summarized view of item records on the screen, which includes:
Item name
Item description
Item code
Item weight
Item quantity
Back To Item Record Button
- Maintain a clear and easily navigable path back to the item records screen, allowing users to switch between item and item detail records effortlessly.
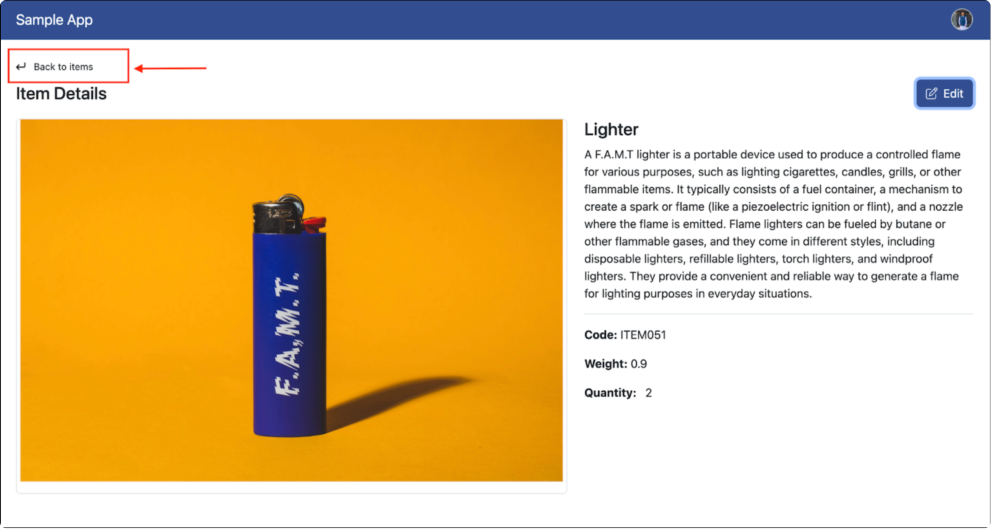
Back To Item Record Button
Item Details Code Snippet
get item list details(itemId) {
   let body = {
     itemId: itemId,
   }
   this.data service.Get item detail(body).subscribe({
     next: (result: any) => {
       if (result.status === "success") {
         this.items = result.data
       }
     },
     error: (error) => {
       console.error(" ERROR ==> ", error);
     },
     complete: () => { },
   }
   )
 }
Code Description
This function, get item list details, is designed to retrieve details for a specific item ' from a data service. Here s a breakdown of its functionality:
Request Body Preparation
- Creates a body object containing itemid based on the provided parameter.
API Request
Calls the get item detail method of this.data service to get details for the specified item.
Subscribes to the observable returned by the getitem detail method.
Response Handling
In the next callback:
Checks if the response status is "success."
If successful, updates the local this.items with the data from the response (result.data).
Error Handling
In the error callback:
- Logs the error to the console using console.error.
Update a Record
Edit Button Interaction
- Include an "Edit" button located in the top right corner within the item details screen, giving users a clear and distinct call-to-action to initiate the editing process.
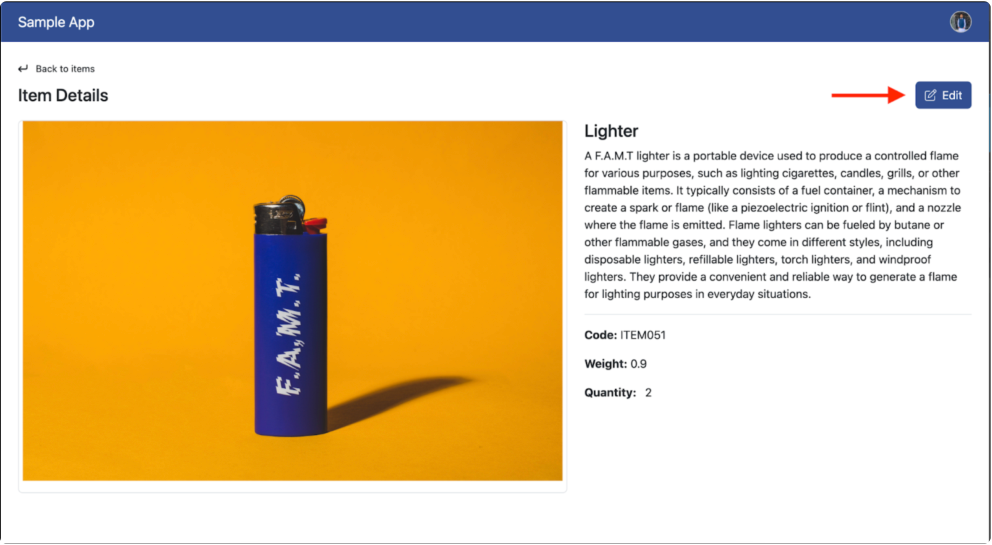
Edit Button Interaction
Editable Fields
- Clearly indicate which fields are editable. Typically, the quantity field is editable.
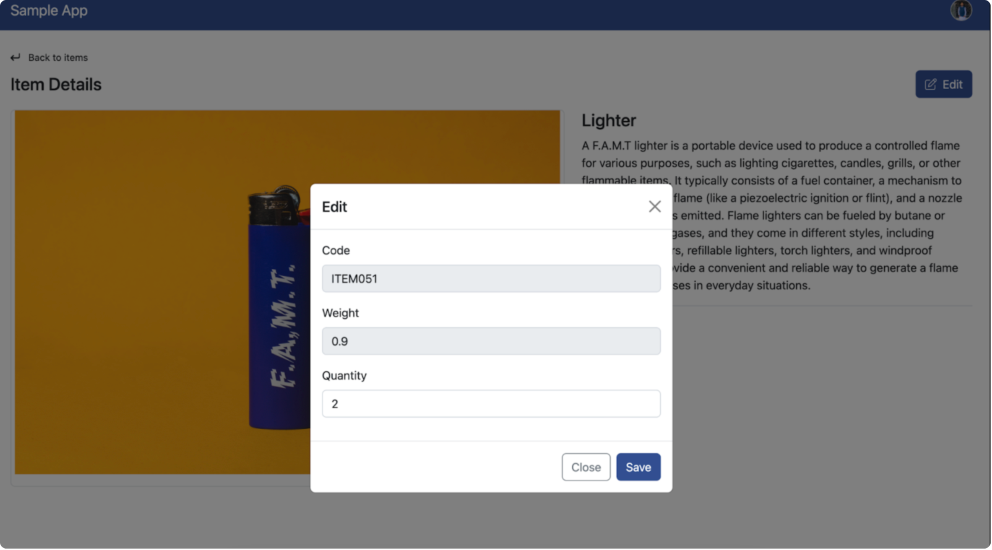
Save Changes Button
Include a "Save" button to allow users to confirm their edits.
Upon clicking "Save" trigger an api(Edit line item) request to update the item details on the server.
Request URL: https://api.eng-dev-1.trilloapps.com/ds/function/shared/Edit line item
Payload: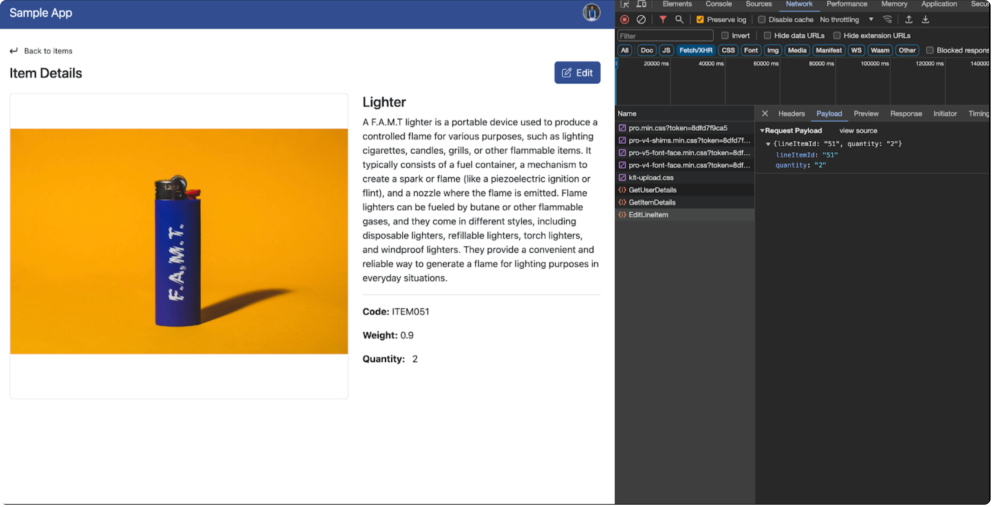
Preview:
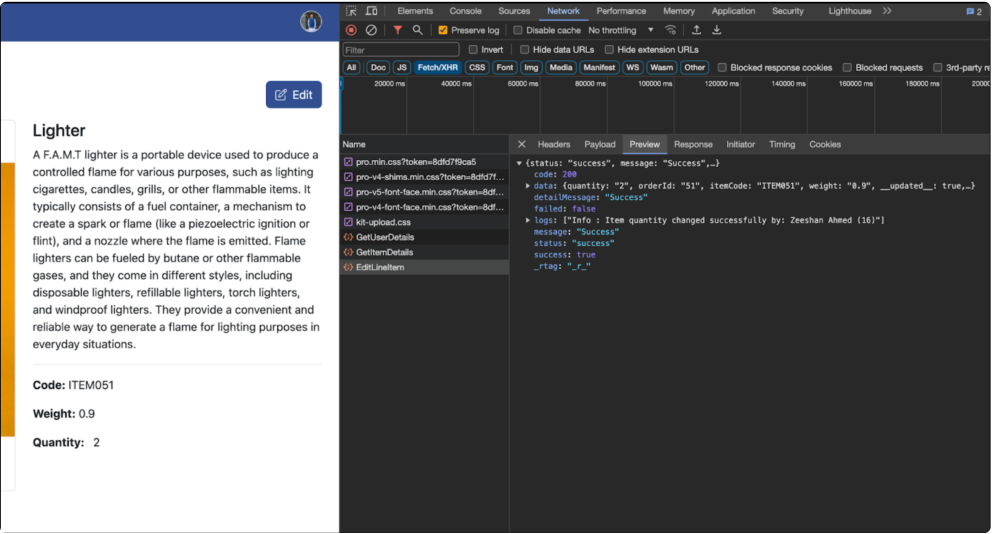
Save Button Preview
Update Record Code Snippet
Edit items list() {
   let body = {
     line itemid: this.itemId.toString(),
     quantity: this.quantity,
   };
   this.data service.Edit item(body).subscribe({
     next: (result: any) => {
       console.log("Result: ", result);
       if (result.status === "success") {
         this.items = {
           quantity: result.data.quantity,
           item code: result.data.item code,
           weight: result.data.weight,
           picture: result.data.picture,
           item name: result.data.item name,
           item description: result.data.item description,
         };
         this.modal service.dismiss all()
         this.display alert message('Item Edit successfully!', 'success',
'success');
       } else {
         console.error("API Error: ", result.message);
       }
     },
     error: (error) => {
       console.error("ERROR: ", error);
     },
     complete: () => { },
   });
 }
Code Description
This TypeScript function, Edit items list, appears to be a method for editing an ' ' item s details through a data service. Here s a breakdown of its functionality:
Request Body Preparation
- Creates a body object containing line itemid and quantity based on the values of this.itemId and this.quantity.
API Request
Calls the edit item method of this.data service to edit the item using the provided body.
Subscribes to the observable returned by the edit item method.
Response Handling
In the next callback:
Logs the result to the console using console.log.
Checks if the response status is "success."
If successful
Updates the local this.items with data from the response.
Dismisses any open modals using this.modal service.dismiss all().
Displays a success alert message using this.display alert message.
If the response status is not "success," log san api error message to the console.
Error Handling
In the error callback:
- Logs the error to the console using console.error.