Trillo Workbench Guide
Introduction
This document describes briefly what is Trillo Workbench and how to build an application using Trillo Workbench.
Trillo Workbench
- Trillo Workbench is a low code platform that helps you build applications for the cloud by writing less code.
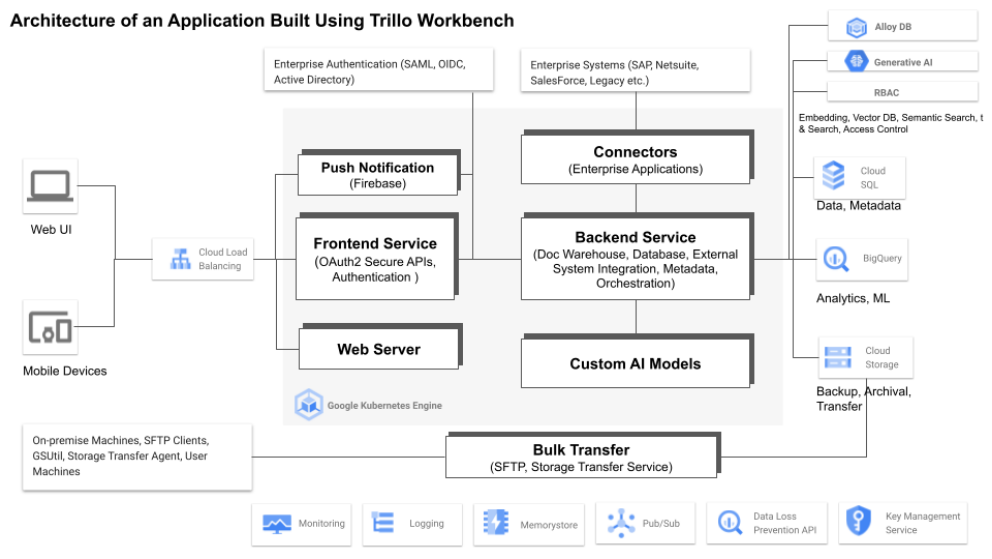
The Trillo Workbench platform consists of micro services that run on the top of Ku bernet es Engine. It uses several cloud services to make up a complete web application.
Trillo Workbench UI
A UI lets developers input and edit metadata and code For example, in order to add a new table, a user can specify table metadata (columns, types of each column, primary key, etc.).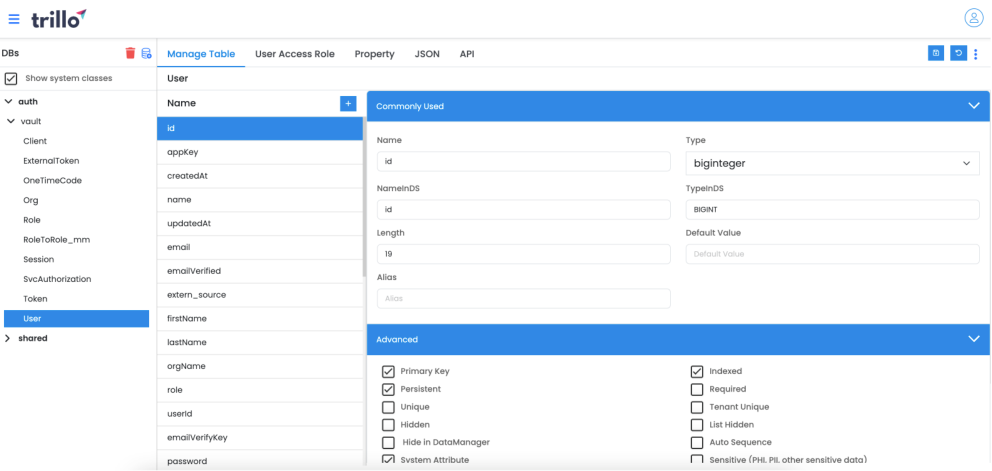
Trillo Workbench UI
Development Workflow
Steps for building an application using Trillo Workbench is shown below. Trillo Workbench exposes application functions and data as a service.
Assumptions
Assumes that you have requirements, specifications, and design documents of your application available (informal or formal).
Assumes that you have access to trillo workbench UI.
Access to an ide or code editor will be very useful. You need an ide for debugging by stepping through the source code.
Steps
•Data model
Use the default database of trillo workbench. Or add a database that is accessible by the workbench (more about it later).
Add tables and/or introspect tables from an existing database.
Edit tables and attribute metadata.
•Domain metadata
- Specify domain metadata file as json - these are json files that contain configuration or metadata used in a function later.
•Settings
Add external api credentials, external authentication systems specs., public key of private/public key pairs.
Link git hub account (done by admin once).
•Functions
Write a function/business logic code using the trillo workbench editor or an IDE.
Debug code using an ide.
•Workflows
Workflows are functions.
They are mentioned briefly to emphasize that they can run as a background task with their own logs accessible from history.
Workflows can be scheduled.
•Access control
Developers can add or update the user roles list.
The actual access control rules are specified by the application users and -
covered in the Role Based Access Control Chapter.
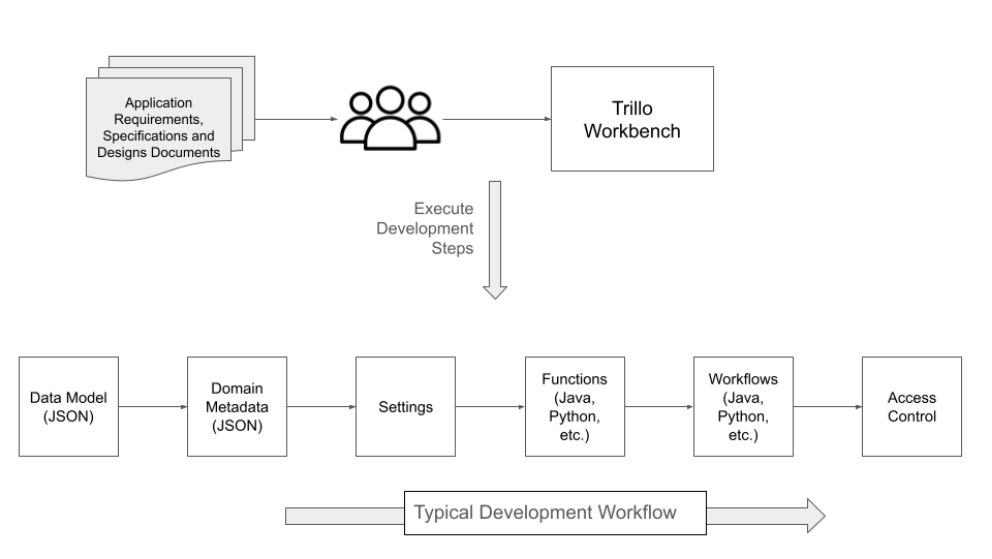
A typical workflow of building an application using Trillo Workbench
Using Trillo Workbench APIs
In previous chapter we saw an introduction of Trillo Workbench. This chapter introduces how to use Trillo Workbench APIs.
Using Trillo Workbench as a service (restful) is a two step process.
Obtaining access token.
Invoking API - by passing access token (bearer) as Authorization header.
Obtaining Access Token
Trillo Workbench uses a token obtained using login or OAuth2 credentials. These options are described below in detail.
Obtaining access token during login
A user's application such as web or mobile UI obtains access token during login (authentication flow). During this process the user establishes own identity. Trillo Workbench supports following options - 1) Trillo Workbench acts an identity provider, 2) Trillo Workbench uses external identity provider through OIDC to acquire an access token.
Trillo Workbench as a Identity Provider
- Trillo Workbench has a built in authentication. In this scenario, WB acts as a service provider and authentication service. This is suitable when an enterprise identity services such as Active Directory, Okta, One login are not available. This may also be useful during early development of an application.
The following example shows how to use Trillo Workbench API to get the authentication token.
Endpoint:
POST /_pre auth svc/user/authenticate
Headers:
'Content-Type':'application/json'
Body:
{
  "userId": "user@example.com",
  "password": ""
}
Response:
{
  "access_token":"",
  "token_type": "bearer",
  "expires_in":3600,
  "refresh_token":"",
  "scope": "comma separated list of roles"
}
External Service as an Identity Provider
Trillo Workbench supports integration with OIDC compliant identity providers such as Okta, One login, Active Directory, Google Cloud Identity, etc. It uses authorization code grant.
See a chapter on OpenID Connect (OIDC) for Identity below. It discusses:
How to configure information of the external identity provider in Trillo Workbench.
API used by the client program to initiate authorization grant flow.
An API used to exchange nonce for the access token (between client and Trillo Workbench, for reference API path is /_oauth2/nonce login).
In future, Trillo Workbench will support SAML for external identity integration. Contact us for SAML support. It is in our product roadmap. We can accelerate if your use case depends on it.
Obtaining access token using server to server communication
The previous section describes the process where a client obtains an access token from the Trillo Workbench. This section describes the process when another server can obtain access token from the Trillo Workbench. Trillo Workbench supports following OAuth2 grants for server to server authorization.
Client credentials grant
Password grant
In order to use either of grants, you need to generate credentials using Trillo Workbench UI. See the section Settings > API Credentials for more details. Once you acquire the credentials, use the following APIs to obtain access token for API calls.
Client credential grant
The following code shows an example of the client credentials grant. This grant is less secure compared to authorization code grant discussed above. It is generally preferred when two applications are trusted, preferably within the same firewall or the data is very sensitive.
Endpoint:
POST /authds/token
Headers:
'Content-Type': 'application/x-www-form-urlencoded'
'Authorization': 'Bearer  '
'x-app-name': 'main'
'x-org-name': 'cloud'
Form Data:
'grant_type=client_credentials&client_id=&client_secret=<>'
Response:
{
  "token_type": "bearer",
  "access_token": "token",
  "scope": "service",
  "tenant id": "-1",
  "expires_in": timestamp
}
Password grant
The following code shows an example of the password grant. This grant is equivalent to the client credentials grant except that it provides for resource owner credentials (username, password). Since it is unlikely that the client application will have access to the actual password of the user, these parameters do not have more significance than another set of credentials.
Endpoint:
POST /authds/token
Headers:
'Content-Type':'application/json'
'Authorization': 'Bearer  '
'x-app-name': 'main'
'x-org-name': 'cloud'
Body:
{
  "grant_type": "password",
  "client_id": "",
  "client_secret": "",
  "username": "user@example.com",
  "password": ""
}
Response:
{
  ... same format as the example above ...
}
Invoking API
Once an access token is obtained using one of the methods described in the previous section, a client can exercise APIs of Trillo Workbench by passing access token in the header. The following is an example of a Trillo Workbench API, to retrieve a signed URL.
End-point:
POST /folders vc/cloud storage/folder/reti eve signed url
Headers:
The following headers are added to all Trillo Workbench APIs. "Authorization" header is required for all APIs except APIs discussed here (to obtain access tokens).
'Authorization':'Bearer ' + ',
   "subFolder":  "",
   “content type” :,
   “fileName” : “,
   “method”: “PUT”
}
The parameter “method”: “PUT” above is a parameter to the signed URL.
It does not imply an HTTP method. It instructs Google Cloud Storage
service
to return a signed URL, which can be used for upload.
Response:
{
    “code”: 200,
    “data: {
       “signed url” : “value of signed URL”
    }
}
Data Service
Using Trillo Workbench, you can build a data service for new or existing databases using a model driven approach i.e. you define data model as JSON files using a UI (or edit the JSON directly).
Architecture
The following diagram shows how you can create or discover database schemas using UI and expose them as APIs.
Enter metadata of new tables or edit metadata of existing tables. Workbench can discover tables of an existing database (i.e. introspect). The meta attributes of each artifact such as database, schemas, tables, columns, etc. are discussed below.
Metadata is saved as JSON in a file and also in the Trillo database. Trillo Workbench transparently archives old versions.
If you add/ change metadata of a table, Trillo Workbench can create/migrate tables in the database.
Using metadata, Trillo Workbench publishes APIs for each table. It publishes APIs to create, update, batch updates, delete, list, paginate through records, etc. It can also publish complex queries as APIs.
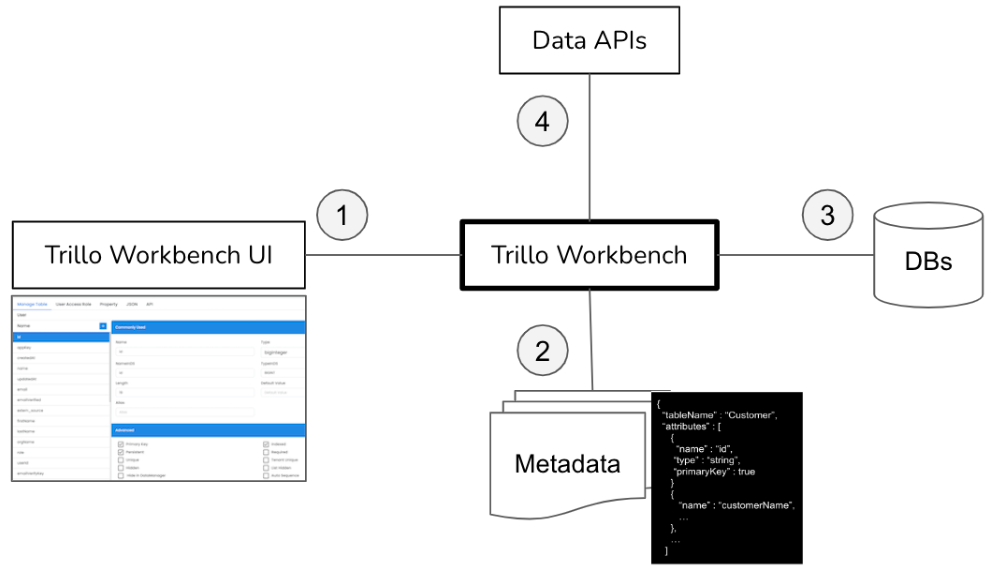
Data Service (Metadata to APIs)
Terminology
Trillo data layer is designed to be generic and independent of the type of database such as relational, document, graph, etc. Therefore, APIs use generic terms from UML (Unified Modelling Language). The following table shows terms that may be used interchangeably.
| Similar Terms | Concept |
|---|---|
| data source, (dsName for short in API) | Represents a database.Data source's nameis logical and used in APIs.It can be different from data source name. |
| table,class,collection(className,tableName,clsName,etc.for short). | Represents a structure with attributes.In a relational DB,it corresponds to a table. |
| column,attribute | A column of a table,an attribute of a class,a property of an object,etc. |
| association,relation | Relationship between tables or association between classes. |
| object,record | An instance of a class or a database record. |
Data Source
The data source is same as a database. Its name is the logical name of the database to be used in API. It is a valid programming language identifier and permits no white space.
- For example, a finance database may have a name as, "Finance DB" or "Finance DB". In Trillo Workbench it may be represented by a data source, named 'Finance db" or "Finane_DB". Since the data source name should be a valid identifier, its name is different from the database (which is not a valid identifier). A data source name may be the same as its db name if the db name is a valid identifier.
Schema
If the database type is Microsoft SQL or Postgres, Trillo Workbench permits the creation of schemas under data source. Its logical name should be a valid identifier. Like the data source, the logical name may be different than the name in the database.
Class
A class corresponds to a table. It is created under a data source (MySQL) or schema (Postgres, Microsoft SQL). Its logical name is a valid identifier. Like the data source, the logical name may be different than the name in the database.
Similarly, the term attribute is used for a column.
Fully Qualified Names
Trillo Workbench API uses the name of the data source, schema, and class name in APIs. Since two different databases can have a table with the same name. The class name needs to be a fully qualified name in APIs. A fully qualified class name is given by dot (.) notation as follows.
...
appName: application name. For the default database of the workbench, itis either "shared" or "auth". It is a logical folder to indicate the source application to which the database originally belongs.
dsName: it is the data source name.
schemaName: Db schema (required in case of postgres, MySQL).
className: classname.
Example 1: shared.finance.finance schema.Invoice: Invoice table of finance schema of the finance data source. (Postgres and Microsoft SQL).
Example 2: shared.common.Audit log: Audit log table of common data source (MySql)
The following 3 APIs can be used to extract the application name, data source name, and class name.
BaseApi.app(qualified classname): returns appname.
BaseApi.ds(qualified classname): returns data source/database name.
BaseApi.cls(qualified classname): return classname. A class name is always returned with the schema name with a dot in between. It means cls("shared.finance db.finance schema.Invoice") will return " finance schema.Invoice".
Default Database
Trillo Workbench by default provisions Cloud SQL in Google Cloud (MySQL). It uses it for storing data, and metadata. It can also used for the new tables. By default, it creates the following two databases:
cloud_vault (data source name - vault): this is used as the user, and tenant store. Its tables can be customized (while retaining existing attributes without '
change). You can t add new tables to this database using the workbench UI. The corresponding data source name is vault.
cloud_common (data source name - common): this is used for several system tables that can be configured (while retaining a few important attributes as they are). Any new table specified in the application is created inside this database. The corresponding data source name is common.
Adding New Tables
- Trillo Workbench UI uses the term class as an alias for a table. Similarly, the term attribute is used for a column. The reason for using class and attribute it to have generic terms for other databases such as MongoDB that may be made available through Workbench.
Using UI, you can add new tables, edit existing tables, or remove them.
The UI is very intuitive.
It provides a grid to create columns of tables, and an extended pane to specify the detailed meta property of each column (discussed below).
You can also use the json editor to edit the file.
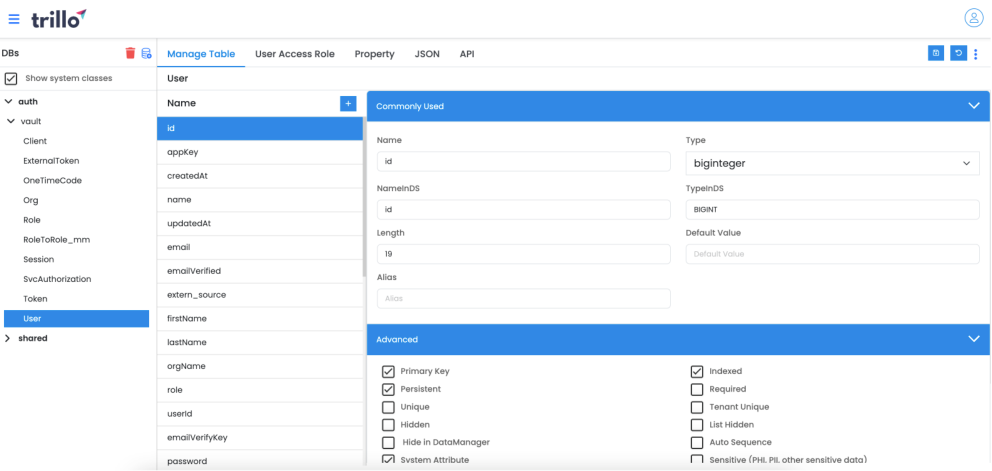
Default Attributes of a Table
When a table is created the following attributes (columns) are automatically added to the initial JSON. These attributes are optional. They can be renamed. But if you are building a new table and have not other reason, we recommend to keep them. They have been proven to work well. If the name is kept then their values would be set automatically by the platform.
| Attribute Name | Description |
|---|---|
| id | By default,object identifier or primary key.An attribute flagged using"primary key" :true is treated as primary key for the data service.You can rename it or flag any other attributes as"primary key".The primary keytype should be biginteger(long)or string. |
| If the primary key type is biginteger and the value of tag"primary key generator"is set to"serial",the primary key value will be automatically generated sequentially. | |
| created at | Timestamp of object creation. |
| updated at | Timestamp of last time the object was updated. |
| deleted | If a record is deleted,this switch is set totrue.By default,the workbench logically deletes a record.Using a parameter in theAPI,a record can be deleted permanently. |
| deleted at | Timestamp of object's deletion. |
The corresponding JSON is shown below (for an example class called Customer).
{
  "name" : "Customer",
  "attributes" : [
    {
      "name" : "id",
      "type" : "biginteger",
      "system attr" : true,
      "primary key" : true
    },
    {
      "name" : "created at",
      "type" : "biginteger",
      "system attr" : true
    },
    {
      "name" : "updated at",
      "type" : "biginteger",
      "system attr" : true
    },
    {
      "name" : "deleted",
      "type" : "boolean",
      "system attr" : true
    },
    {
      "name" : "deleted at",
      "type" : "biginteger",
      "system attr" : true
    }
  ],
  "displayName" : "Customer",
  "name inds" : "Customer_tbl",
  "table create able" : true,
  "primary key generator" : "serial"
}
More Operations Available Via UI
There are several commonly used operations are available via UI.
Add a new database by specifying its URL and credentials.
Check database connection.
Add a new table to a database and specify its metadata.
Edit an existing table's metadata.
Introspect a database and list its tables. Selectively save metadata of discovered tables.
Update a table's schema in the database from metadata.
Describe a table to view its metadata (schema) in the database.
Database as APIs
Operations on databases, schemas, and tables are published as APIs. Database APIs take, db name, schema name, or class name (qualified table name) as parameters. For example, to get a record by "id" (identifier or primary key), class name parameter will be default.
A complete list of APIs is given in API documents: a) Trillo Java SDK, or b) Trillo Restful API.
An example API is discussed for each case, SDK or restful.
SDK Toolkit API Example
The platform makes all database tables and their metadata available as an SDK toolkit for use inside a serverless function.
An example API to retrieve an object is shown below (for Java, Python). These APIs are available under the java-class/ python-class DSApi.
Java
public static Object get(String className, String id)
Python
def get(className, id)
parameters:
className: fully qualified name of the table.
id: primary key (identifier of the record)
returns:
a. If the record is found then it returns a Map (HashMap)/Dict.
b. If there is an error, it returns the Result object.
Result object has the following properties:
status: success | failed | unknown (in this case failed)
message: the error message
code: HTTP code
data: Any application-specific object that is returned to the invoker
(it is
      generally null if there is an error).
See the document Trillo Serverless Function SDK (APIs) for more details.
Restful APIs
The platform also automatically publishes restful API for each table. You can view it by selecting the API Tab (as shown in the above screenshot).
Each restful API has the following format:
ds//
In the above URL, the meaning of each part is explained below:
ds: it means that this is an API for the data service.
: it is the name of the operation such as 'save',
             'get', 'page', etc.
: fully qualified name of the table.
 Example:
  /ds/get/shared.cloud_vault.User
See the document Trillo Workbench Restful API for more details.
Testing APIs
By selecting the API tab, you can exercise an API. For example, you can add a few records using save API and retrieve them using get API. See the diagram below.
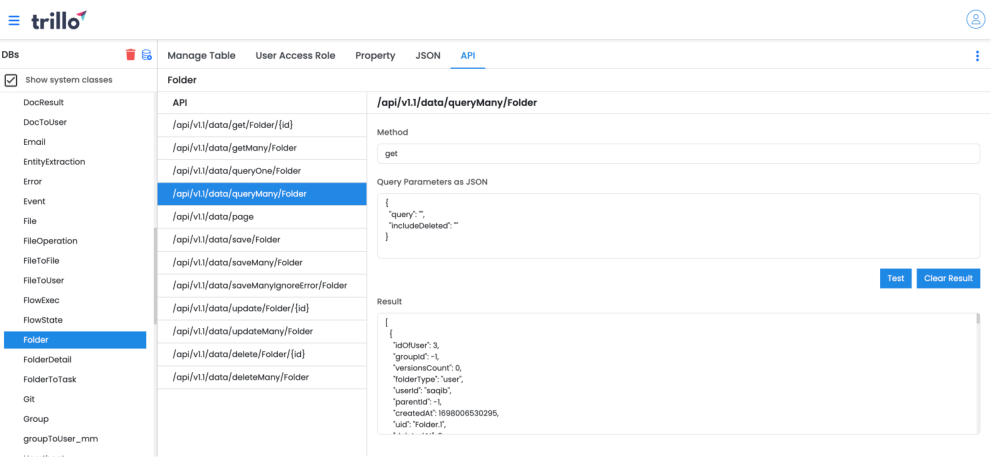
API tab for its specification and testing
SQL Queries as API
Complex SQL queries can be published as APIs. Any parameters that need to be substituted are specified by enclosing within 3 curly braces as {{{parameter}}}.
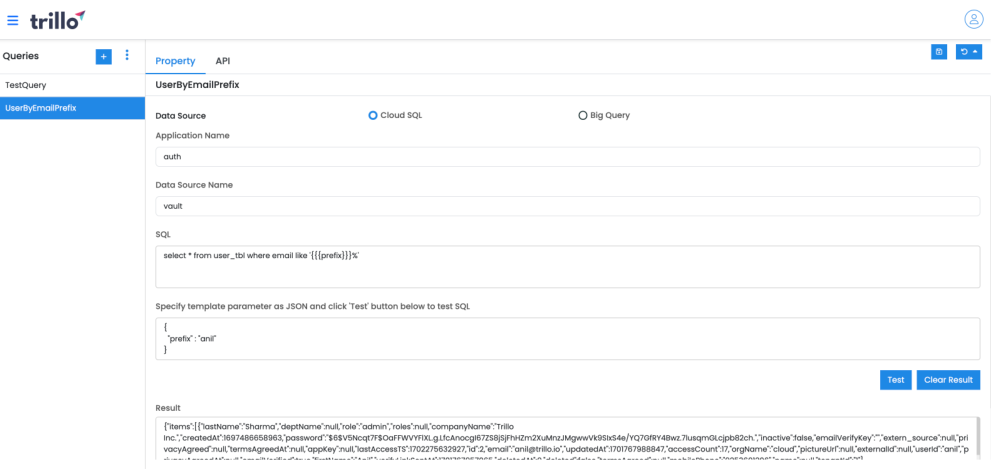
An example SQL template ('User by email prefix') is shown below:
select * from cloud_vault.user_tbl as u where u.email like
'{{{prefix}}}%'
------
Here, the prefix is a parameter.
when this template is invoked as API by passing the following
parameters
as JSON:
{
   "prefix": "a"
}
The retful version of this is shown below.
The URL includes the template name ("User by email prefix") in the path. The restful API is as follows:
URL: /ds/query/User by email prefix
Method: POST (although the API does not update the data, in order to
keep
it readable, Trillo uses the POST method).
The complete POST body will be a JSON as follows.
{
    "prefix": "an"
}
Customize System Table
Trillo Workbench provides several tables to support its out-of-the-box functionality. For example, there are tables for user management, task management, audit and log messages, files, folders, etc. There may be instances when you want to extend these tables with additional columns. For example, you may need to add columns to the user's table. Trillo Workbench supports such customization. You will notice a red color button Customize on the toolbar for system tables. Once a table is customized, it is no longer treated as a system table.
We recommend that you don't delete or change the type of existing columns of a system table. It may break the system. You can change the length of the string type attributes. You can change other meta properties such as validation expression, indexed or not, unique or not, etc.
What you Achieved
Create a complete data model for your application using UI.
Understand and test apis published by trillo workbench.
Write complex queries and make them available as apis.
Serverless Functions for Business Logic
This section discusses how to implement business behavior using serverless functions.
What is a Trillo Serverless Function?
Trillo serverless function implements some business logic and it can be invoked using restful API.
A serverless function is automatically published as an API.
Create a Function
Creating a serverless function using Trillo Workbench is simple. Simply select the Functions menu options in the left navigation. Select + New Function.
Currently, Trillo Workbench supports only Java and Python languages.
Say, you create a function by giving it a name as My function. The function will be created with the following stubbed code.
Java
import java.util.Map;
import com.collage r.trillo.util.Api;
import com.collage r.trillo.util.Serverless function;
public class my function extends serverless function{
@Api(http method="post")
public object post method change me(Map parameters)
{
return parameters;
}
}
In the above code, My function is the name of the function. It has a method 'post method change me'. This serves as an API endpoint. It is of type HTTP post due to the annotation above the method. Note that the function
implements the Serverless function class (which implements Trillo function). More about it below.
THe URL that will target this function and its method would be as follows:
/ds/function/shared/My function/post method change me
where,
ds/function indicates the service of Trillo Workbench (data dervice and its function module).
shared is package (folder) containing the function.
My function is the name of the function that is the target of URL.
post method change me is the method that will be invoked due to API call.
A function can support more than one endpoint (callable methods as API). The names of the methods can be anything (generally reflect the purpose). Say the above My function needs to support the following 4 methods:
save value
update value
getValue
4. remove overheads
The refined My function will be as follows.
import java.util.Map;
import com.collage r.trillo.util.Api;
import com.collage r.trillo.util.Serverless function;
public class My function extends Serverless function {
  @Api(http method="post")
  public Object save value(Map parameters) {
    return parameters;
  }
  @Api(http method="put")
  public Object update value(Map parameters) {
    return parameters;
  }
  @Api(http method="get")
  public Object getValue(Map parameters) {
    return parameters;
  }
  @Api(http method="delete")
  public Object remove overheads(Map parameters) {
    return parameters;
  }
}
In this case, the function will publish 4 endpoints.
a post endpoint as /ds/function/shared/My function/save value.
a put endpoint as /ds/function/shared/My function/update value.
a get endpoint as /ds/function/shared/My function/getValue.
a delete endpoint as /ds/function/shared/My function/remove overheads.
Python
def handle (params):
  return params
In the above code, My function is the name of the function. It has a method 'handle'. This serves as an API endpoint. It is of type HTTP post due to the annotation above the method. Note that the function implements the Serverless function class (which implements Trillo function). More about it below.
The URL that will target this function and its method would be as follows:
/ds/function/shared/My function/handle
where,
ds/function indicates the service of Trillo Workbench (data service and its function module).
shared is package (folder) containing the function.
My function is the name of the function that is the target of URL.
handle is the method that will be invoked due to API call.
Serverless function (Base class of Trillo Function)
Serverless function is the base class of Trillo functions class. This encapsulates runtime context provides access to its properties such as user identity, task id, state map. All These properties are available to any subclass using access or methods.
| Parameter Name | Description |
|---|---|
| is of user | Internal identifier of the current user(onwhose behalf the call is made,it may be asystem user). |
| userId | User id(assigned to the user when it was created,also login userId) |
| first name | First name of the user |
| last name | Last name of the user. |
| Email of the user. | |
| role | Roles assigned to the user. |
| email verified | A flag indicating if the user's email has been verified or not. |
| tenant id | If the deployment is a multi-tenant then it returns the id of the tenant. |
| tenant name | If the deployment is a multi-tenant then it returns the name of the tenant. |
| execution id | If the function is running as a background job then it gives the identifier which is usedto track the task in the database(it is internal is you can ignore it barring an advanced use-case). |
| task name | If the function is running as a background job then it gives the name of the task.It maybe useful for logging. |
| state map | An arbitrary java.util.map/Dict can be usedto store some state information.This is useful when a function calls another function.This map is passed back to the calling function with any updates made bythe caller function.This is useful,for example,for building a lookup cache in achain of function. |
| All Trillo serverless function runs within a transaction boundary. By default, the transaction is rolled back if the function invocation returns a Result object with an error. Since a function may run a few steps that may be committed irrespective of the final result, Trillo SDK provides an API to commit the transaction. After a transaction is committed, a new transaction is created. |
Sample Hello World Function
The sample code with a method called "say hello" as the endpoint:
Java @Api(http method="get") private Object say hello(Map parameters) { String hello = "Hello from, " + get userid(); if (parameters.containsKey("youSaid")) { hello += "\n You said, " + parameters.get("youSaid"); } return hello; }
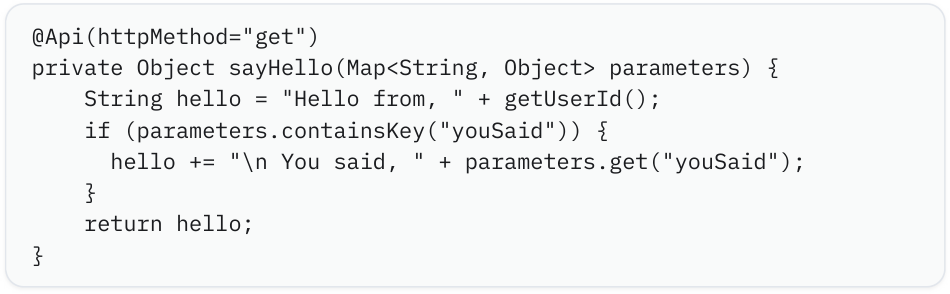
@Api(http method="get")private Object say hello(Map parameters) { String hello = "Hello from, " + get userid(); if (parameters.containsKey("youSaid")) { hello += "\n You said, " + parameters.get("youSaid"); } return hello;}
Python def handle(parameters): hello = "Hello from, " + get userid() if "youSaid" in parameters: hello += "\n You said, " + parameters["youSaid"] return hello
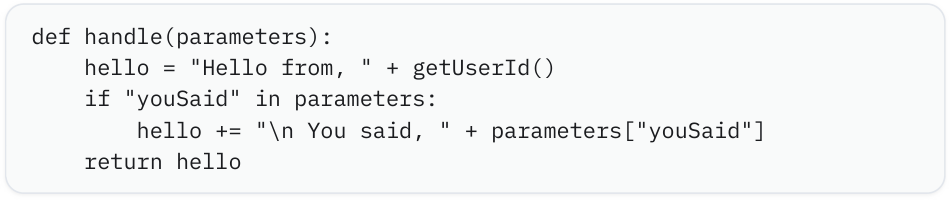
def handle(parameters): hello = "Hello from, " + get userid() if "youSaid" in parameters: hello += "\n You said, " + parameters["youSaid"] return hello
Notice that this method simply echos "Hello from ". The current user id is accessed from the runtime context. The function adds the parameter "youSaid" if it is passed.
Test Function
The sample code with a method called "say hello" as the endpoint:
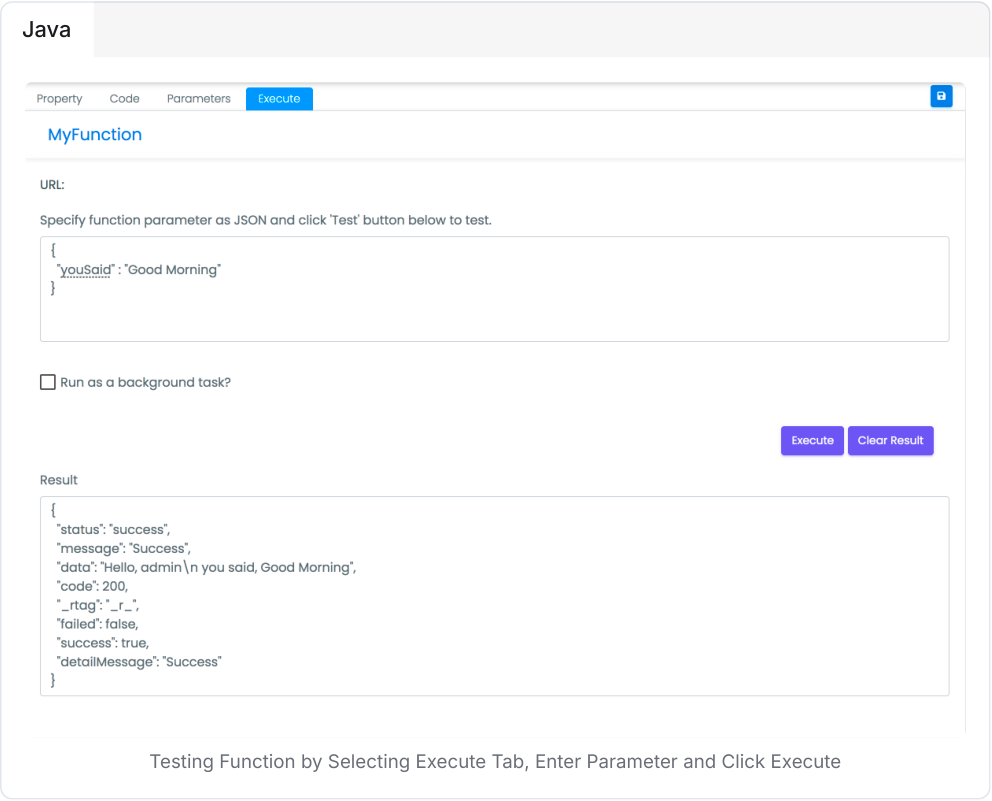
Java testing Function by Selecting Execute Tab, Enter Parameter and Click Execute
Result
Notice in the above figure, that the actual result is wrapped inside an object and passed as its data attribute. The wrapper class is Result (a Java class/ python class). It contains the actual result in the data attribute. It has other attributes for status, error message, detailed message, etc. A special attribute called _rtag is included with a special value r to assist a JavaScript client in identifying if the returned value is an instance of Result.
Log Messages In a Function
The serverless function can use logging APIs available in Trillo SDK. See the modified example code below:
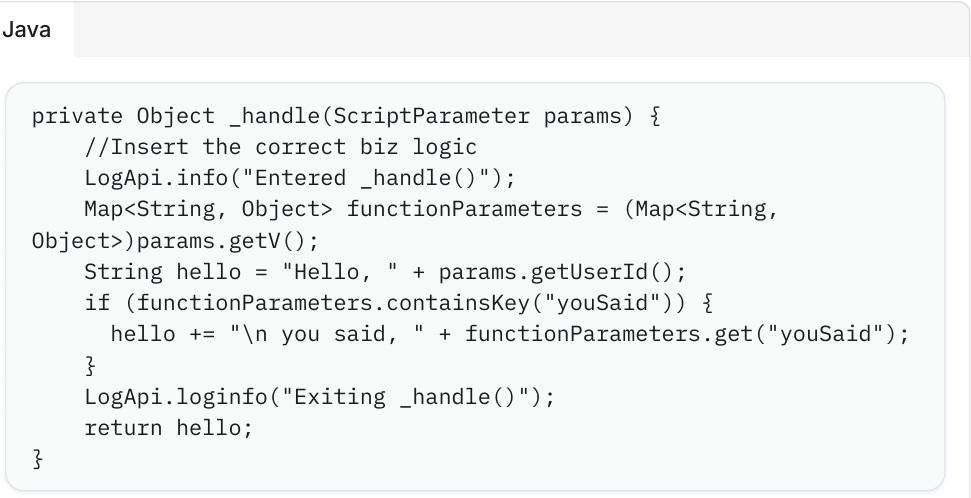
Java private Object _handle(Script parameter params) { //Insert the correct biz logic LogApi.info("Entered _handle()"); Map function parameters = (Map object>)params.getV(); String hello = "Hello, " + params.get userid(); if (function parameters.containsKey("youSaid")) { hello += "\n you said, " + function parameters.get("youSaid"); } LogApi.loginfo("Exiting _handle()"); return hello;}
Audit Logs
Audit logs are similar to the log messages discussed above with the distinction that these calls also log messages in the database. This is useful for auditing important business events. It is also useful to track, troubleshoot, and monitor the status of long-running jobs.
The following code shows how to use logging vs audit logs.
Java
Tapix.audit info("action name", "Entered _handle()");    // this is a
log
Tapix.audit info("action name", "Entered _handle()"); // this is
audit log
"action name" can be any text. It is generally the action that caused this log, such as "Bucket file write". It is used to filter logs.
Samples
Refer to Trillo Workbench Tutorial for sample functions.
Trillo SDK (APIs) in a Function
Trillo SDK provides several APIs to simplify writing a serverless function code. These APIs include:
Database access
Google cloud service
External restful service
CVS, Json file processing
...
...
many more
Refer to Trillo Workbench Java SDK for a detailed list of all APIs.
Not only Trillo SDK functions but several open-source libraries that are integrated with the Trillo runtime, become available for use in your serverless functions (such as Apache Commons for example).
Version 1 Serverless Function
Trillo function Version 1 (V1) supported only one endpoint per function, landing into - a default method called "handle". They were always invoked using HTTP Post irrespective of API semantics. An example of V1 is shown below.
Java
import com.collage r.trillo.pojo.Result;
import com.collage r.trillo.pojo.Script parameter;
import com.collage r.trillo.util.LogApi;
import com.collage r.trillo.util.Trillo function;
import java.util.Map;
public class My function implements Trillo function {
  public Object handle(Script parameter script parameter) {
    try {
      // actual implementation inside _handle()
      return _handle(script parameter);
    } catch (Exception e) {
      LogApi.error("Failed", e);
      return Result.get failed result(e.get message());
    }
  }
  @Suppress warnings("unchecked")
  private Object _handle(Script parameter script parameter) {
    Map parameters = (Map)script parameter.getV();
    return parameters;
  }
}
Methods of Version 1 Function
A V1 serverless functions generally have the following two methods. The first, method called 'handle', is the default method and always required. The second method is optional. It could have been renamed or merged into first one.
handle: This is the entry point of the function that is invoked by the runtime by passing Script parameter (see below).
_handle: A private method that is invoked by the method handle.
The 'handle' method catches all exceptions, unwraps all error messages, and passes as a Result object.
You should implement your code in the _handle (you can rename it). T
he endpoint of published by the function is /ds/function/My function.
Script parameter
Script paramter provides equivalent functionality as provided by the superclass (Serverless function) of Version 2 Trillo functions. It provides the same access or methods as provided by the Serverless function. In addition to it, it provides a method "getV" to retrieve the parameter passed to the function.
Domain Metadata
This section discusses how to use domain metadata. i.e. specific to the application. Domain metadata is useful for writing easily configurable applications.
Domain metadata file stores configuration settings and parameters external to the source code, enabling easy modification and customization of an application without code changes.
This makes it easier to adapt the application to different environments such as development, testing, production, etc.
For security reasons, sensitive information such as passwords, API keys, and -
credentials should not be hard coded in the functions. Externalizing these values into Domain metadata files allows for more secure handling of sensitive data.
Trillo workbench does not enforce any sh cema or type. You can use xml, JSON, text, HTML etc. files as appropriate.
Example:
Create a file under metadata file > files.
Name the file - config dev.json(fordev), config qa.json(forQA), config.json (for PROD).
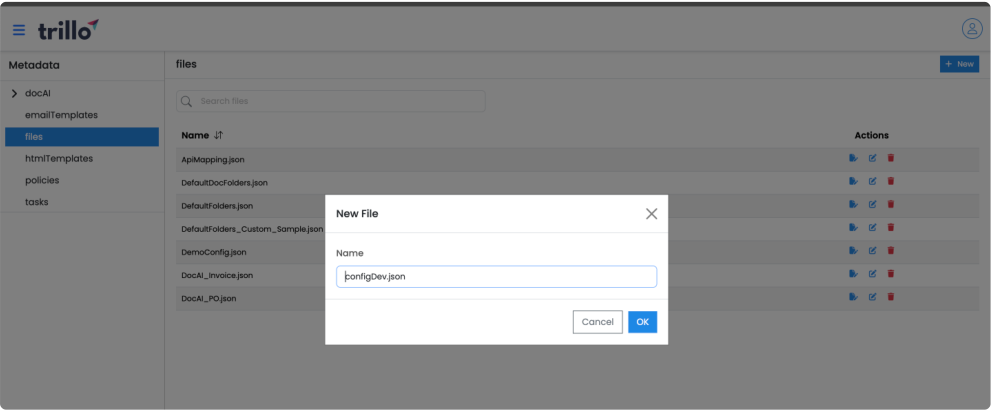
Add properties in the config dev.json file and click on save.
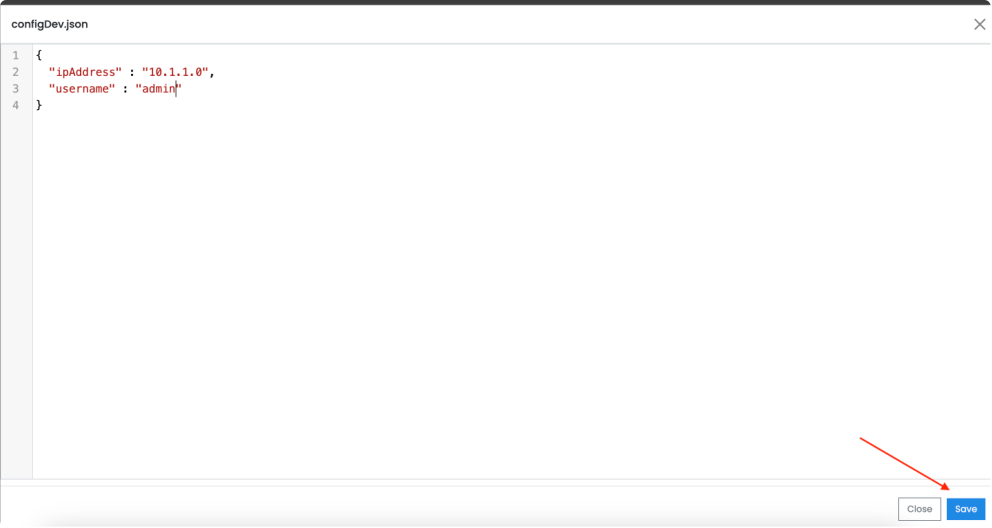
We can reference the config file from any functions using the below code -
String config file = parameters.get("config file")
Map configs =
  MetaApi.get domain file as map("shared/domain meta/files/" + config file);
File Management Service
Trillo Workbench provides a restful file management service and SFTP. In addition to it, it provides a complete application for files management including its UI.
Architecture
The following diagram shows file management related components of Trillo Workbench.
Trillo Workbench provides a restful service to upload, download files. It also provides APIs to delete, move, copy files and folders.
Trillo Workbench incorporates a SFTP server for file transfer.
Trillo Workbench database caches the folders and files hierarchy for logical views and high performance.
Access control rules (RBAC) are stored in the Trillo WOrkbench Database.
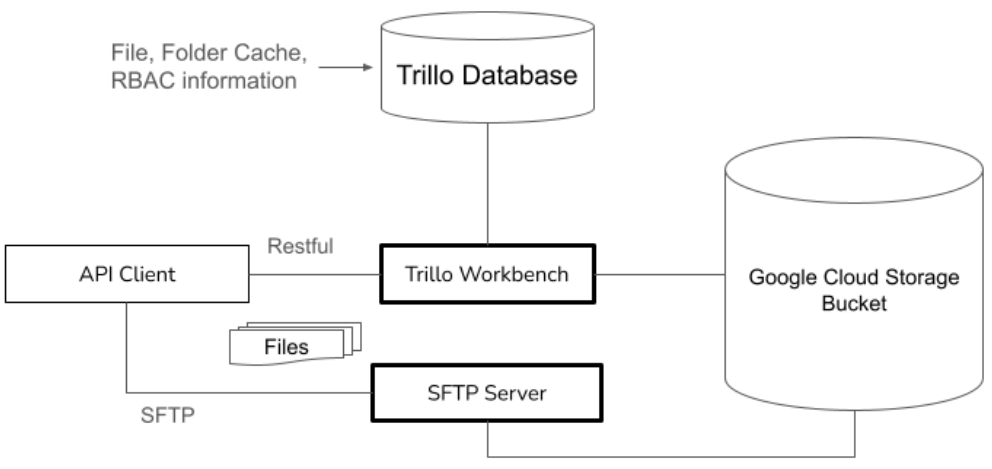
Trillo Workbench File Management Service
Trillo File Manager
Trillo File Manager is complete product, including UI, for managing files stored on the cloud storage buckets. It is a part of the Trillo Workbench, and also available as a standalone product. It is similar to DropBox or Box. It features:
Folders and files management using UI. A few examples are as follows:
Create folder hierarchy.
Upload one or more files.
Move, copy, delete, and rename files.
Versioning of files.
Sharing of files.
Download one or more files.
SFTP (secure using public/private key pairs).
Apis for file transfer and managing folders and files (move, delete, rename, copy, paste, etc.)
See the document Trillo File Manager Documentation for more details of the Trillo File Manager.
Folder Service APIs
The internal service that supports file management APIs is called Folder Service. This section discusses a few examples of its APIs.
File Upload APIs
Uploading a file to cloud storage bucket uses more than one APIs. The are listed in the order of the control flow. Each API assumes that access token is passed as Authorization header.
Retrieve Signed URL (for upload).
Upload File Using Signed URL - using multipart mime.
Save File Object - it creates a record for the uploaded file in the database (for caching and access control rules).
Example APIs for each of the above steps are shown below.
Retrieve Upload Signed URL
End-point:
POST /folders vc/cloud storage/folder/reti eve signed url
Body:
{
   “folder name” : ,
   "subFolder":  "",
   “content type” :,
   “fileName” : “,
   “method”: “PUT”
}
The parameter “method”: “PUT” instructs Cloud Storage Service to create
a signed url for uplaod.
Response:
{
    “code”: 200,
    “data: {
       “signed url” : “value of signed URL”
    }
}
Upload File Using Signed URL
End-point:
PUT
Header:
'Content-Type': 'multipart/form data; charset=UTF-8'
Body:
{
   actual file
}
Response:
Returns HTTP code 200 if successful. No body is returned.
Save File Object
This API creates a database record corresponding to the file.
End-point:
POST /folders vc/cloud storage/folder/save object
Body:
{
   “folder name” : ,
   "subFolder":  "",
   “content type” :,
   “fileName” : “,
   "provider": "cloud storage"
}
Response: It returns the file object created in the database as JSON. An example is shown below.
{
   "fileName":"Trill workbench-Database-Tabs.png",
   "folder name":"/users/test201/Home/tmp",
   ...
   "folder id":84,
   "size":79336,
   "content type":"image/png",
   "file type":"png",
   "id of user":3,
   "userId":"test201",
   ...
   "top folder id":82,
   "created at":1615795228850,
   ...
   "updated at":1615795228850,
   "versions count":0,
   "id":444
}
File Download API
A client obtains a signed URL to download a file from the bucket.
Retrieve Download Signed URL
Endpoint:
POST /folders vc/cloud storage/folder/reti eve signed url
Body:
{
   “folder name” : ,
   “content type” :,
   “fileName” : “,
   "fileId": "",
   “method”: “GET”
}
The parameter “method”: “GET” instructs Cloud Storage Service to create
a signed url for download.
Response:
{
    “code”: 200,
    “data: {
       “signed url”: “value of signed URL”
    }
}
Downloading FIle
A client such as browser can download the file using a signed URL.
Other APIs
We discussed file upload and download APIs above. They provide file transfer feature using HTTPs. In addition to these APIs, there are other APIs to perform operations on folders and files - such as rename, delete, copy, paste, delete, etc. Refer to APIs reference guide for the details of these APIs.
Doc Management Service
This chapter describes Trillo Workbench document service. It processes documents using document AI and generative AI for structured data extraction, semantic matching, summarization and Q & A.
Architecture
Trillo Doc AI is another Trillo product. It is built on the top of Trillo Workbench. It uses Doc Management Service APIs. Trillo Doc AI is described in a separate document. This chapter provides an overview of Doc Management Service, its component architecture (shown below) and document processing pipeline.
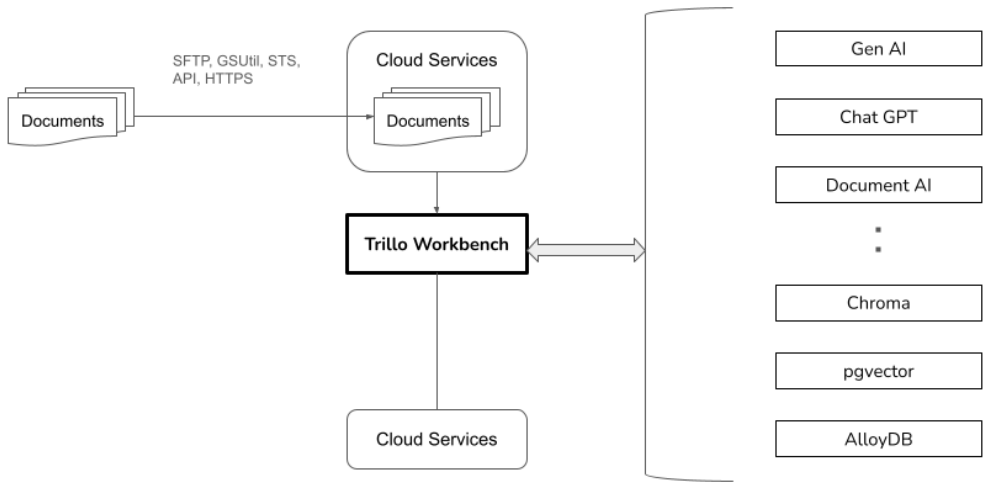
Trillo Document Management Service
Trillo Doc Service is built on the top Trillo Workbench like any other application using metadata for data models and serverless functions for API and workflows.
Using the service a workflow processes files available on the cloud storage buckets (the processing pipeline is described below). These files can be transferred from the source using multiple channels. One of the channel is SFTP which is provided by another Trillo product called Trillo File Manager.
Trillo Doc Service organizes files into logical folders. A file may appear in multiple folder hierarchy depending on the application needs.
A processing pipeline built using Doc Service, processes each file for extracting its content and structured data using PDF libraries, Document AI and Generative AI APIs.
It provides APIs to create embeddings and summaries of documents.
It provides APIs to store embedding in one of the several vector databases. Trillo Workbench integrates with several vectors databases such as, i) pg vector, ii) AlloyDB, iii) Chroma.
Doc Services implements access control (RBAC) on documents. RBAC is discussed in a separate chapter.
APIs of Doc Management Service
Doc Management Service APIs can be categorized into following APIs.
File Transfer APIs: Similar to File Management Service discussed in the previous chapter, it provides APIs to upload and download files.
Organize Folders and Files: Again, similar to File Management Service, it provides APIs to organize folders and files using operations such as copy, rename, move, delete, etc.
Classification: It provides APIs to classify documents if it is purchase order, invoice, article, medical transcripts, etc. It provides APIs to classify pages of a document.
Extraction: These APIs are built using Trillo functions. They extract content of file as text or structured data using libraries and other APIs such as, i) PDF libraries, ii) Google Document AI APIs, iii) Generative AI APIs.
Summarization: It provides APIs to summarize document pages.
Embedding: It provides APIs for generating vectors based on default or custom chunking.
Storage: Using Data Service APIs, it stores raw content, summaries into relational databases or Big query. It stores embedding into vector databases for semantic search.
Preview Image, Image Extraction, Thumbnail: It provides APIs using Trillo functions to generate preview or page, extract embedded images and generate thumbnails.
RBAC: An enterprise class RBAC (role, group, rule and attribute based) can be overlayed on the top of folder hierarchy. (This is under development).
Search and QA: It provides APIs for semantic search and Q&A.
These APIs are described in the following documents.
Trillo Workbench Restful APIs
Trillo Workbench SDK
API Playground - in addition to it, all APIs are available in the Trillo Workbench UI with documents. You can exercise APIs if its preconditions are met.
Document Processing Pipeline
The following diagram shows a document processing pipeline. Trillo Workbench can form the pipeline into multiple concurrent threads and nodes to process a large number of documents.
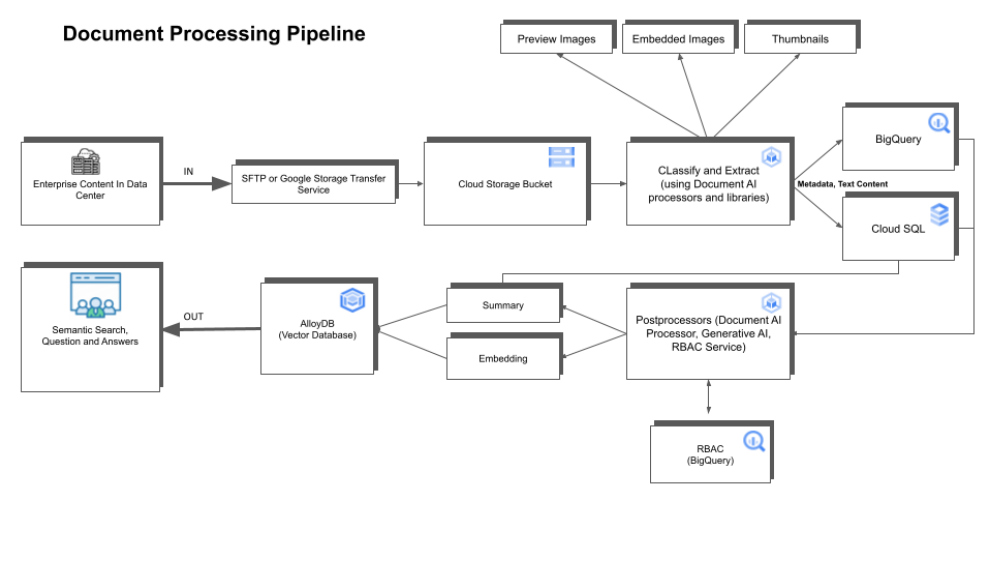
Document Processing Pipeline
Customization of Pipeline
Trillo Doc AI is implemented using metadata driven schemas and serverless functions. Therefore it is easy to customize. In an enterprise use case it is expected that this pipeline will have steps to integrate with enterprise application APIs and access control policies.
Scheduling a Backend Task
This section discusses how to create scheduler and use them to trigger backend task based on cron expression.
The scheduling allows the activation of a function or workflow at designated times or intervals. It provides the flexibility to set input parameters, if needed, for the function or workflow. Additionally, it offers the capability to start or stop the
scheduler. For creating a cron job, the instructions provided at the following link can be followed: https://www.free formatter.com/cron-expression-generator-quartz.html
Example:
- Navigate to the "Schedules" tab, click on the three dots, and choose the "New Schedule" option.
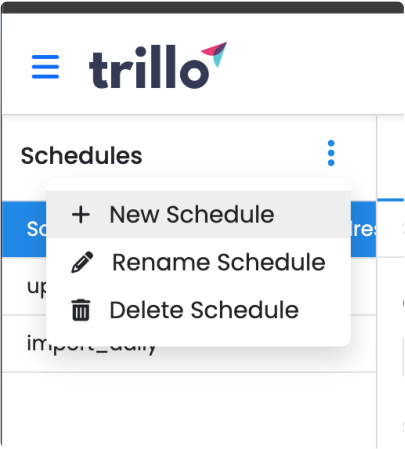
Enter the scheduler name and click "OK."
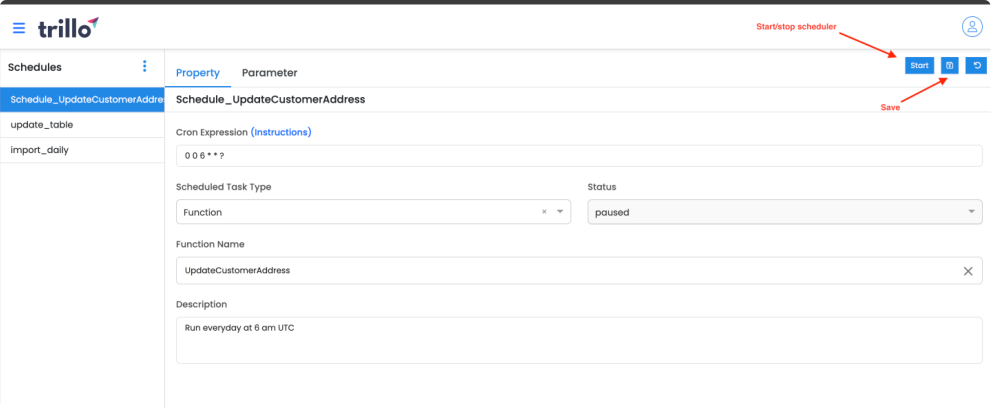
On the left side, choose the recently created scheduler. Provide the cron job, function/workflow name, and description.
After adding the details, click on the save icon located in the top right corner. Start the scheduler when you are ready.
The function specified in form is executed as per the cron expression by passing the specified parameters.
Task History
This section discusses how to work with task history User Interface (UI) page.
The task history page shows a list of tasks that have been completed/in progress/failed, along with their start date, duration, status, and other relevant information. The page also includes several features that allow users to easily manage and view their task history, including:
Filtering and sorting:Users can filter and sort the task list by a variety of criteria, such as task name, status, and completion date. This allows users to quickly find specific tasks or groups of tasks.
Searching:Users can search the task list by keyword to quickly find tasks that contain specific information.
Task details:Each task in the list includes a link to a page that provides more detailed information about the task, such as its inputs, outputs, and execution logs.
Task status:The task status icons provide a quick visual indication of the status of each task (e.g., completed, failed, or in progress).
Task messages:The task message column displays any messages that were generated during the task execution. This information can help troubleshoot problems or understand why a task failed.
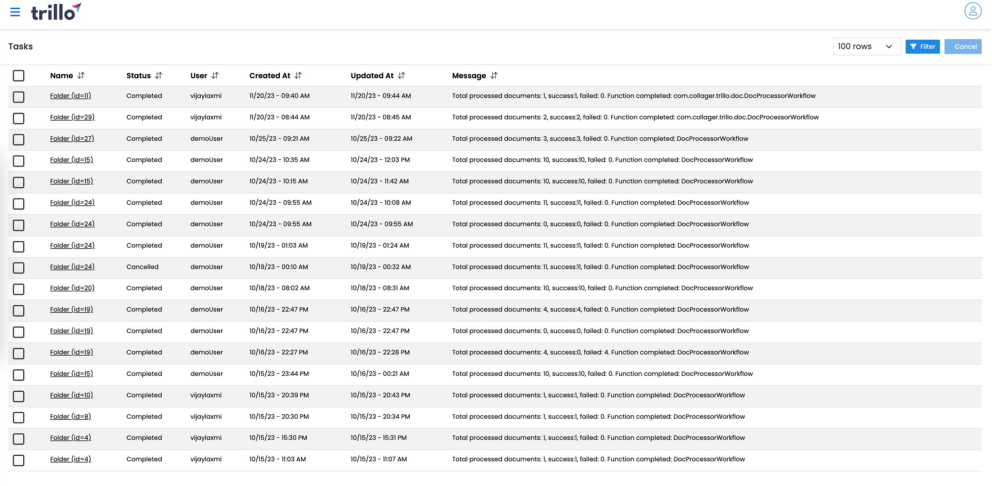
Task History User Interface Page
Audit Logs
This section discusses how to work with audit logs User Interface (UI) page.
The Audit log provides a comprehensive and informative view of the execution of a specific task. It makes it easy for users to find the information they need and troubleshoot problems. This is also useful for pulling audit reports such as who updated a certain record, any access controle rules violation, etc.
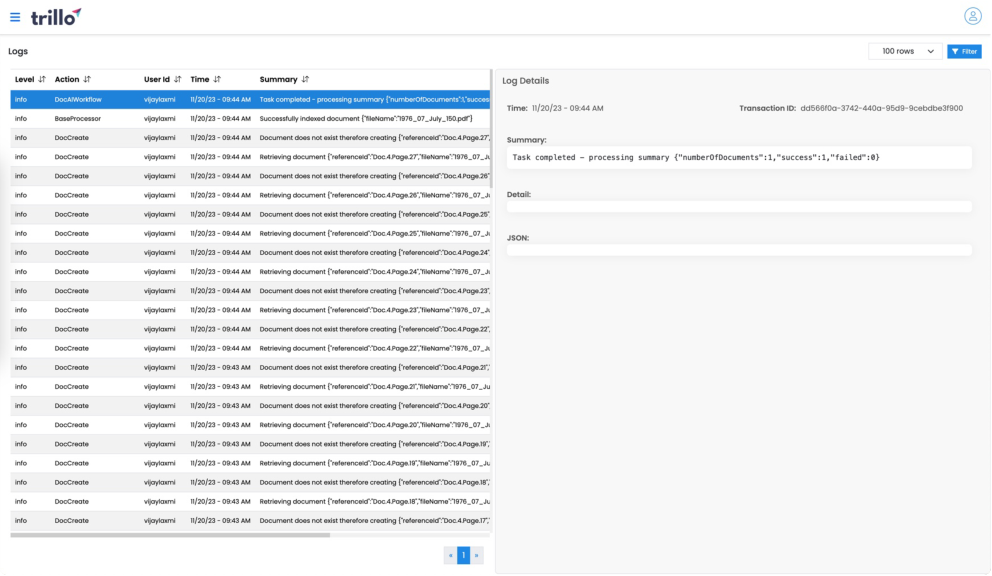
Audit Logs User Interface Page
LogApi class is used for logging. In turn, it makes use of the information in the context to log a few information such as flow exec id, task exec id, transaction id, etc.
Types of Logging
- Standard logging: Log basic information using log4j to the console. These show up in the stack driver logs in the cloud).
LogApi.info("Hello world"); // Standard logging
- Audit logging: It logs into DB and also to the console. It has an additional level called “critical” (maps to error for the log4j logging). These logs are collected in -
the MySql DB. These should be used for important business level signals.
LogApi.audit loginfo("Summary", "response", res); //Audit logging
- Standard logging along with Result response: It is similar to basic logging, but it also returns a result object. This is useful to log and construct a Result object (for critical, errors, it constructs a “failed” result, for others it constructs “success”). This should be used when you want to log a message and also return the same message in a Result object. This avoids making two calls one to log and another to construct a Result object.
LogApi.infoR("Hello world", "response", res); // Standard logging along
with Result response
- Audit logging along with Result response: t is similar to audit logging, but it also returns a result object. This should be used when you want to audit log the message and also return the same message in a Result object. This avoids making two calls one to log and another to construct a Result object.
LogApi.audit in for("action", "summary", "details", "source uid",
"response", res) //Audit logging along with Result response
Complete Logging API
public class LogApi {
  // Standard logs
  public static final void debug(String msg, Object... args) {
    ...
  }
  public static final void debug(String msg, Throwable t, Object...
args) {
    ...
  }
  public static final void info(String msg, Object... args) {
    ...
  }
  public static final void info(String msg, Throwable t, Object...
args) {
    ...
  }
  public static final void warn(String msg, Object... args) {
    ...
  }
  public static final void warn(String msg, Throwable t, Object...
args) {
    ...
  }
  public static final void error(String msg, Object... args) {
    ...
  }
  public static final void error(String msg, Throwable t, Object...
args) {
    ...
  }
  public static final Result infoR(String msg, Object... args) {
    ...
  }
  // standard logs that return Result object.
  // It ensures that logged and returned messages are same and avoid
extra
  // formatting call.
  public static final Result infoR(String msg, Throwable t, Object...
args) {
    ...
  }
  public static final Result warnR(String msg, Object... args) {
    ...
  }
  public static final Result warnR(String msg, Throwable t, Object...
args) {
    ...
  }
  public static final Result errorR(String msg, Object... args) {
    ...
  }
  public static final Result errorR(String msg, Throwable t, Object...
args) {
    ...
  }
  public static final Result errorR(String msg) {
    ...
  }
  // Audit logs - logs on to console and make a record in the database.
  public static final void audit log(Map log object) {
    ...
  }
  public static final void audit log(Map log object,
boolean permit logging) {
    ...
  }
  public static final void audit info(String action, String summary,
Object detail, String source uid, Object ...args) {
    ...
  }
  public static final void audit warn(String action, String summary,
Object detail, String source uid, Object ...args) {
    ...
  }
  public static final void audit error(String action, String summary,
Object detail, String source uid, Object ...args) {
    ...
  }
  public static final void audit critical(String action, String summary,
Object detail, String source uid, Object ...args) {
    ...
  }
  // a variation of above methods that require no detail and source uid
  public static final void audit info2(String action, String summary,
Object ...args) {
    ...
  }
  public static final void audit warn2(String action, String summary,
Object ...args) {
    ...
  }
  public static final void audit error2(String action, String summary,
Object ...args) {
    ...
  }
  public static final void audit critical2(String action, String
summary, Object ...args) {
    ...
  }
  //audit logs that return Result object.
  // It ensures that logged and returned messages are same and avoid
extra
  // formatting call.
  public static final Result audit in for(String action, String summary,
Object detail, String source uid, Object ...args) {
    ...
  }
  public static final Result audit war nr(String action, String summary,
Object detail, String source uid, Object ...args) {
    ...
  }
  public static final Result audit error r(String action, String summary,
Object detail, String source uid, Object ...args) {
    ...
  }
  public static final Result audit critical r(String action, String
summary, Object detail, String source uid, Object ...args) {
    ...
  }
  public static final Result audit info2R(String action, String summary,
Object ...args) {
    ...
  }
  public static final Result audit warn2R(String action, String summary,
Object ...args) {
   ...
  }
  public static final Result audit error2R(String action, String
summary, Object ...args) {
    ...
  }
  public static final Result audit critical2R(String action, String
summary, Object ...args) {
    ...
  }
}
Restful Services Integration
This chapter describes how to connect with restful services from Trillo. It is done using Trillo functions. Trillo provides a distributed cache to store access token in a clustering environment.
Architecture
The concept is simple:
Store API credentials in the secret manager (so only authorized people can see them). On GCP, it uses Google Cloud secret manager.
Using credentials, retrieve access token. To support, the use of the same token in a clustering environment, store it in a distributed memory cache provided by Trillo Workbench.
Use Trillo funciton to write connector logic using HTTP APIs.
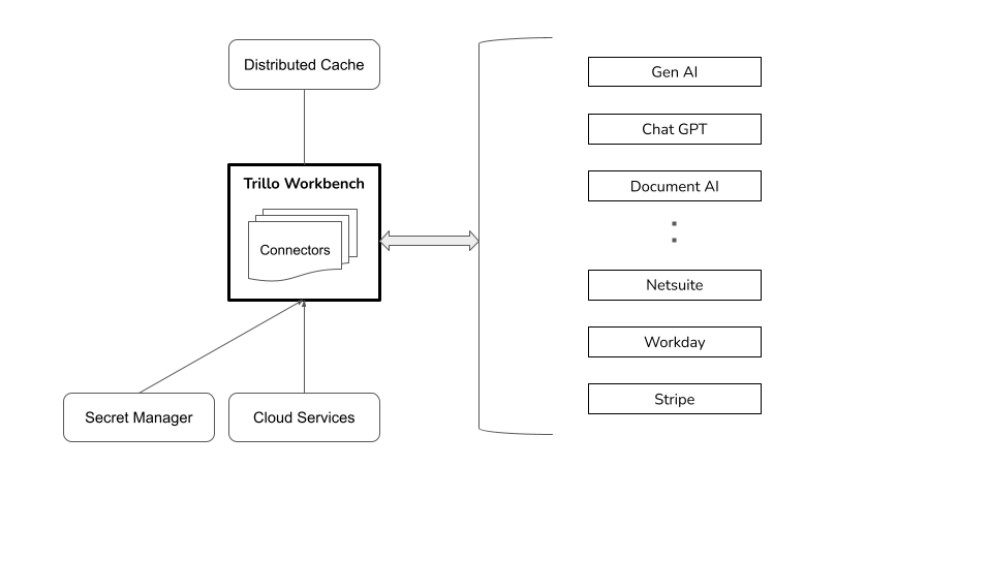
Integrating with External Restful Services using Trillo Functions as Connectors
Writing Connectors
Store client credentials in the secret manager (preferably).
Store any other API related configuration as domain meta data.
Write function using MetaApi and Token api (see below).
Use the following HTTPApi method to communicate with the service.
Test in IDE or on the cloud by copying the code using Trillo Workbench UI.
The following APIs are available using Trillo SDK.
public static Result httpGet(String request url, Map
headers);
public static Result http post(String request url, Map
body,
   Map headers);
public static Result httpPut(String request url, Map
body,
   Map headers);
public static Result http delete(String request url, Map
body,
   Map headers);
API for Retrieving Secret Value from Secret Manager
It assumes that an admin (authorized person) has given name to each value and made entry in the GCP secret manager.
Using the name of a secret you can retrieve its value at runtime using the following API.
Token api.retrieve secret(String secret name)
Storing Access Token in Trillo Workbench Distributed Memory Cache
You normally obtain access token once and use it several times. In a clustering environment, one node may fetch the token, but code running on another node uses it due to a later request. The access token should be stored in a distributed memory cache so it is available to processes running on different nodes.
Assuming you receive OAuth2 compliant access token as a JSON object, it can be converted to a Java class OAuth2Token as follows.
public static OAuth2Token make o auth token(Map response,
                                         String service name)
This is a method of Token api class.
You can then add it to Trillo Workbench distributed cache using the following API call.
public static Result addo auth token(String key, OAuth2Token token)
This is a method of Token api class.
You can later retrieve it from the cache using the following API call.
public static Result get o auth token(String key)
This is a method of Token api class.
You can remove the token from the cache as follows.

This is a method of Token api class.
The following method of OAuth2Token can be used to check if the token has expired.
public boolean is access token expired()
This is a method of OAuth2Token class.
OpenID Connect (OIDC) for Identity
This chapter discusses how to integrate an external Identity Provider (IdP) such as Okta, One login, Google, etc. with Trillo Workbench using OpenId Connect (OIDC).
Trillo Workbench connects to external IdP using OIDC authorization code flow. Refer to the following document for an overview of it.
An Overview of Authorization Code Flow
Steps for Integrating Identity using OIDC
This chapter describes generic steps to integrate an identity provider with the Trillo Workbench using OIDC authorization code.
Trillo Workbench supports seamless integration with external IdPs like Okta, - One login, and Google, using the industry standard OpenID Connect (OIDC) authorization code flow. This guide outlines the straightforward 3-step process to enable this integration, empowering you to leverage your existing identity systems for Trillo Workbench logins.
Enter IdP settings into Trillo Workbench using UI.
Map user profile returned by IdP onto Trillo Workbench user schema.
Start using it for login through Trillo Workbench.
Enter IdP settings into Trillo Workbench using UI
When you register with an IdP, you will receive a number of parameters that need to be used in the application (i.e. Trillo Workbench as your application platform). These parameters are listed in the table below.
When you add an IdP to the Trillo Workbench you create a record with the following information.
Name - some user friendly name for reference.
Service Name - a service name that is used in the API by the client (UI).
Grant type, it is set as Authorization Code.
IdP and Trillo Workbench related parameters listed in the following table.
Trillo Workbench Label Example/Description Authorization URL Issued by IdP.It is Url where user is redirected tologin with redirect url,state etc parameters. https://accounts.google.com/o/oauth2/auth Token URL Issued by IdP.It is used by trillo Workbench to obtain access Token. https://oauth2.google apis.com/token Client Id Issued by IdP. Client Secret Issued by IdP. Redirect URL It is standard Trillo workbench callback URL.Use your Trillo Workbench instance url. Server>//_oauth2/callback Comma Separate List of scopes Issued by IdP. openid,email,profile User Profile Info URL Issued by IdP.It is used to obtain user profile(email,name,phone,etc.as permitted by the scope). https://www.google apis.com/oauth2/v2/user info User Info Transformation function This is discussed more in detail below.This is asimple code that maps user profile returned by IdP to trillo Workbench user schema. Google user profile mapper Post Authentication URL URL where user should land after successful login. UI URL where user is supposed to land post successful login Logout URL Issued by IdP.It is used to logout the use from IdPwhen user logs out of the application. https://accounts.google.com/o/oauth2/logout
Map user profile returned by IdP onto Trillo Workbench user schema
Trillo Workbench aligns user profiles received from your IdP with its own user schema, ensuring effortless data synchronization. The intuitive nature of this mapping is clearly illustrated in the following example.
public class Google user profile mapper implements Log gable,
Trillo function {
  public Object handle(Script parameter script parameter) {
    try {
      return _handle(script parameter);
    } catch (Exception e) {
      log().error("Failed", e);
      return Result.get failed result(e.get message());
    }
  }
  @Suppress warnings("unchecked")
  private Object _handle(Script parameter script parameter) {
    Map idpUser = (Map)script parameter.getV();
    Map trillo user = map user profile(idpUser);
    return trillo user;
  }
  private Map map user profile(Map
idpUser) {
    Map trillo user = new Linked hashmap
();
    trillo user.put("first name", idpUser.get("given_name"));
    trillo user.put("last name", idpUser.get("family_name"));
    trillo user.put("externalId", "" + idpUser.get("id"));
    trillo user.put("picture url", idpUser.get("picture"));
    trillo user.put("email address", idpUser.get("email"));
    return trillo user;
 }
}
In order to make this code available to the Trillo Workbench, simply add the above function to the Trillo Workbench. (For convenience, the above function is added to the Trillo Workbench and you can view it by turning on Show system function.
Start using it for login through Trillo Workbench
Once you follow the above steps are completed, you can integrate external IdP with the login button using the following steps.
Add a Button: Add button with a label such a Login Using Google Identity.
Fetch IdP Url and point the browse to it: When user clicks on the login button the following actions should take place.
Use /_oauth2/url endpoint to get a url with a new "state" parameter (generated and recorded by the Trillo Workbench).
Point browser to the url returned by the above call. This will take the user to IdP UI, which will present a login dialog to the user.
Once user logs in successfully, the browser will be redirected to the trillo Workbench UI with a code. The code will be used by the Trillo Workbench to fetch the access token using the token endpoint. This will happen behind the scene and you don't have to do anything for it.
Sample code for the above interaction is as follows:
Endpoint:
POST /_oauth2/url
Headers:
'Content-Type':'application/json'
Body:
{
  appName : "auth",  // required by Trillo, its value is always
"auth"
  service name :
 }
Response:
{
    "status": "success",
    "message": "Success",
    "data": "https:///oidc/2/auth?response_type=code&
        client_id=&
        redirect_uri=/_oauth2/callback&
        state=&
        scope=openid",
    "code": 200,
    "_rtag": "_r_",
    "task status": "task_status_not_set",
    "failed": false,
    "detail message": "Success",
    "success": true
}
"data" above is the value of IdP URL for login.
- After obtaining access token, Trillo Workbench redirect the browser to "Post Authentication URL", which is a UI URL. This URL will have a query parameter called a_t_nonce. Using the value of this URL, the UI will invoke a API (/_oauth2/nonce login) of Trillo Workbench to get the access token recently acquired by the Trillo Workbench.
Endpoint:
GET /_oauth2/nonce login
Headers:
'Content-Type':'application/json'
Query Parameters: none
Response:
{
    "access token": "",
    "user" :
}
Once the UI receives recently generated access token and the user's profile, it is logged in. It can use access token in other API calls.
Google Identity Integration
The processing of integrating an IdP has several steps that are common and discussed in the previous chapter. This chapter discusses steps that are specific to the Google Identity.
In order to add a new identity platform you need to do two things.
Register with the identity service on its website and note down value of parameters.
Using a sample user profile response found on its website, write the code snippet to map the user profile onto Trillo Workbench user schema.
Registering applications Google
The steps of registering with an identity service are found on its website. For the Google Identity, we have repeated here for explaining concepts using it as a sample. Each identity has similar content based on OIDC standards. It is organized differently. The current documentation of the Google Identity too may have changed, but the principle of registration would remain the same as described below.
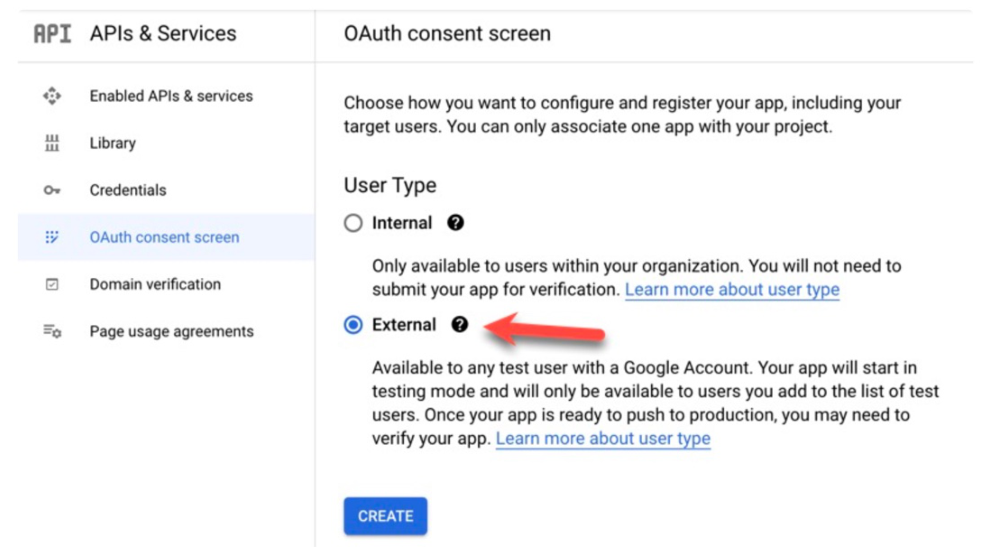
You will start registering from the screen below navigated from the page, Configure the OAuth consent screen and choose scopes.
Consent Screen and Entering App Information
After creating the consent screen you have to configure the setting for the OAuth for the project. You will be providing the following data on this page below.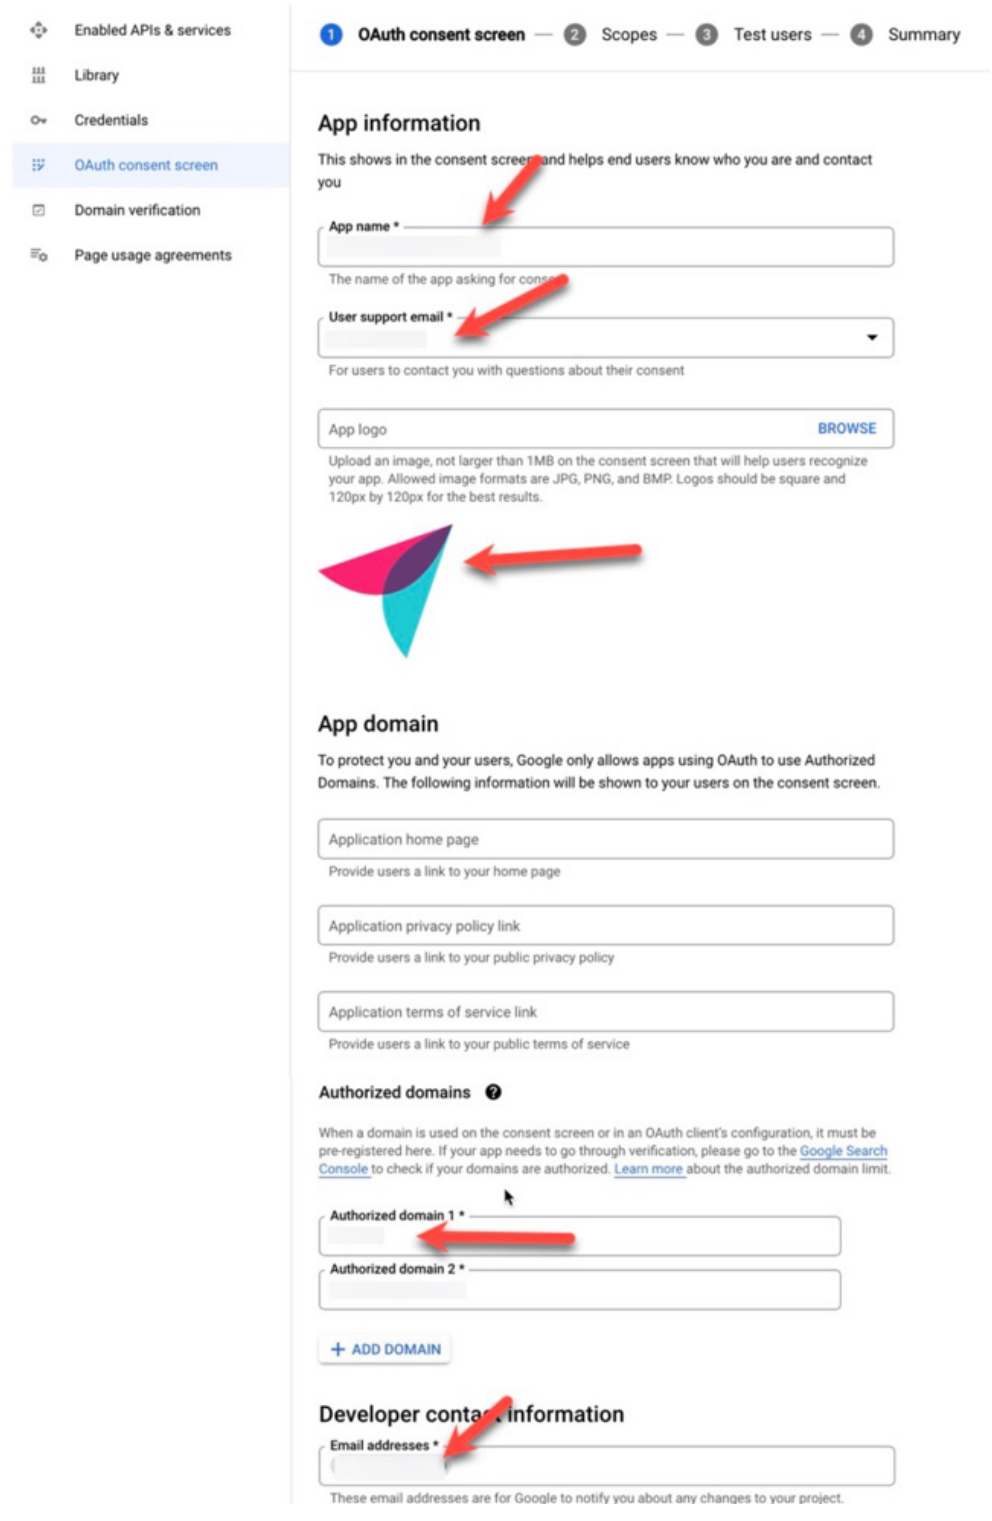
Consent Configuration

Once the configuration is complete the page will look as shown below. You must add one valid email (which can be identified by Google) to confirm that the workbench configuration is working end to end.
Create authorization credentials
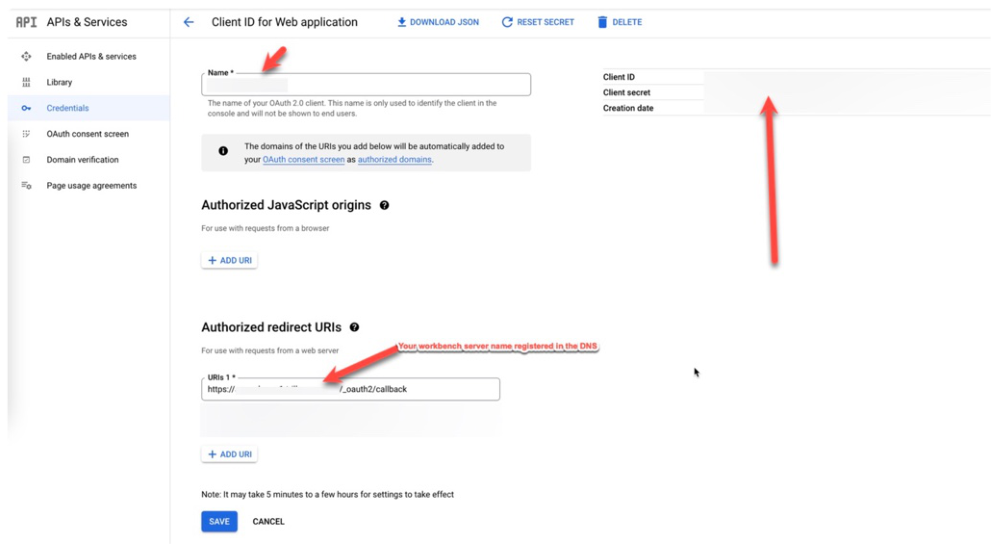
On the credential screen click 'Create new credentials' and generate a new 'OAuth client ID'
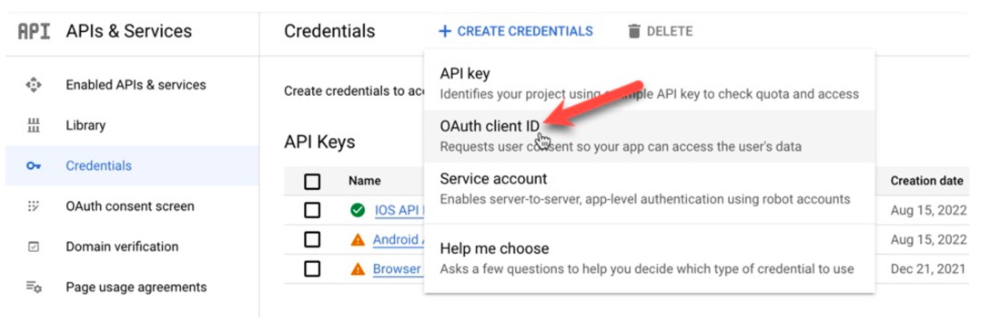
You must provide an authorized redirect URI. The format of this URI will be https://your-server-name/_oauth2/callback
- Your application client ID and secret will always be shown on the right hand side of this page.
List of Parameters Collected During Registration
During the registration process you will collect the following parameters.
Authorization URL: https://accounts.google.com/o/oauth2/auth
Token URL: https://oauth2.google apis.com/token
Client ID:
Client Secret:
Redirect URL: https://api..trillo apps.com/_oauth2/callback
Comma Separate List of Scopes: openid profile email
User Profile Registration Required? checked
User profile Info URL: https://www.google apis.com/oauth2/v2/user info
User Info Transformation Function: Google user profile mapper
Post Authentication Redirect Host with Protocol:
https://.trillo apps.com/cloud/auth
Logout URL: https://accounts.google.com/o/oauth2/logout
Writing Mapping Function
The next step is to write the mapping function (before you add login button to your ' UI). The Google s mapping function is shown below.
public class Google user profile mapper implements Log gable,
Trillo function {
public Object handle(Script parameter script parameter) {
    try {
      return _handle(script parameter);
    } catch (Exception e) {
      log().error("Failed", e);
      return Result.get failed result(e.get message());
    }
  }
  @Suppress warnings("unchecked")
  private Object _handle(Script parameter script parameter) {
    Map idpUser = (Map)script parameter.getV();
    Map trillo user = map user profile(idpUser);
    return trillo user;
  }
  private Map map user profile(Map
idpUser) {
    Map trillo user = new Linked hashmap
();
    trillo user.put("first name", idpUser.get("given_name"));
    trillo user.put("last name", idpUser.get("family_name"));
    trillo user.put("externalId", "" + idpUser.get("id"));
    trillo user.put("picture url", idpUser.get("picture"));
    trillo user.put("email address", idpUser.get("email"));
    return trillo user;
 }
}
Okta Integration
To integrate Okta Identity with Trillo Workbench, the first step involves setting up an Okta account. This process is handled conveniently on the Okta website, as described below.
Registering applications with Okta
Refer to the following page on the Okta website for registering a new application.
Create an OIDC Web App in the Okta Admin Console
Writing Mapping Function
Okta function for mapping the user profile is shown below.
public class Okt a user profile mapper implements Log gable, Trillo function
{
  public Object handle(Script parameter script parameter) {
    try {
      return _handle(script parameter);
    } catch (Exception e) {
      log().error("Failed", e);
      return Result.get failed result(e.get message());
    }
  }
  @Suppress warnings("unchecked")
  private Object _handle(Script parameter script parameter) {
    Map idpUser = (Map)script parameter.getV();
    Map trillo user = map user profile(idpUser);
    return trillo user;
  }
  private Map map user profile(Map
idpUser) {
    Map trillo user = new Linked hashmap
();
    trillo user.put("first name", idpUser.get("given_name"));
    trillo user.put("last name", idpUser.get("family_name"));
    trillo user.put("externalId", idpUser.get("sub"));
    trillo user.put("email address", idpUser.get("email"));
    return trillo user;
 }
}
One login Integration
This chapter discusses steps to integrate One login Identity. The registration step is described by a reference to the instruction page.
Registering applications with One login
Refer to the following page on the One login website for registering a new application.
How To Set Up Your Own One login App
Writing Mapping Function
Okta function for mapping the user profile is shown below.
public class Okt a user profile mapper implements Log gable, Trillo function
{
  public Object handle(Script parameter script parameter) {
    try {
      return _handle(script parameter);
    } catch (Exception e) {
      log().error("Failed", e);
      return Result.get failed result(e.get message());
    }
  }
  @Suppress warnings("unchecked")
  private Object _handle(Script parameter script parameter) {
    Map idpUser = (Map)script parameter.getV();
    Map trillo user = map user profile(idpUser);
    return trillo user;
  }
  private Map map user profile(Map
idpUser) {
    Map trillo user = new Linked hashmap
();
    trillo user.put("first name", idpUser.get("given_name"));
    trillo user.put("last name", idpUser.get("family_name"));
    trillo user.put("externalId", idpUser.get("sub"));
    trillo user.put("email address", idpUser.get("email"));
    return trillo user;
 }
}
Settings
This chapter describes settings (configuration) required for integration (writing) flexible and configurable apps. The important categories are discussed below.
Properties
Every application in Trillo Workbench features a set of configurable properties, allowing admins to tailor settings based on their environment. As an example, what template to use for sending a certain types of email. These properties are further divided into two sub-categories.
System Properties
- These are properties that are used by the Trillo Workbench for certain built in functionalities. For example, the name of template file to be used for sending "forgot password" email. The key (name) are retained, but the value can be changed.
Custom Properties
Custom properties are entirely defined and managed by users (admin), as opposed to system properties with fixed keys.
Trillo Workbench provides APIs to read a list of properties or a single property given its name.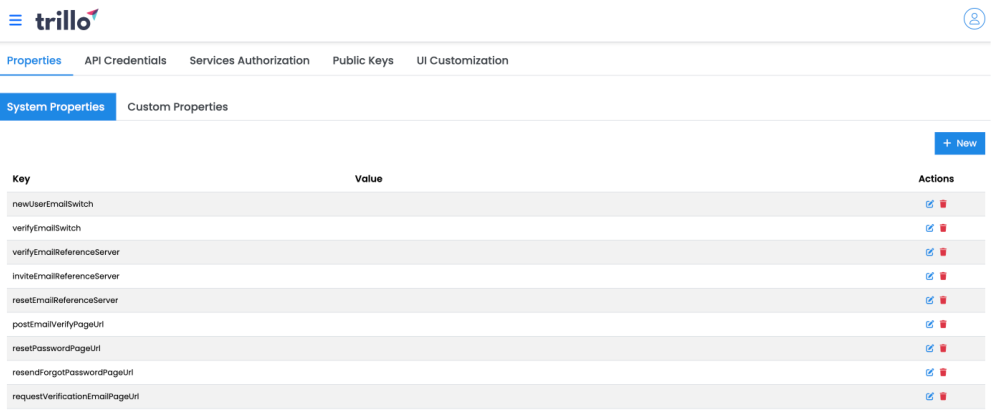
Settings > Properties Tab
API Credentials
API credentials are used for issuing credentials by Trillo Workbench and used for accessing its APIs.
Users can issue API credentials for program atic access to its APIs. It supports - client credentials and password grant. These are discussed in the chapter "Using Trillo Workbench APIs".
Admins can create and manage multiple API credentials for a single application client.
Adding a New Credential
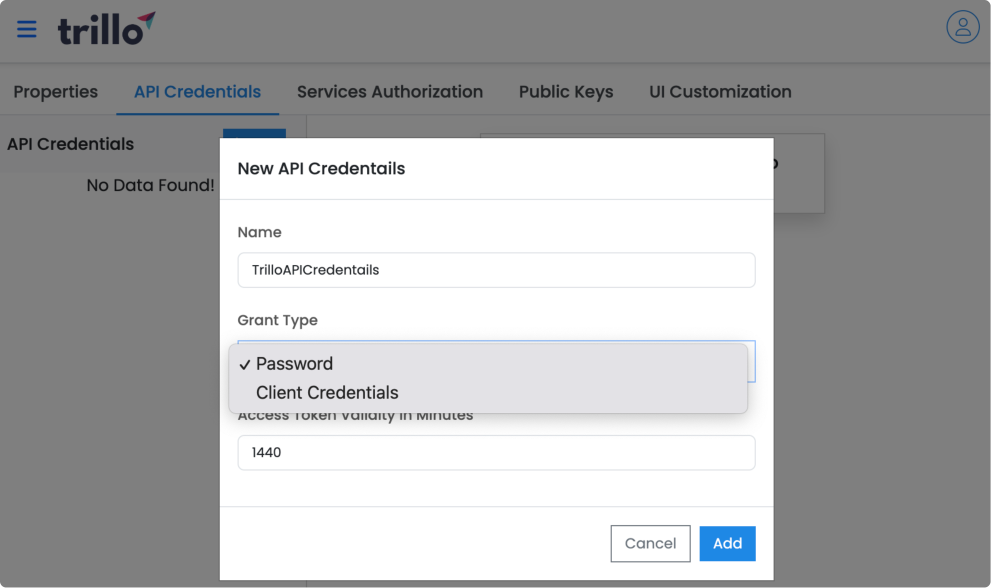
Creating a New Credentials
Generating New Credentials
Once a new instance (by giving it a name) is created, a user can generate credentials for it.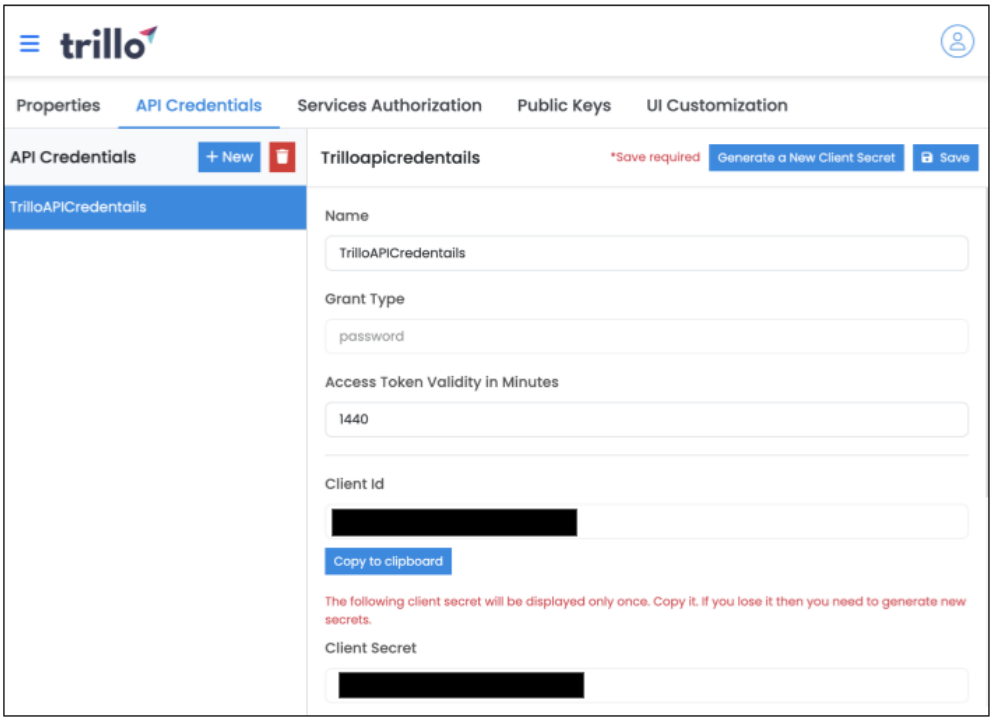
Services Authorization
Service Authorization is used for adding credentials of external services so Trillo Workbench can use them for integration (invoking their APIs) or login using authorization code flow.
Under Service Authorization, you define URLs and credentials of external services including identity. The chapter OpenID Connect (OIDC) discuss the authorization code flow settings. You can specify setting of all type of OAuth2 grants.
The following screen shows a service authorization settings for Google Identity.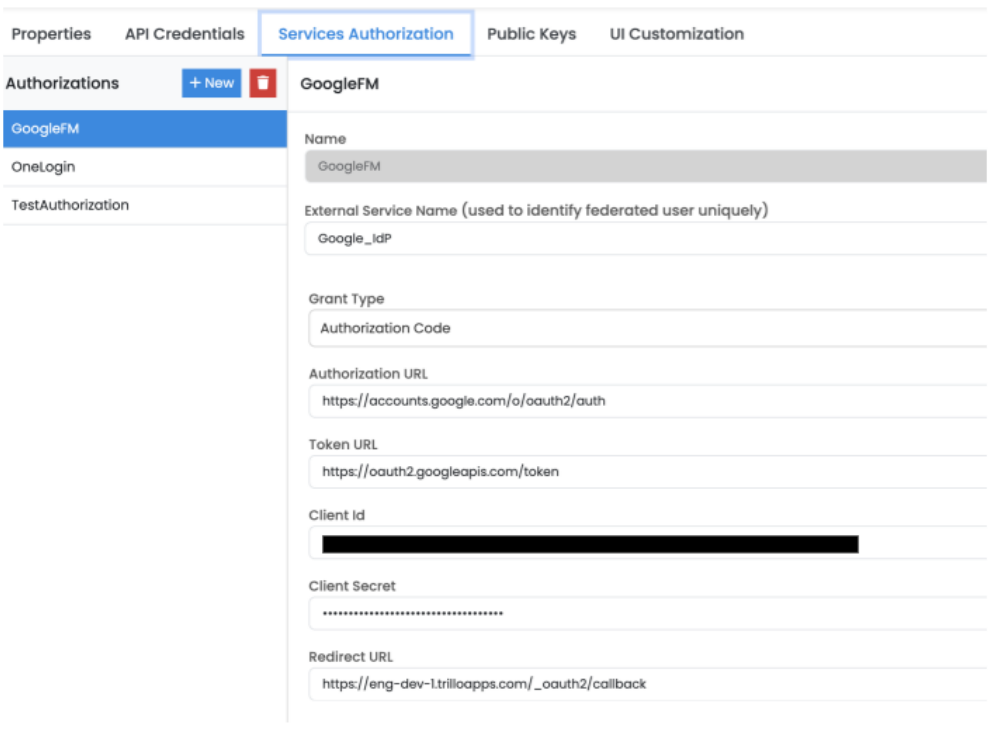
Google Identity Integration - Authorization Code Settings
Using Secret Manager with Service Authorization
Trillo Workbench API seamlessly resolves any value if it starts with $ (leveraging the Google Secret Manager). For example, instead of specifying the value of client_id as "324332....6.apps.google user content.com", you can specify $google_idp_client_id. Trillo Workbench will replace the string
$google_idp_client_id with the value of "google_idp_client_id" in secret manager (notice secret manager lookup key is without $).
User Management
Trillo Workbench provides a user management application for managing application specific user profile, roles and group membership.
User Management Application
Trillo Workbench incorporates a user management application covering following functionalities.
Manage users (admin) - add, delete, suspend, edit, change password.
Manage roles (admin) - add, delete roles.
Groups (user) - create groups, add, remove members.
Role (admin) - create new roles.
Assign roles (admin) - Assign one or more roles to a user.
Own profile - User can edit own profile, change password.
Trillo Workbench Authentication System
- Trillo User Management includes a built in authentication system. It features:
Login using user id and password.
re captcha (cloud configuration required).
2 Factor authentication (cloud configuration required, messaging service subscription required).
Forgot password.
Managing Users of External Authentication System
When an external identity provider (authentication system) is linked with the Trillo Workbench, a user is automatically created in the Trillo Workbench when the user logs in for the first time. This user is flagged as an external user in the Trillo Workbench and tracked by its unique key in the external system. The value of the key in the external system is stored in 'externalId' attribute of the user class. The external user's profile can be managed inside Trillo Workbench except that its email ' and userId can t be modified.
An external user can be assigned application specific roles and be a member of groups.
Support for User Signup
Normally there are two types of applications.
An admin creates a user - example, an application used inside an enterprise.
User signs up - Examples of such applications are SaaS applications, social media, shopping websites, etc.
Trillo Workbench can be configured to support the signup mode of the application.
Email Communication
An admin function requires email communications. These email communications are handled by Trillo Workbench using an external email services. Email templates are stored under domain metadata. They can be configured simply by editing HTML files.
Trillo Workbench verifies each user's email address by sending a secure link to the same email address and asking user to click on it (as is commonly used by several applications).
Example Screens
The following example screens are for the visuals of the user management application.
List of Users
An administrator can view a list of users, search in the list, upload a CSV file with a list of users for the bulk import.
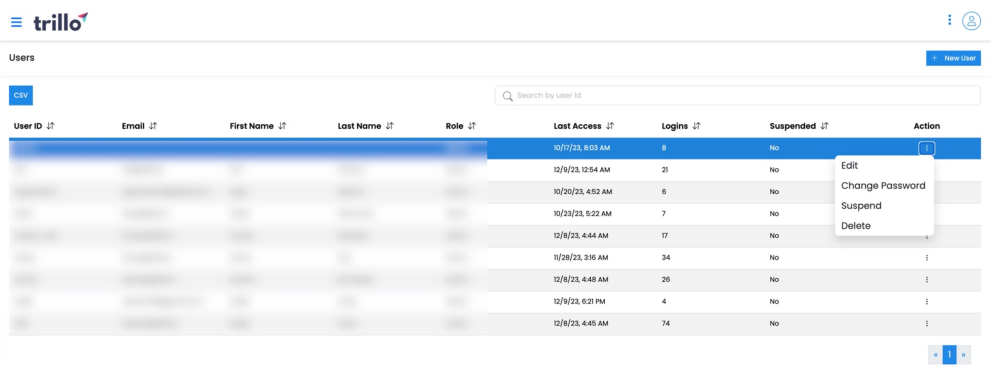
User Management - List of Users
New User
An admin can create a new user using UI by specifying its unique user id, email, initial password, phone, name, company and department. Since, like any other table, the user table is also metadata driven, the user profile and form can be customized to suit the application needs.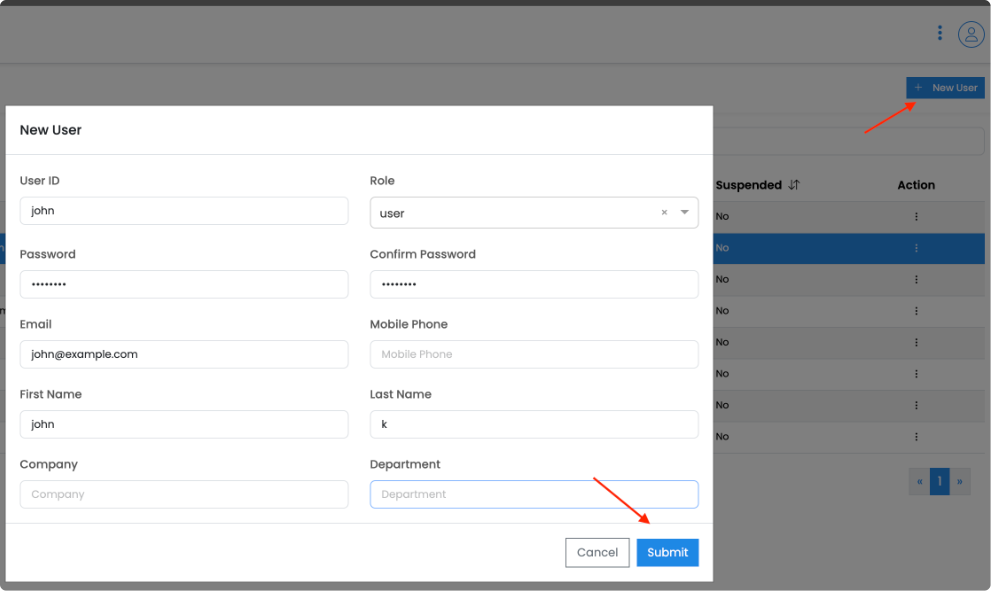
User Management - New User
More Admin Actions
An admin can perform following actions by selecting a row menu (by clicking on 3 dots).
Edit user profile.
Change the user password.
Temporarily suspend the user.
Permanently delete the user.

Admin actions on a user
GitHub Integration
Trillo Workbench integrates with the GitHub. It is useful for storing code (metadata and functions) and for deployment in a new environment such as from development to staging, staging to production.
By default code is saved and versioned in the Trillo Workbench database (which is backed up regularly). The git integration has several benefits such as branching, peer review, pull requests, reporting, etc. Trillo Workbench also uses git for deployment of code from one environment to another. Once code is pushed from an environment, it can be deployed in a different environment by git pull.
Using git requires one time set up to link Trillo Workbench instance with the GitHub. It is described below. After that a user can perform push and pull.
Linking Trillo Workbench to GitHub
The linking Trillo WOrkbench and GitHub is a 3 steps process.
Create an OAuth application in GitHub.
Configuring Trillo Workbench with the GitHub credentials.
Connect and login to GitHub (using GitHub's login screen) so the Trillo Workbench can acquire a token for API calls.
Create an OAuth Application in GitHub
In order to use APIs of GitHub from the Trillo Workbench, you need to create an OAuth application to GitHub. It is explained in this documentation - Creating an OAuth application with GitHub . You will require the internet accessible URL of the Trillo Workbench to register your application.
The steps described in the document are repeated here for convenience. Even if they have changed since, the principles remain the same.
First login into your GitHub account and click on settings.
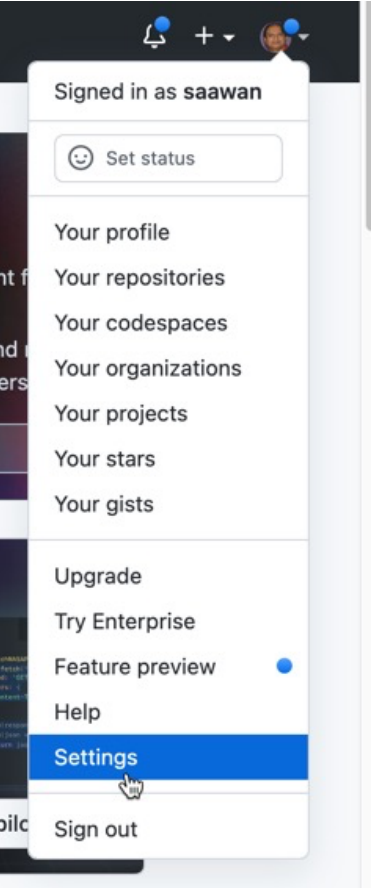
Click on the developer settings as shown below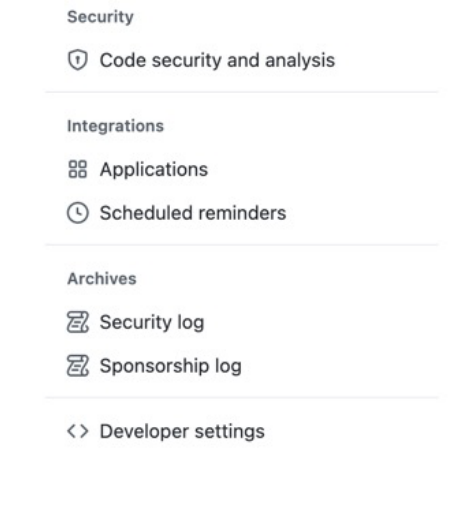
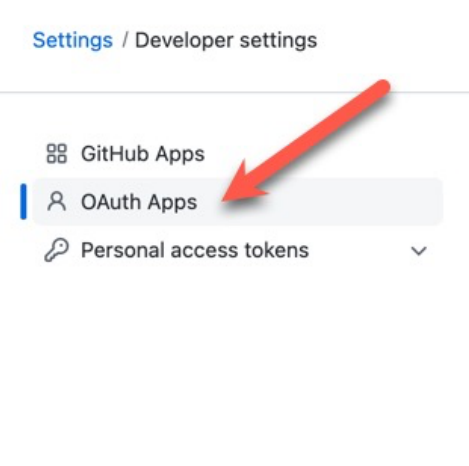
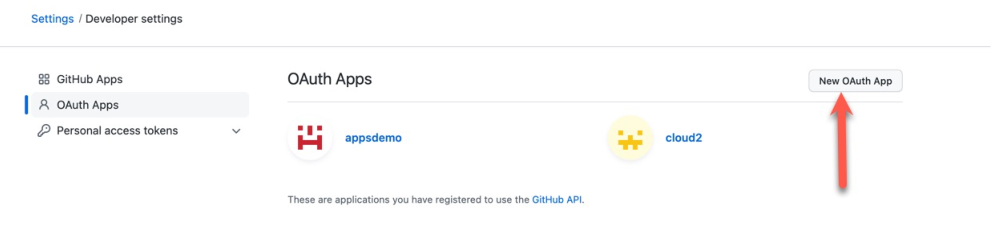
Proceed to creating a new OAuth application
Enter the workbench URL (accessible over the internet) at two places as shown below.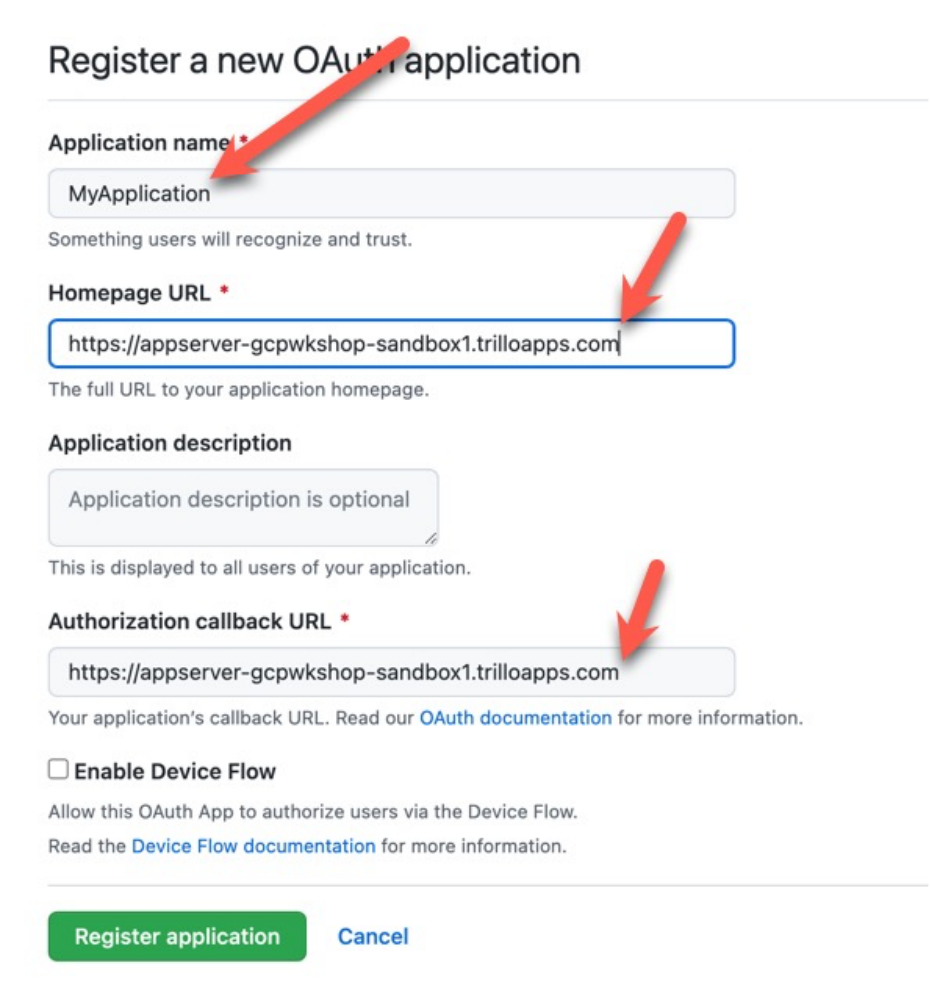
Next generate the client secret as shown below.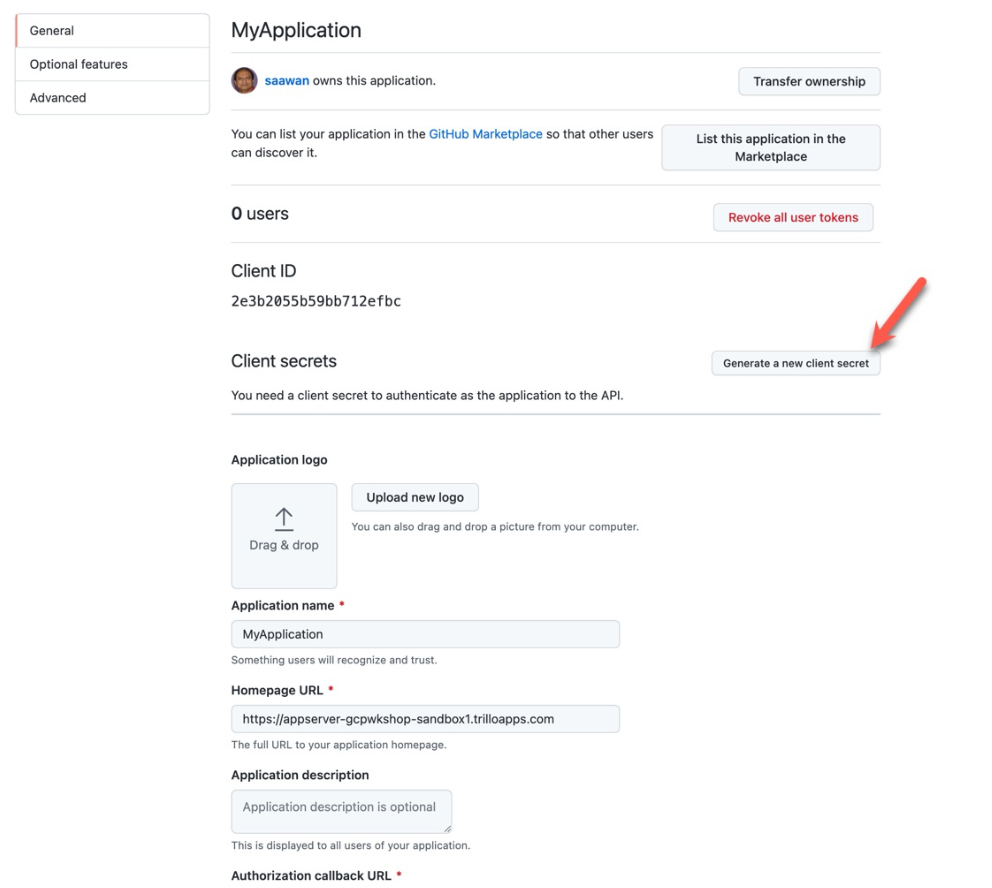
Note down client ID and secret securely on your machine (recommended to delete then after entering into the workbench).
Configuring Trillo Workbench with GitHub Credentials
In order to configure Trillo Workbench you need following information:
GitHub credentials of the OAuth application created in previous step.
A name of repository in the GitHub. Let us use "My application" as the name in the example below.
Enter these information in the form of Trillo Workbench UI shown below.
Enter 'Save'. It will save information securely in the Trillo Workbench server.
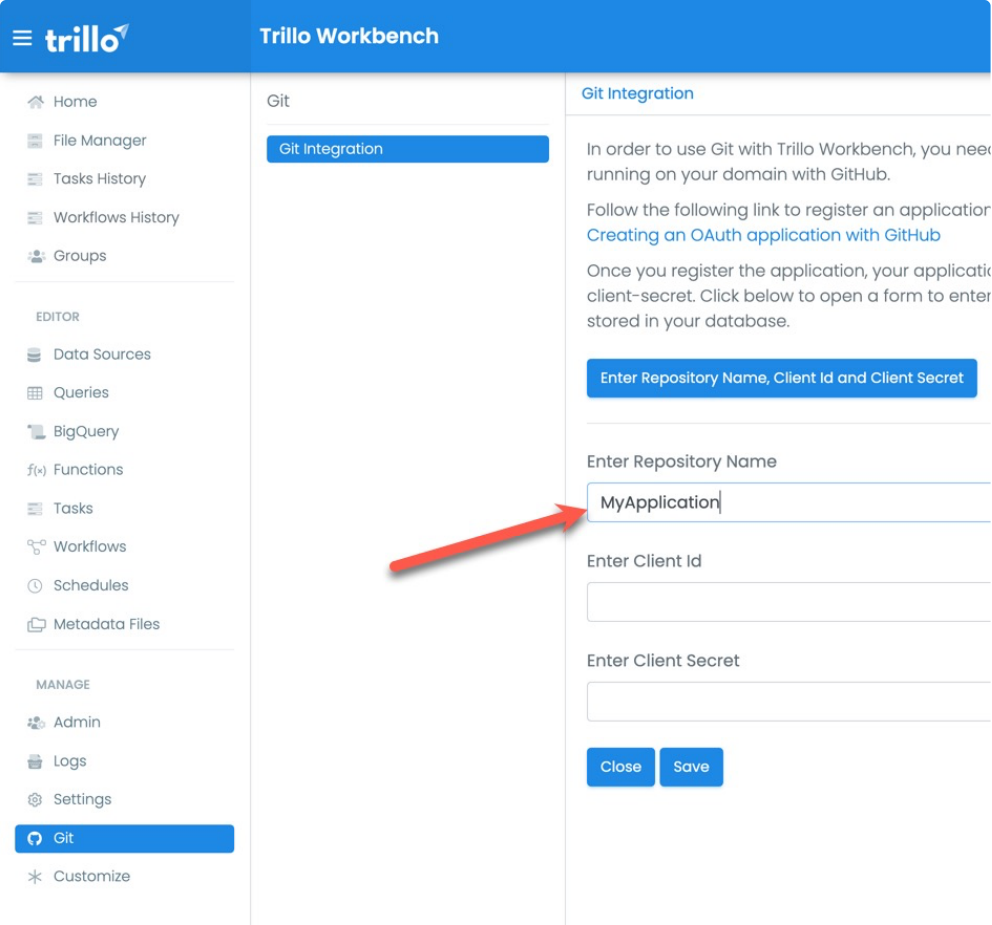
Connect with GitHub
Once you configure Trillo Workbench with GitHub info, the Settings navigation item becomes visible. Select it and then click on Connect with Git Account. It will initiate the authorization workflow with GitHub to obtain an access token.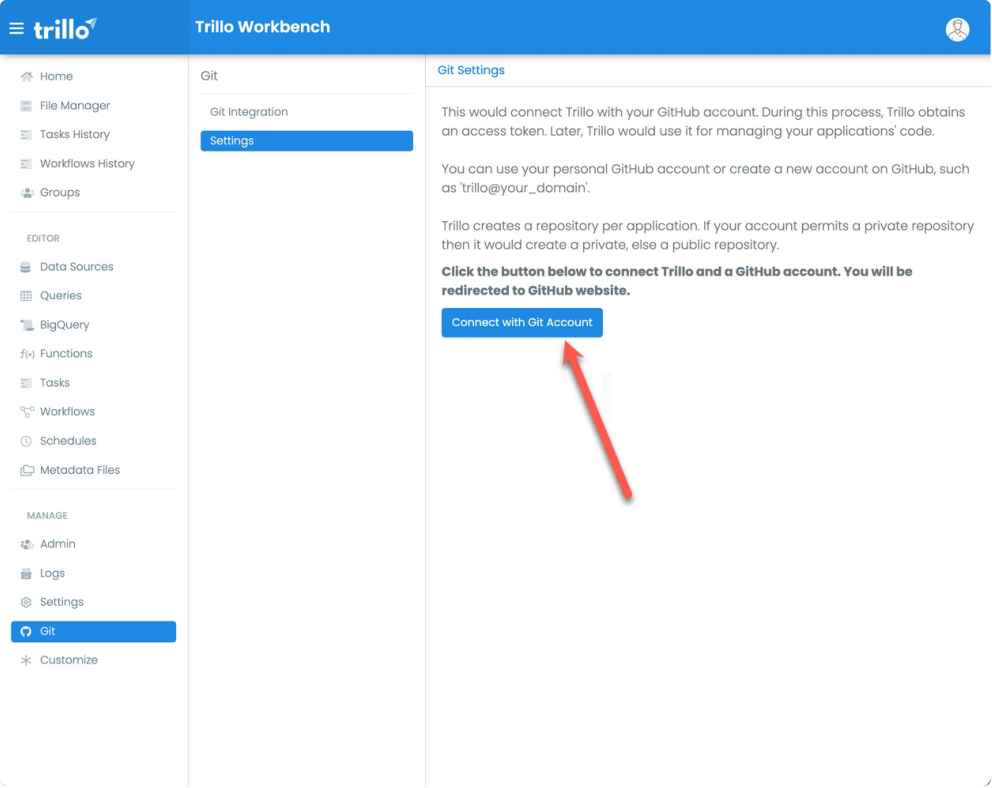
Clicking on Connect with Git Account will navigate you to the following login page on the GitHub website.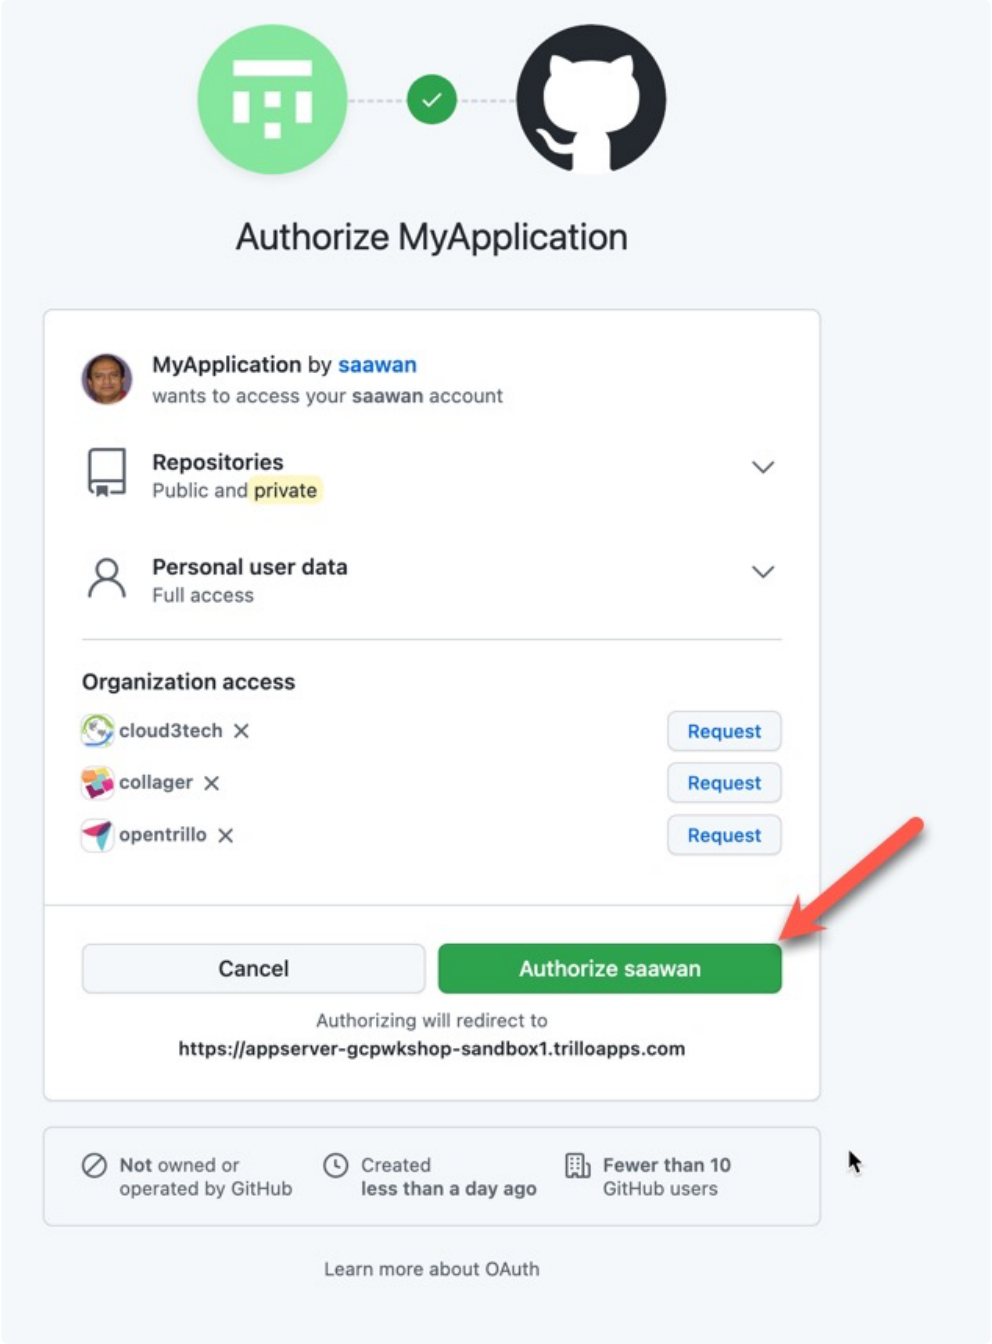
OAuth Authorization on GitHub using User's Login Information
Click on the Authorize saawan ('saawan' will be replaced by your GitHub id). Once you authorize, the control will be transferred back to the Trillo Workbench. Using the "code" provided in redirect URL, the Trillo Workbench will acquire an access token and redisplay its Git page. Now the Trillo Workbench page would look like as shown below.
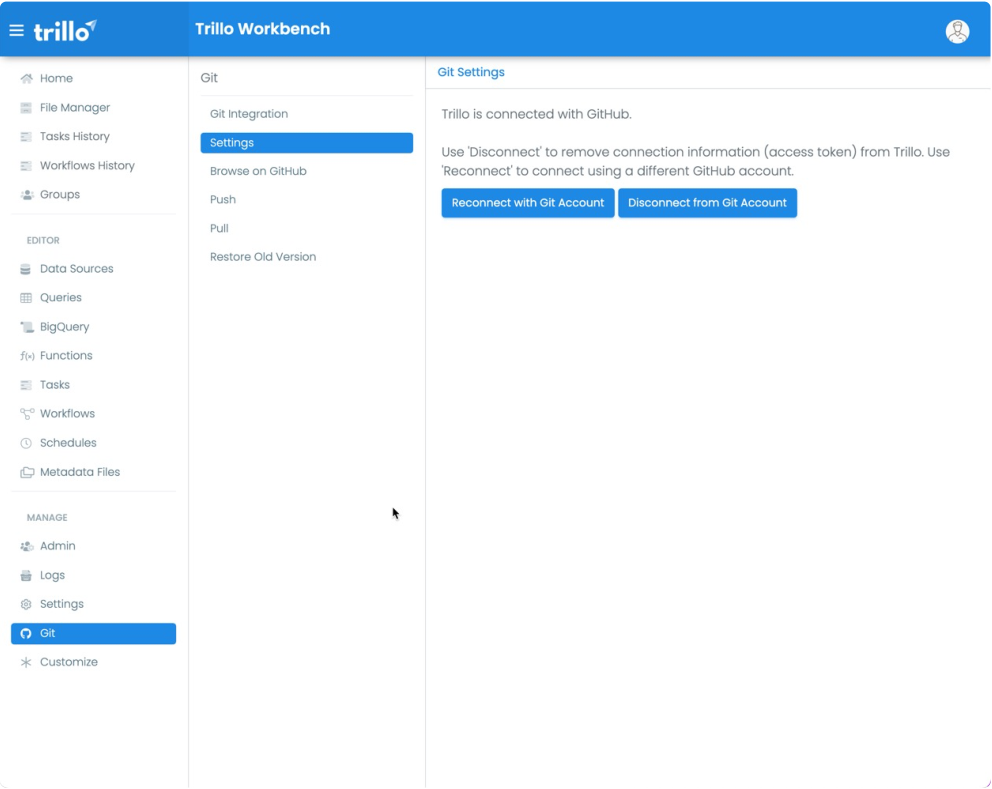
Trillo Workbench Git Page after Linking Trillo Workbench with GitHub
Git Operation
Once the above setup is completed, users can perform git push and pull operations as shown below.
Git Push
A user can push code to the GitHub using the following screen. It will create a branch with your user id as the name of the branch. You can create a peer review request using GitHub UI and merge it.
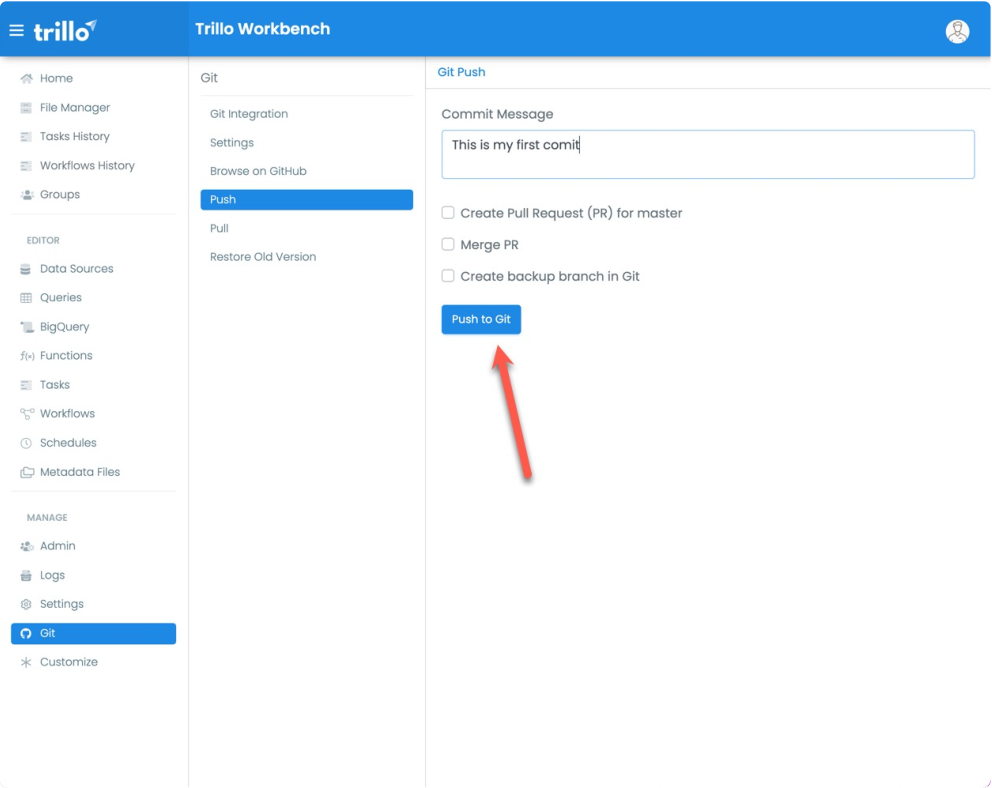
Git Push by a User
Alternatively the can push through your branch create a pull request and merge the pull request into the master branch.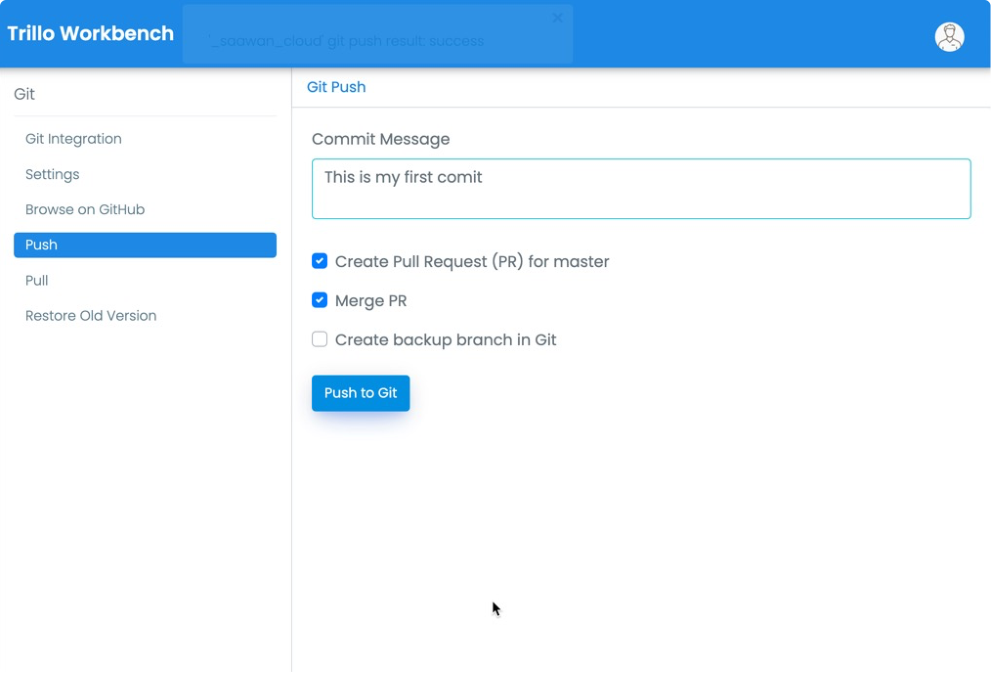
Push Code to a branch, Create PR and Merge it
Check your task history at the end of the operation the logs will be shown highlighting the details of this operation.
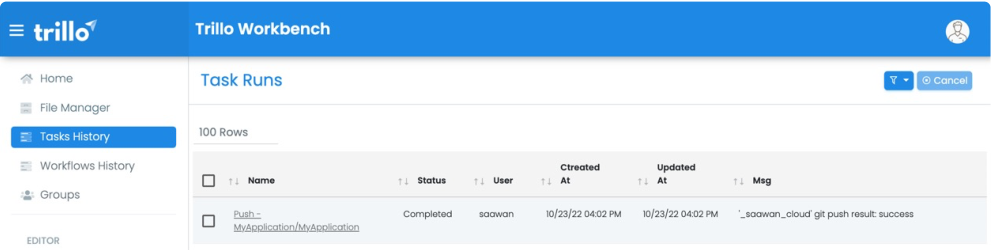
Checking operation in the Task History
You can check operation result on the GitHub by clicking on "Browse on GitHub"

GitHub Page showing code in your branch
Git Pull
Similar to Push, a user can initiate the Git Pull flow. The interaction for the Git Pull are simple. The Trillo Workbench asks for the confirmation of action and initiates a background task to pull the code from the connect Git repository into Trillo Workbench.
Since Git Pull overwrites code in the Trillo Workbench, this action is available only to a user with "admin" role.
Releases
Releases and release notes
The release notes of the Trillo platform main releases are described below.
5.0.610
- Miscellaneous bug fixes in the workbench and its applications (packages).
Docker Containers
gcr.io/project-trillo rt/trillo-rt/trillo-data-service:5.0.610
gcr.io/project-trillo rt/trillo-rt:5.0.610
5.0.33
Security updates
Stability fixes
Other minor bug fixes
Docker Containers
gcr.io/project-trillo rt/trillo-rt/trillo-data-service:5.0.33
gcr.io/project-trillo rt/trillo-gke-tasker:5.0.33
gcr.io/project-trillo rt/trillo-rt:5.0.33
4.0.937
Major security updates
Stability fixes
Other bug fixes and enhancements
Docker Containers
gcr.io/project-trillo rt/trillo-rt/trillo-data-service:4.0937
gcr.io/project-trillo rt/trillo-gke-tasker:4.0.937
gcr.io/project-trillo rt/trillo-rt:4.0.937
4.0.735
Logging (both the front end as well as the backend) enhancements
Bug fixes and minor enhancements
Docker Containers
gcr.io/project-trillo rt/trillo-rt/trillo-data-service:4.0.735
gcr.io/project-trillo rt/trillo-gke-tasker:4.0.735
gcr.io/project-trillo rt/trillo-rt:4.0.735
4.0.634
Data studio reports integration and enablement via the file manager
Bug fixes
Docker Containers
gcr.io/project-trillo rt/trillo-rt/trillo-data-service:4.0.634
gcr.io/project-trillo rt/trillo-gke-tasker:4.0.634
gcr.io/project-trillo rt/trillo-rt:4.0.634
4.0.499
Api security enhancements and robust penetration defense
Various miscellaneous optimizations
Bug fixes
Docker Containers
gcr.io/project-trillo rt/trillo-rt/trillo-data-service:4.0.499
gcr.io/project-trillo rt/trillo-gke-tasker:4.0.499
gcr.io/project-trillo rt/trillo-rt:4.0.499
4.0.258
Security vulnerabilities in the apache log4j2 version 2.15 (orbelow) are fixed as - - - -
described in CVE 2021 44228 and CVE 2021 45046 . The library version is upgraded to 2.17.1
Other miscellaneous bug fixes
GCP Marketplace Installs: if you have installed workbench from GCP Marketplace then update the following deployments
Update trillo-rt deployment and update its container version with gcr.io/project- trillo rt/trillo-rt:4.0.258
Update trillo-data-service deployment and update its container version with gcr.io/project-trillo rt/trillo-rt/trillo-data-service:4.0.258
4.0.204
Security vulnerabilities in the apache log4j2 version 2.15 (orbelow) are fixed as - - - -
described in CVE 2021 44228 and CVE 2021 45046 . These vulnerabilities have been mitigated by adding -Dlog4j2.format msg no lookups=true to the JVM args.
Other bug fixes
GCP Marketplace Installs: if you have installed workbench from GCP Marketplace then update the following deployments
Update trillo-rt deployment and update its container version with gcr.io/project- trillo rt/trillo-rt:4.0.204
Update trillo-data-service deployment and update its container version with
- gcr.io/project-trillo rt/trillo-rt/trillo-data-service:4.0.204
Version: 4.0
- latest major release
Version: 3.0
Introducing trillo workbench & user management
Simplified the main page
Ability to customize the main page.