Создание модуля на Python
Предупреждение
A new version of this tutorial is available at Building a Python Plugin (QGIS3)
Модули - это отличный способ расширить функциональность QGIS. Вы можете создавать модули на Python, от добавления простой кнопки до сложных наборов инструментов. Этот урок в общих чертах покажет процесс, связанный с настройкой среды разработки, проектированием пользовательского интерфейса для модуля и написанием кода для взаимодействия с QGIS. Пожалуйста, просмотрите урок Первые шаги в программировании на Python, чтобы ознакомиться с основами.
Обзор задачи
Мы разработаем простой модуль под названием Save Attributes, который позволит пользователям выбрать векторный слой и записать его атрибуты в CSV-файл.
Получение инструментов
Qt Creator
Qt это фреймворк для разработки программного обеспечения, который используется для разработки приложений, работающих на Windows, Mac, Linux, а также на различных мобильных операционных системах. Сам QGIS написан с использованием Qt. Для разработки модулей мы будем использовать приложение под названием Qt Creator, чтобы разработать интерфейс для нашего модуля.
Загрузите и установите приложение Qt Creator с SourgeForge
Связки Python для Qt
Так как мы разрабатываем модуль на Python, нам необходимо установить расширение Python для Qt. Способ его установки будут зависеть от платформы, которую вы используете. Для создания модулей нам нужен инструмент командной строки pyrcc4.
Windows
Скачайте установочный файл OSGeo4W и выберите Express Desktop Install. Установите пакет QGIS. После установки вы сможете получить доступ к инструменту pyrcc4 через OSGeo4W Shell.
Mac
Установите менеджер пакетов Homebrew . Установите пакет PyQt, выполнив следующую команду:
brew install pyqt
Linux
В зависимости от вашего дистрибутива, найдите и установите пакет python-qt4. В дистрибутивах, основанных на Ubuntu и Debian, вы можете запустить следующую команду:
sudo apt-get install python-qt4
Текстовый редактор или интегрированная среда разработки Python
Any kind of software development requires a good text editor. If you already have a favorite text editor or an IDE (Integrated Development Environment), you may use it for this tutorial. Otherwise, each platform offers a wide variety of free or paid options for text editors. Choose the one that fits your needs.
В этом уроке используется редактор Notepad ++ на Windows.
Windows
Notepad++ - это хороший бесплатный редактор для Windows. Скачайте и установите редактор Notepad++.
Примечание
Если вы используете Notepad++, убедитесь, что отмечена настройка Replace by space в меню . Python очень чувствителен к пробелам, и эта настройка гарантирует, что табуляции и пробелы обрабатываются корректно.
Модуль Plugin Builder
There is a helpful QGIS plugin named Plugin Builder which creates all the
necessary files and the boilerplate code for a plugin. Find and install the
Plugin Builder plugin. See Использование модулей расширения for more details on how to
install plugins.
Модуль Plugins Reloader
Это еще один полезный модуль, который позволяет разрабатывать модули итеративно. Используя этот модуль, вы можете изменять код своего модуля, и перемены будут отражены в QGIS без необходимости перезагружать QGIS каждый раз. Найдите и установите модуль Plugin Reloader. Подробнее об установке модулей можно прочитать тут: Использование модулей расширения.
Примечание
Plugin Reloader является экспериментальным модулем. Убедитесь, что вы отметили галочкой опцию Show also experimental plugins в настройках Plugin Manager, если вы не можете его найти.
Методика
Откройте QGIS. Перейдите к меню .
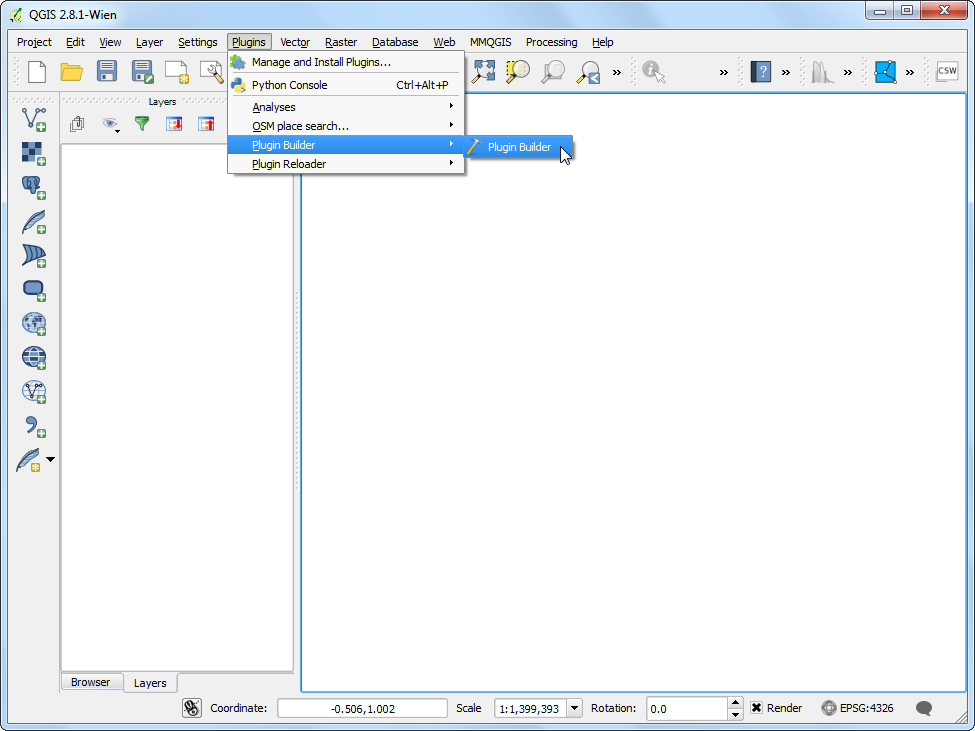
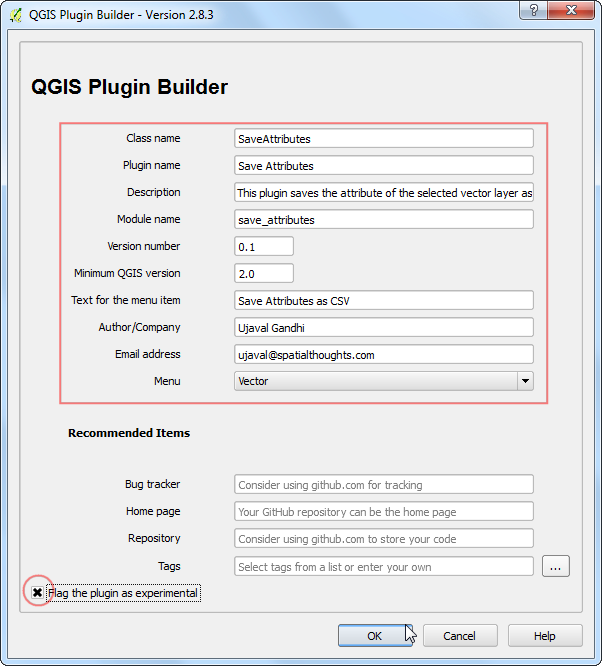
Вы увидите диалоговое окно QGIS Plugin Builder с формой. Вы можете заполнить форму, указав детали, касающиеся нашего модуля. В поле Class name нужно указать имя класса Python, содержащего логику модуля. Это также будет имя папки, содержащей все файлы модуля. Введите строку
SaveAttributesв качестве имени класса. Plugin name - это имя, под которым ваш плагин появится в меню Plugin Manager. Введите `` Save Attributes``. Добавьте описание в поле Description. Module name - это имя основного файла Python для модуля. Укажите его какsafe_attributes. Оставьте номер версии без изменения. Строка Text for menu item указывает, как пользователи будут видеть ваш плагин в меню QGIS. ВведитеSave Attributes as CSV. Введите свое имя и адрес электронной почты в соответствующих полях. Поле Menu показывает, в какое меню QGIS будет добавлен ваш модуль. Так как наш плагин предназначен для векторных данных, выберитеVector. Отметьте галочкой поле Flag the plugin as experimental в нижней части. Нажмите OK.
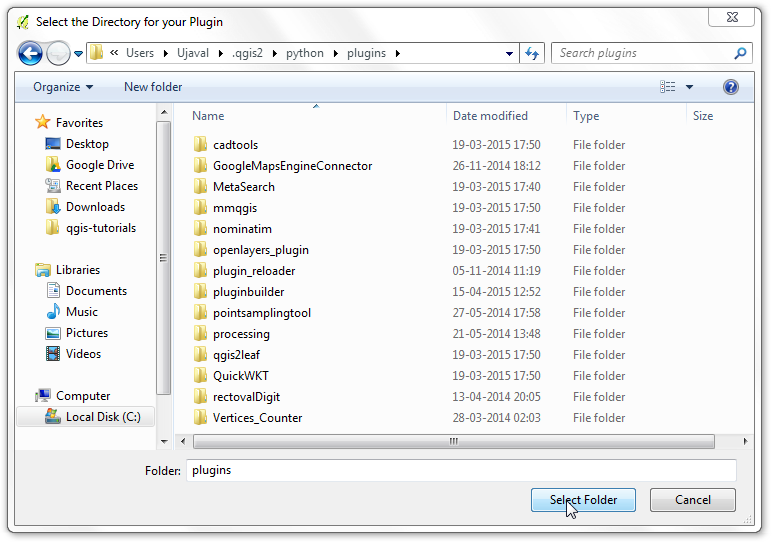
Далее вам будет предложено выбрать каталог для вашего модуля. Вы должны перейти к папке модулей QGIS на вашем компьютере и нажать Select Folder. Как правило, папка
.qgis2/находится в вашей домашнем каталоге. Местоположение папкиpluginбудет зависеть от вашей платформы следующим образом: (Заменитеusernameна ваше имя пользователя)
Windows
c:\Users\username\.qgis2\python\plugins
Mac
/Users/username/.qgis2/python/plugins
Linux
/home/username/.qgis2/python/plugins
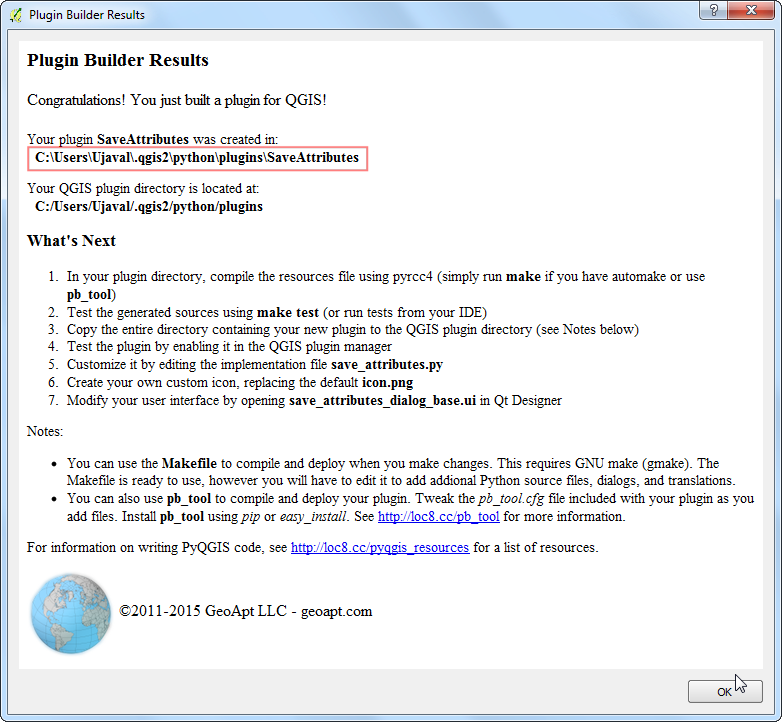
Вы увидите диалоговое окно подтверждения при создании шаблона вашего модуля. Обратите внимание на путь к папке с модулем.
Прежде чем мы сможем использовать вновь созданный плагин, мы должны скомпилировать файл
resources.qrc, который был создан модулем Plugin Builder. Запустите OSGeo4W Shell под Windows или в терминале на Mac или Linux.
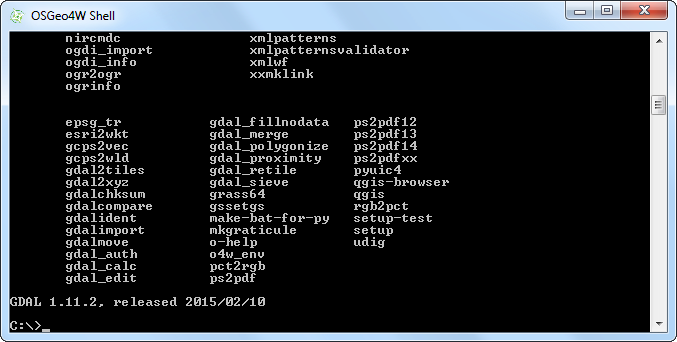
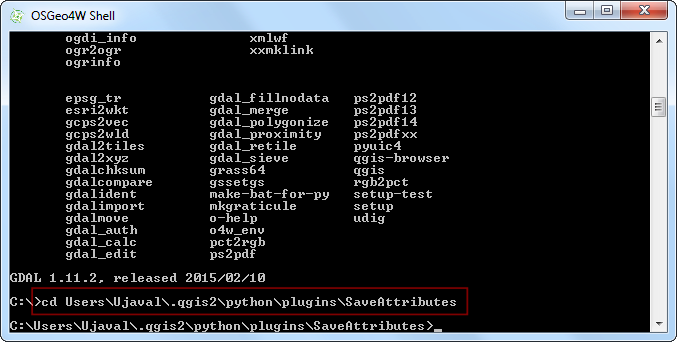
Перейдите к папке модуля, в которой были созданы файлы с помощью модуля
Plugin Builder. Вы можете использовать командуcdс последующим указанием пути к директории.
cd c:\Users\username\.qgis2\python\plugins\SaveAttributes
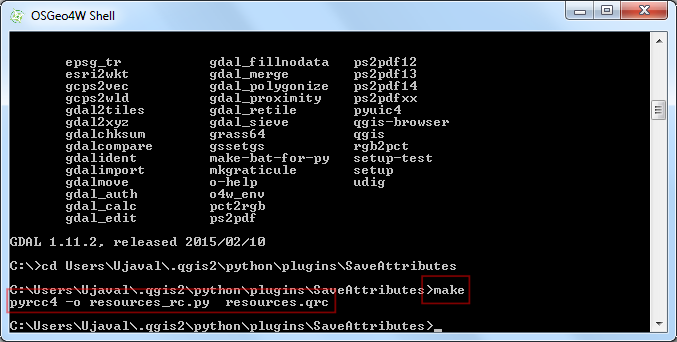
Оказавшись в каталоге, напечатайте
make. Это запустит командуpyrcc4, которую мы установили, как часть расширения Qt для Python.
make
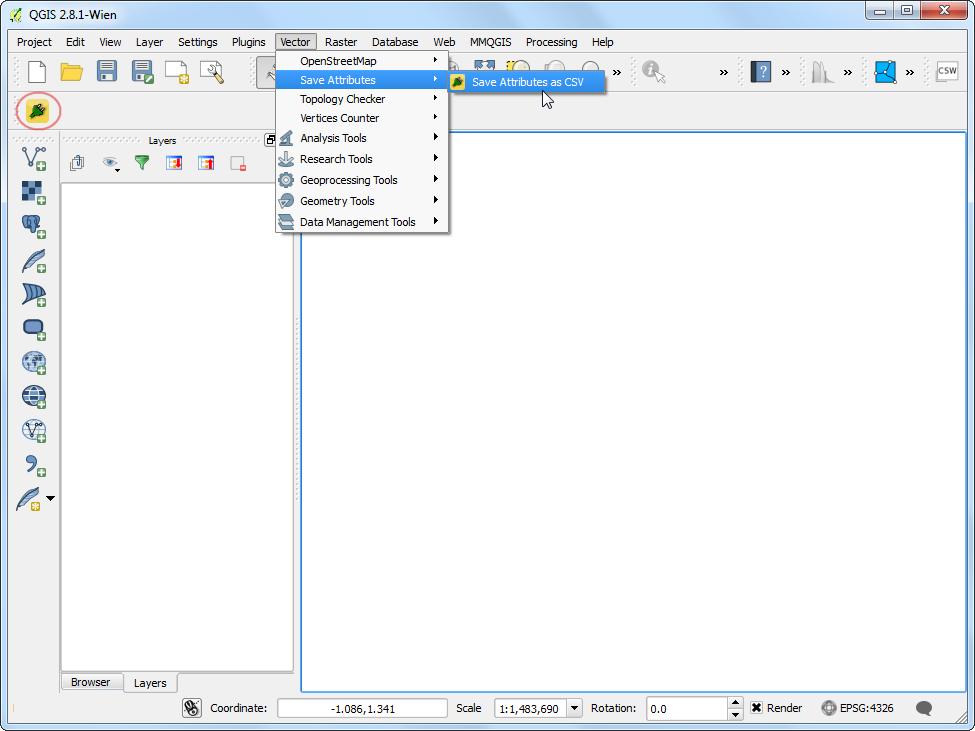
Now we are ready to have a first look at the brand new plugin we created. Close QGIS and launch it again. Go to and enable the
Save Attributesplugin in the Installed tab. You will notice that there is a new icon in the toolbar and a new menu entry under . Select it to launch the plugin dialog.
Вы заметите новое пустое диалоговое окно под названием Save Attributes. Закройте это окно.
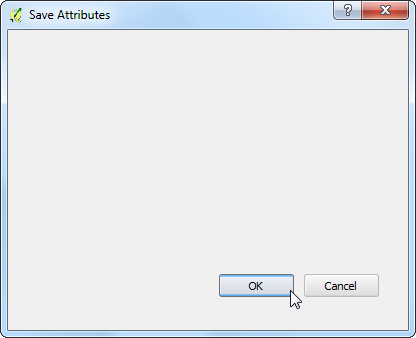
We will now design our dialog box and add some user interface elements to it. Open the
Qt Creatorprogram and to to File –> Open File or Project….
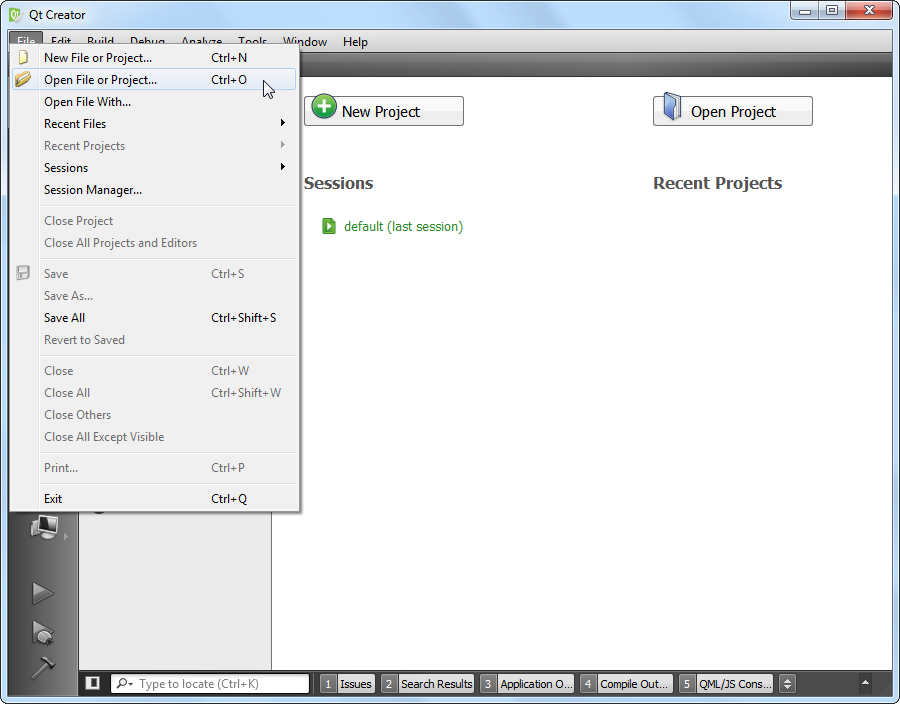
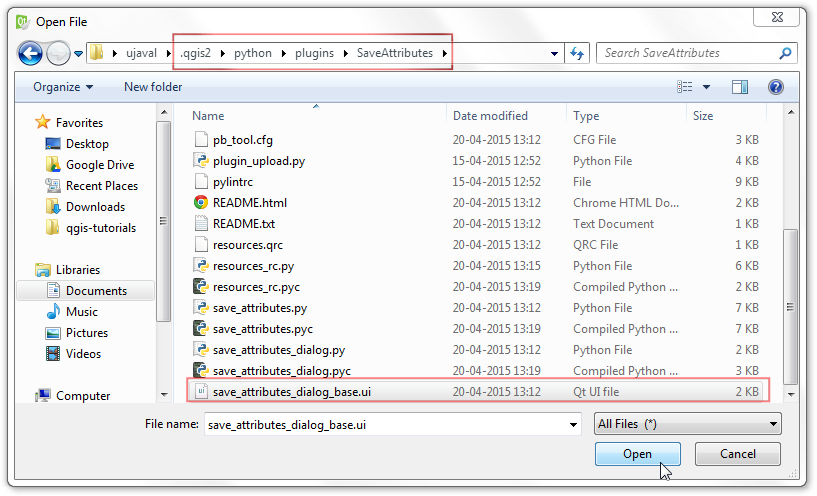
Перейдите к папке с модулем и выберите файл
save_attributes_dialog_base.ui. Нажмите Open.
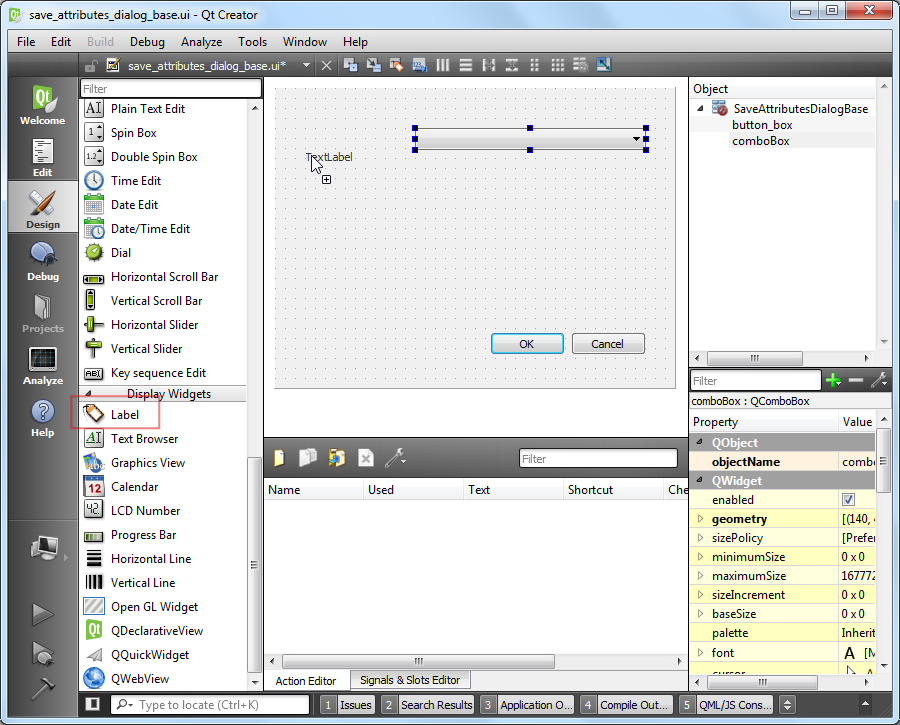
Вы увидите пустое диалоговое окно модуля. Вы можете перетаскивать элементы из панели слева в диалоговое окно. Мы добавим Input Widget вида Combo Box. Перетащите его в диалоговое окно модуля.
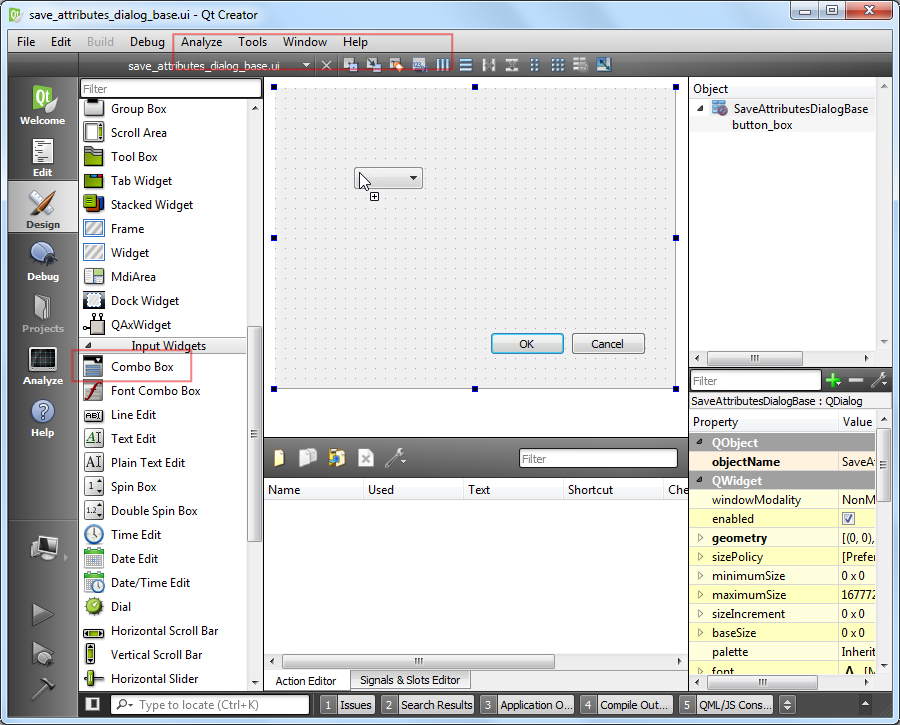
Настройте подходящий размер поля со списком. Теперь перетащите элемент Display Widget типа Label в диалоговое окно.
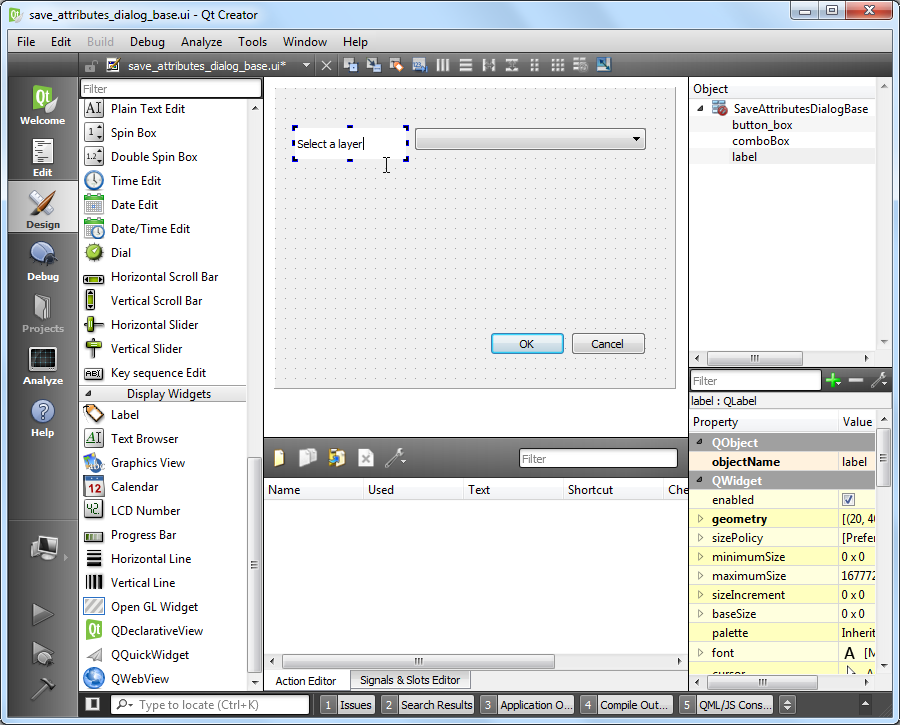
Щелкните на тексте и введите
Select a layer.
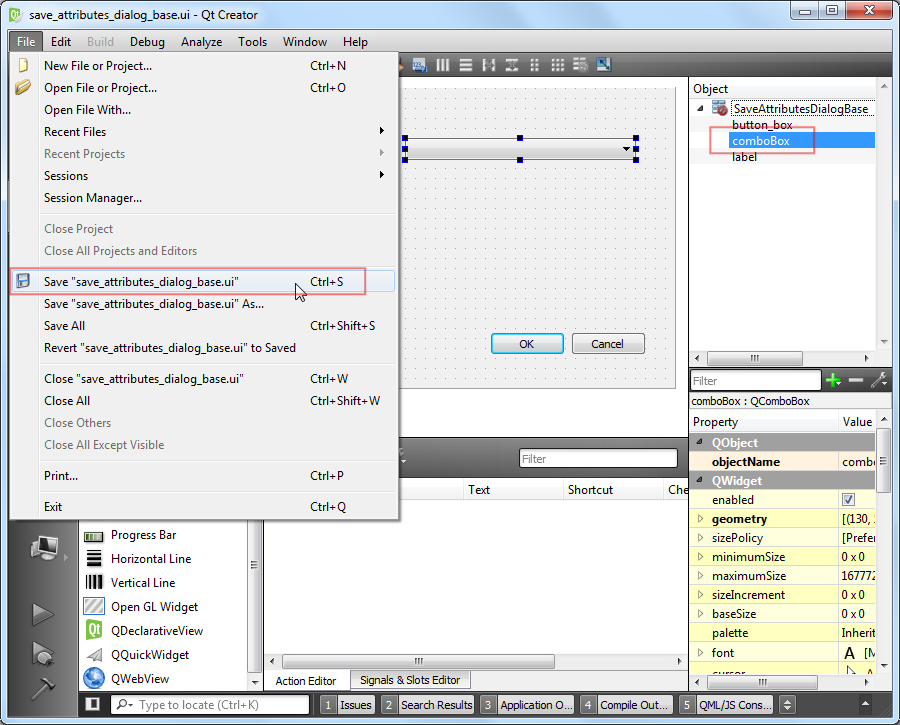
Сохраните этот файл, перейдя в . Заметьте, что имя объекта поля со списком -
comboBox. Для взаимодействия с этим объектом через код Python, мы должны обратиться к нему по этому имени.
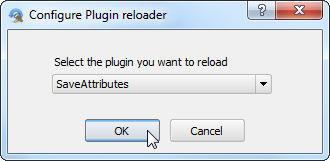
Давайте перезагрузим наш модуль, чтобы мы могли видеть изменения в диалоговом окне. Перейдите к .
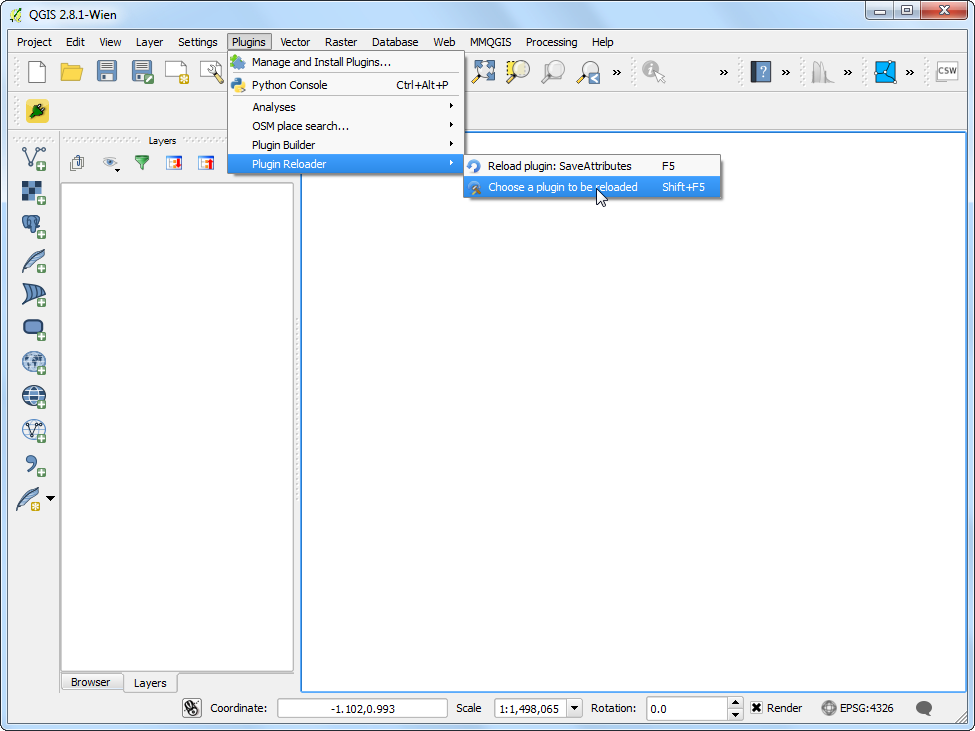
Выберите
SaveAttributesв диалоговом окне Configure Plugin reloader.
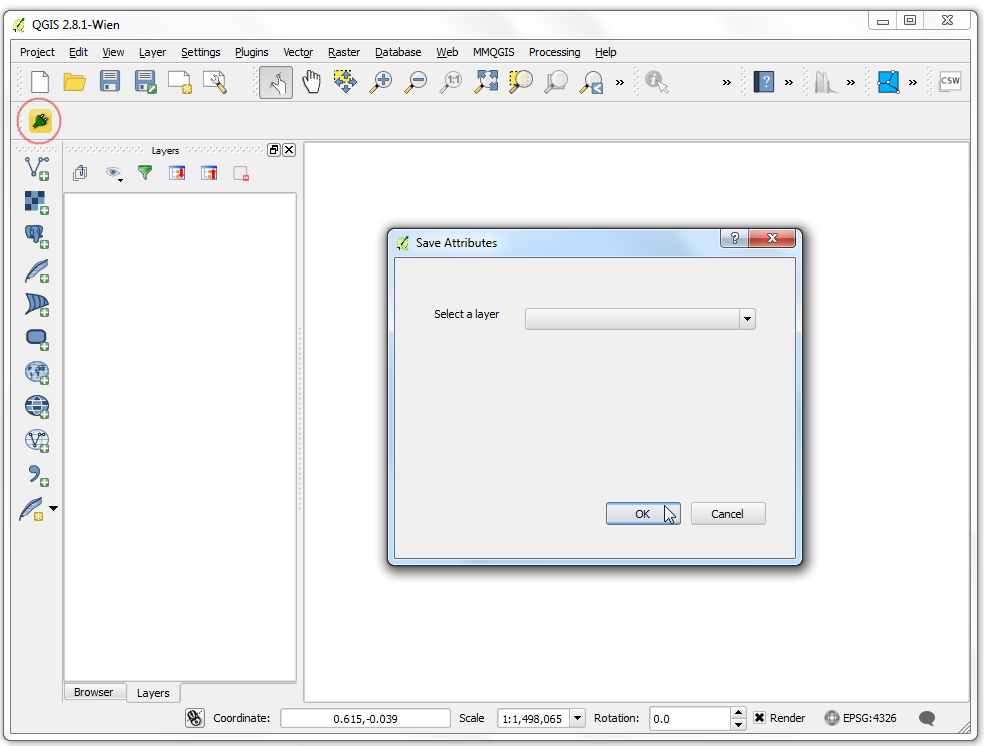
Теперь нажмите кнопку Save Attributes as CSV. Вы увидите только что созданное диалоговое окно.
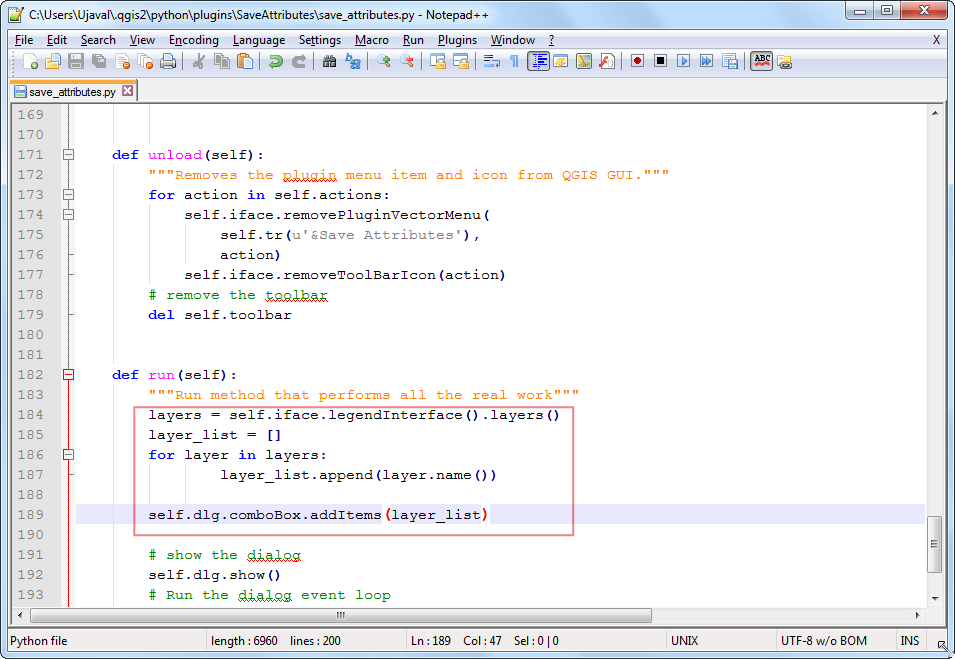
Давайте добавим в модуль алгоритм, заполняющий выпадающий список слоями, загружаенными в QGIS. Перейдите в папку модуля и откройте файл
save_attributes.pyв текстовом редакторе. Прокрутите вниз и найдите методrun(self). Этот метод будет вызываться, когда вы нажмете кнопку на панели инструментов или выберете пункт меню модуля. Добавьте следующий код в начале метода. Этот код получает слои, загруженные в QGIS, и добавляет их в объектcomboBoxиз диалогового окна модуля.
layers = self.iface.legendInterface().layers()
layer_list = []
for layer in layers:
     layer_list.append(layer.name())
     self.dlg.comboBox.addItems(layer_list)
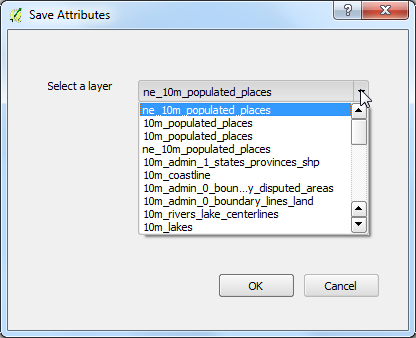
Вернитесь в главное окно QGIS, перезагрузите модуль, перейдя к . Либо вы можете просто нажать F5. Чтобы проверить эту новую функциональность, мы должны загрузить какие-то слои в QGIS. После того как вы загрузите данные, запустите модуль, перейдя к .
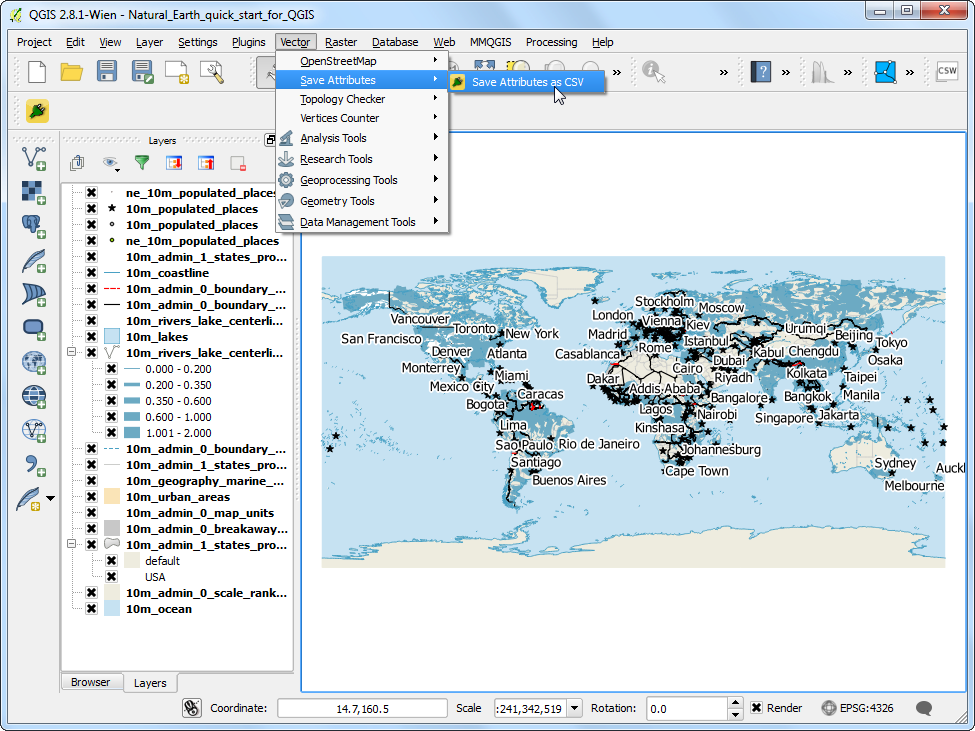
Вы увидите, что наш список теперь заполнен именами слоев, загруженных в QGIS.
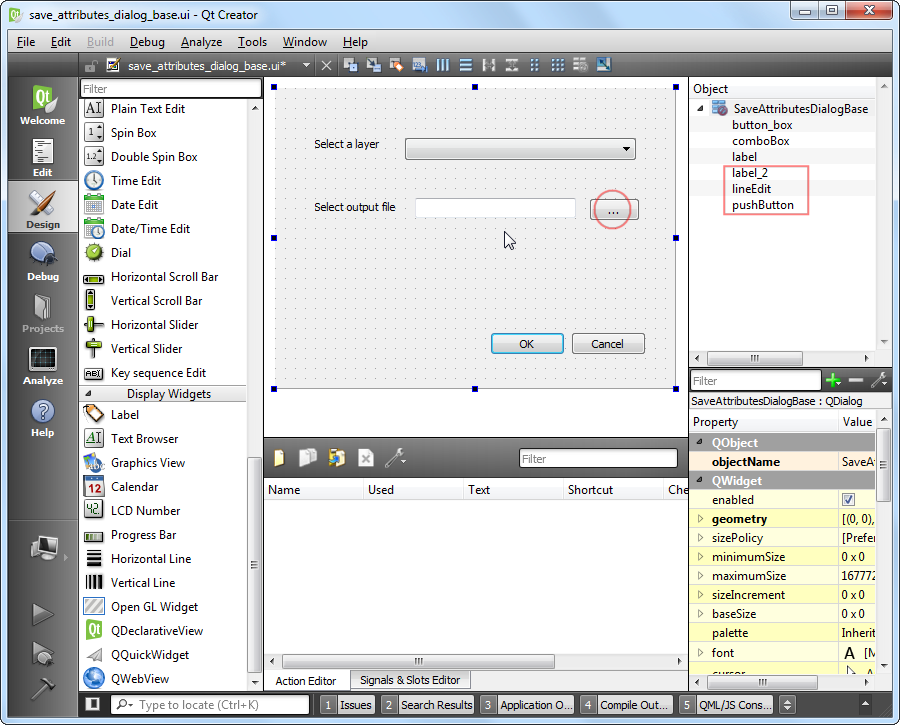
Let’s add remaining user interface elements. Switch back to
Qt Creatorand load thesave_attributes_dialog_base.uifile. Add aLabelDisplay Widget and change the text toSelect output file. Add aLineEdittype Input Widget that will show the output file path that the user has chosen. Next, add aPush Buttontype Button and change the button label to.... Note the object names of the widgets that we will have to use to interact with them. Save the file.
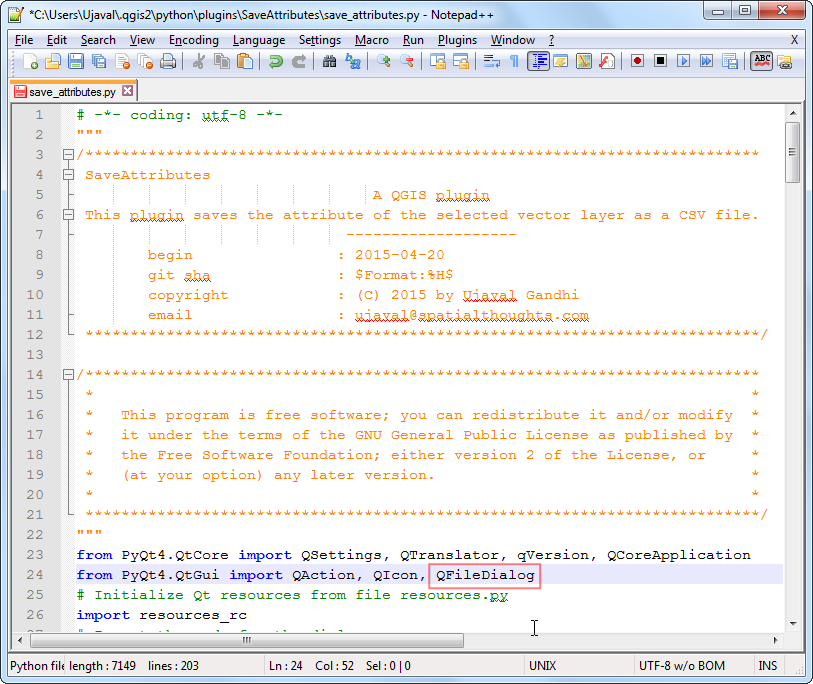
Теперь мы добавим код Python, который откроет файловый браузер, когда пользователь нажимает на кнопку
..., и покажет выбранный путь в строке редактирования. Откройте файлsave_attributes.pyв текстовом редакторе. ДобавьтеQFileDialogв наш список импорта в верхней части файла.
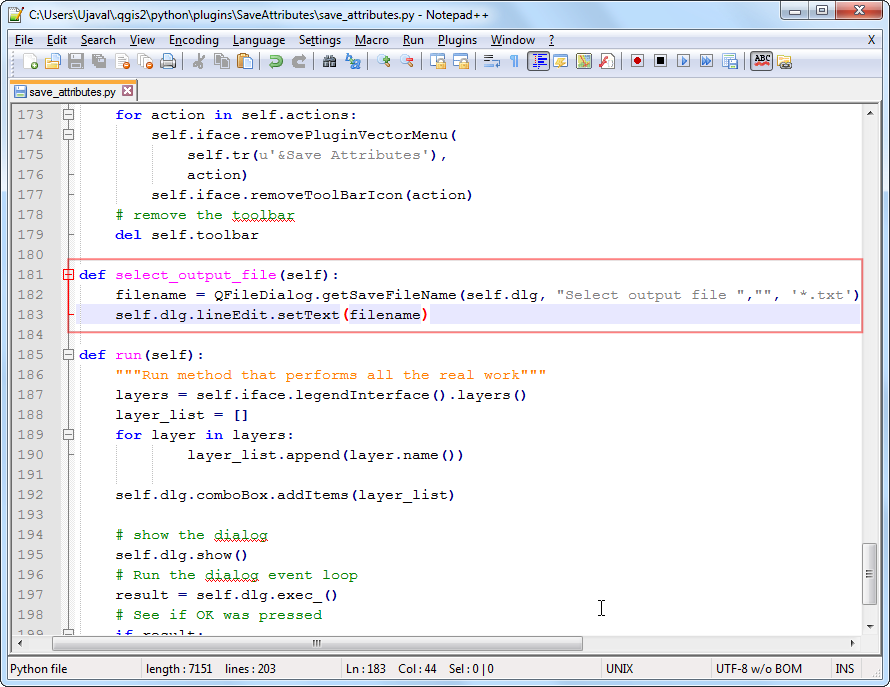
Добавьте новый метод под названием
select_output_fileсо следующим кодом. Этот код откроет файловый браузер и вставит в строку редактирования путь к файлу, выбранный пользователем.
def select_output_file(self):
    filename = QFileDialog.getSaveFileName(self.dlg, "Select output file ","", '*.txt')
    self.dlg.lineEdit.setText(filename)
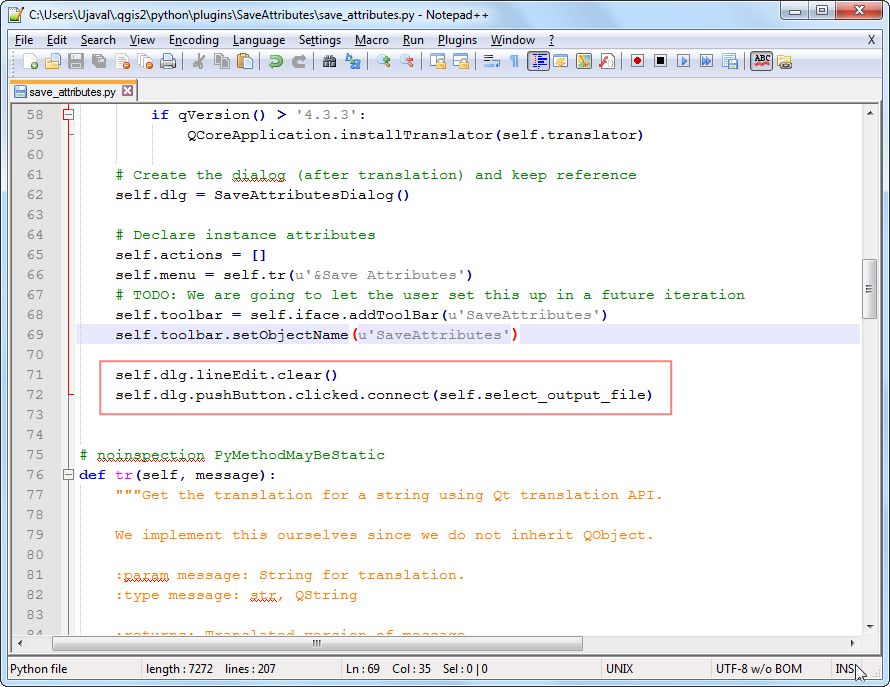
Now we need to add code so that when the … button is clicked,
select_output_filemethod is called. Scroll up to the__init__method and add the following lines at the bottom. This code will clear the previously loaded text (if any) in the line edit widget and also connect theselect_output_filemethod to theclickedsignal of the push button widget.
self.dlg.lineEdit.clear()
self.dlg.pushButton.clicked.connect(self.select_output_file)
Вернитесь в QGIS, перезагрузите плагин и откройте Save Attributes` dialog. Если все прошло нормально, вы сможете нажать на кнопку `` … `` и выбрать текстовый файл вывода с вашего диска.
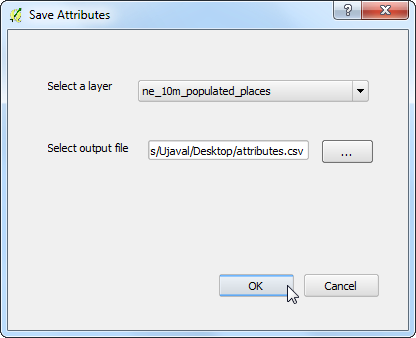
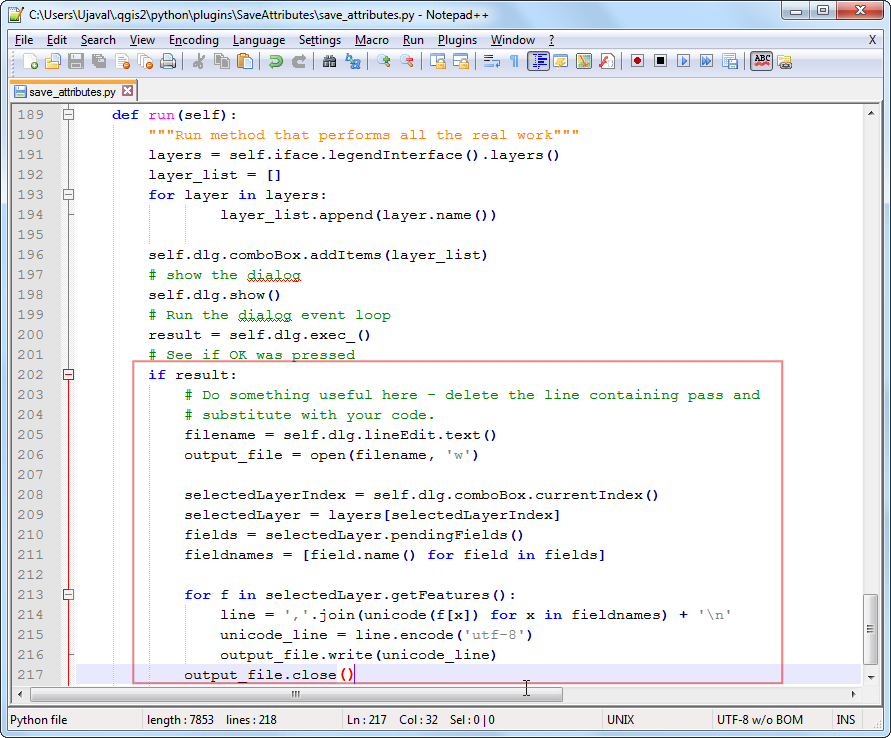
При нажатии OK в диалоговом окне модуля ничего не происходит. Это потому, что мы не добавили алгоритм для извлечения атрибутов из слоя и записи его в текстовый файл. Теперь у нас есть все, чтобы сделать это. Найдите место в методе
run, где написаноpass. Замените его на код ниже. Объяснение этого кода можно найти в уроке Первые шаги в программировании на Python.
filename = self.dlg.lineEdit.text()
output_file = open(filename, 'w')

selectedLayerIndex = self.dlg.comboBox.currentIndex()
selectedLayer = layers[selectedLayerIndex]
fields = selectedLayer.pendingFields()
fieldnames = [field.name() for field in fields]

for f in selectedLayer.getFeatures():
    line = ','.join(unicode(f[x]) for x in fieldnames) + '\n'
    unicode_line = line.encode('utf-8')
    output_file.write(unicode_line)
output_file.close()
Теперь наша модуль готов. Перезагрузите модуль и испробуйте его. Вы увидите, что выходной текстовый файл, который вы выбрали, будет иметь атрибуты из векторного слоя. Вы можете заархивировать папку с модулем и поделиться им с другими пользователями. Они смогут распаковать содержимое в их папку с модулями и попробовать ваш модуль. Если бы это был реальный модуль, вы бы загрузили его на QGIS Plugin Repository <https://plugins.qgis.org/> _, чтобы все пользователи QGIS смогли найти и скачать ваш модуль.
Примечание
Этот модуль предназначен только для демонстрационных целей. Не публикуйте этот модуль и не загружайте его в репозиторий модулей QGIS.
Ниже приводится полный текст файла save_attributes.py.
# -*- coding: utf-8 -*-
"""
/***************************************************************************
 SaveAttributes
                                 A QGIS plugin
 This plugin saves the attribute of the selected vector layer as a CSV file.
                              -------------------
        begin                : 2015-04-20
        git sha              : $Format:%H$
        copyright            : (C) 2015 by Ujaval Gandhi
        email                : ujaval@spatialthoughts.com
 ***************************************************************************/

/***************************************************************************
 *                                                                         *
 *   This program is free software; you can redistribute it and/or modify  *
 *   it under the terms of the GNU General Public License as published by  *
 *   the Free Software Foundation; either version 2 of the License, or     *
 *   (at your option) any later version.                                   *
 *                                                                         *
 ***************************************************************************/
"""
from PyQt4.QtCore import QSettings, QTranslator, qVersion, QCoreApplication
from PyQt4.QtGui import QAction, QIcon, QFileDialog
# Initialize Qt resources from file resources.py
import resources_rc
# Import the code for the dialog
from save_attributes_dialog import SaveAttributesDialog
import os.path


class SaveAttributes:
    """QGIS Plugin Implementation."""

    def __init__(self, iface):
        """Constructor.

        :param iface: An interface instance that will be passed to this class
            which provides the hook by which you can manipulate the QGIS
            application at run time.
        :type iface: QgsInterface
        """
        # Save reference to the QGIS interface
        self.iface = iface
        # initialize plugin directory
        self.plugin_dir = os.path.dirname(__file__)
        # initialize locale
        locale = QSettings().value('locale/userLocale')[0:2]
        locale_path = os.path.join(
            self.plugin_dir,
            'i18n',
            'SaveAttributes_{}.qm'.format(locale))

        if os.path.exists(locale_path):
            self.translator = QTranslator()
            self.translator.load(locale_path)

            if qVersion() > '4.3.3':
                QCoreApplication.installTranslator(self.translator)

        # Create the dialog (after translation) and keep reference
        self.dlg = SaveAttributesDialog()

        # Declare instance attributes
        self.actions = []
        self.menu = self.tr(u'&Save Attributes')
        # TODO: We are going to let the user set this up in a future iteration
        self.toolbar = self.iface.addToolBar(u'SaveAttributes')
        self.toolbar.setObjectName(u'SaveAttributes')

        self.dlg.lineEdit.clear()
        self.dlg.pushButton.clicked.connect(self.select_output_file)


    # noinspection PyMethodMayBeStatic
    def tr(self, message):
        """Get the translation for a string using Qt translation API.

        We implement this ourselves since we do not inherit QObject.

        :param message: String for translation.
        :type message: str, QString

        :returns: Translated version of message.
        :rtype: QString
        """
        # noinspection PyTypeChecker,PyArgumentList,PyCallByClass
        return QCoreApplication.translate('SaveAttributes', message)


    def add_action(
        self,
        icon_path,
        text,
        callback,
        enabled_flag=True,
        add_to_menu=True,
        add_to_toolbar=True,
        status_tip=None,
        whats_this=None,
        parent=None):
        """Add a toolbar icon to the toolbar.

        :param icon_path: Path to the icon for this action. Can be a resource
            path (e.g. ':/plugins/foo/bar.png') or a normal file system path.
        :type icon_path: str

        :param text: Text that should be shown in menu items for this action.
        :type text: str

        :param callback: Function to be called when the action is triggered.
        :type callback: function

        :param enabled_flag: A flag indicating if the action should be enabled
            by default. Defaults to True.
        :type enabled_flag: bool

        :param add_to_menu: Flag indicating whether the action should also
            be added to the menu. Defaults to True.
        :type add_to_menu: bool

        :param add_to_toolbar: Flag indicating whether the action should also
            be added to the toolbar. Defaults to True.
        :type add_to_toolbar: bool

        :param status_tip: Optional text to show in a popup when mouse pointer
            hovers over the action.
        :type status_tip: str

        :param parent: Parent widget for the new action. Defaults None.
        :type parent: QWidget

        :param whats_this: Optional text to show in the status bar when the
            mouse pointer hovers over the action.

        :returns: The action that was created. Note that the action is also
            added to self.actions list.
        :rtype: QAction
        """

        icon = QIcon(icon_path)
        action = QAction(icon, text, parent)
        action.triggered.connect(callback)
        action.setEnabled(enabled_flag)

        if status_tip is not None:
            action.setStatusTip(status_tip)

        if whats_this is not None:
            action.setWhatsThis(whats_this)

        if add_to_toolbar:
            self.toolbar.addAction(action)

        if add_to_menu:
            self.iface.addPluginToVectorMenu(
                self.menu,
                action)

        self.actions.append(action)

        return action

    def initGui(self):
        """Create the menu entries and toolbar icons inside the QGIS GUI."""

        icon_path = ':/plugins/SaveAttributes/icon.png'
        self.add_action(
            icon_path,
            text=self.tr(u'Save Attributes as CSV'),
            callback=self.run,
            parent=self.iface.mainWindow())


    def unload(self):
        """Removes the plugin menu item and icon from QGIS GUI."""
        for action in self.actions:
            self.iface.removePluginVectorMenu(
                self.tr(u'&Save Attributes'),
                action)
            self.iface.removeToolBarIcon(action)
        # remove the toolbar
        del self.toolbar

    def select_output_file(self):
        filename = QFileDialog.getSaveFileName(self.dlg, "Select output file ","", '*.txt')
        self.dlg.lineEdit.setText(filename)

    def run(self):
        """Run method that performs all the real work"""
        layers = self.iface.legendInterface().layers()
        layer_list = []
        for layer in layers:
                layer_list.append(layer.name())

        self.dlg.comboBox.clear()
        self.dlg.comboBox.addItems(layer_list)
        # show the dialog
        self.dlg.show()
        # Run the dialog event loop
        result = self.dlg.exec_()
        # See if OK was pressed
        if result:
            # Do something useful here - delete the line containing pass and
            # substitute with your code.
            filename = self.dlg.lineEdit.text()
            output_file = open(filename, 'w')

            selectedLayerIndex = self.dlg.comboBox.currentIndex()
            selectedLayer = layers[selectedLayerIndex]
            fields = selectedLayer.pendingFields()
            fieldnames = [field.name() for field in fields]

            for f in selectedLayer.getFeatures():
                line = ','.join(unicode(f[x]) for x in fieldnames) + '\n'
                unicode_line = line.encode('utf-8')
                output_file.write(unicode_line)
            output_file.close()
If you want to report any issues with this tutorial, please comment below. (requires GitHub account)