
How to Choose the Right Materials for Your Rain Gutter Installation
Understanding Material Durability When selecting materials for rain gutters , the foremost consideration should be durability. Different materials can withstand varying environmental conditions such as exposure to extreme temperatures, moisture, and physical wear. Aluminum is popular due to its resistance to rust and moderate price point, while copper offers longevity and an aesthetic appeal that matures with age. Steel is another durable option but can be susceptible to rust if not properly coated or maintained. Considering Weather Resistance The local climate plays a critical role in choosing the right gutter material. In areas prone to heavy rainfalls or snow, sturdy materials like vinyl or galvanized steel are advisable as they handle large amounts of water well and resist weather-related damages. Conversely, aluminum works well in coastal areas since it resists salt corrosion better than most metals. Evaluating Aesthetic Appeal Gutters are not only functional but also contribute to the exterior look of your house. Copper gutters enhance traditional homes with a rustic charm that evolves as the metal patinas over time. For modern homes, aluminum gutters can be painted to match any color scheme, offering customization that complements contemporary aesthetics.
How to Choose the Right Gutter Contractor for Your Home
Choosing the right gutter installation contractor for your home can be a daunting task! It's essential to make sure you find someone trustworthy, professional and experienced. (After all,) you don't want to end up with shoddy work or overpay for the services. The first step is to do some research. See who is available in your area and read their reviews online. (Plus,) don't forget to ask around for recommendations from people you trust. Once you've narrowed down your choices, it's time to take an even closer look at each potential contractor. Make sure they are qualified and licensed if necessary, as well as insured so that any damage is covered during the job. Ask about their past projects and get references if possible, too. Don't hesitate to inquire about guarantees on labor or materials they use either - this will ensure your peace of mind when getting the work done! Finally, when making your decision, think carefully about cost versus quality: don't go with the cheapest option just because it sounds good on paper; instead consider both factors together before committing to anything! Also pay attention to communication: how quickly do they
3. Saw gutter to length
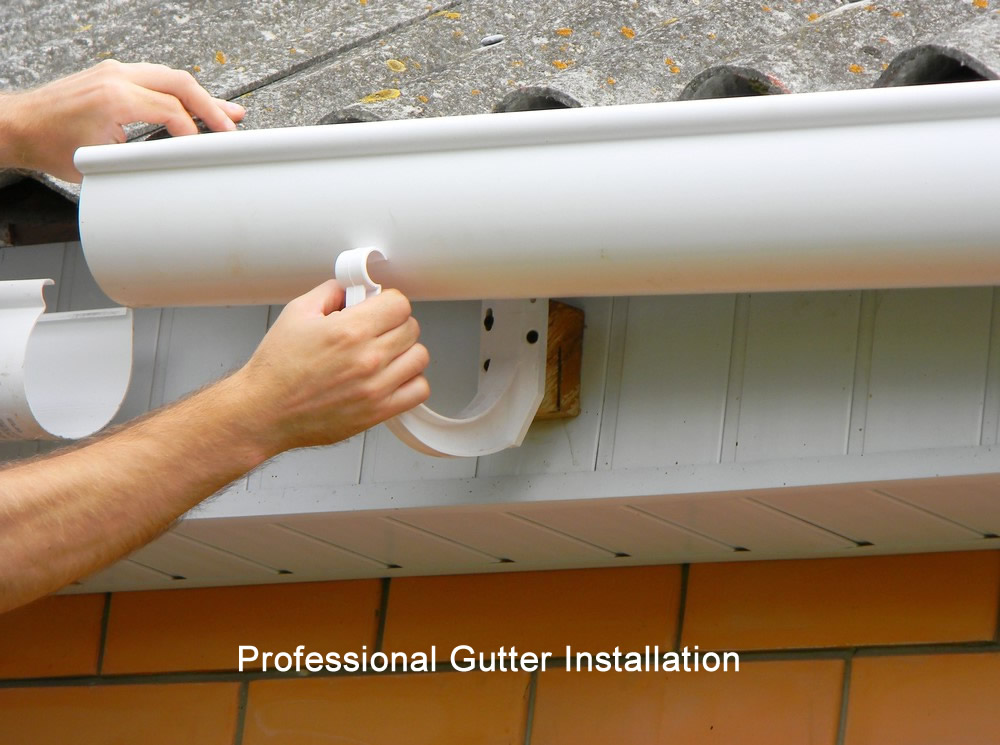
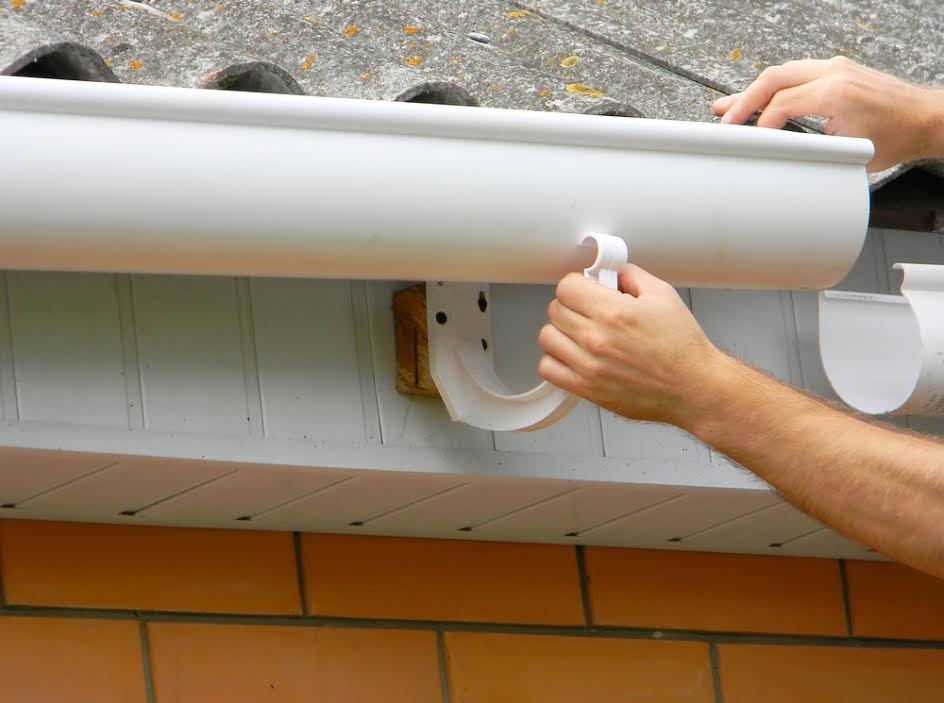
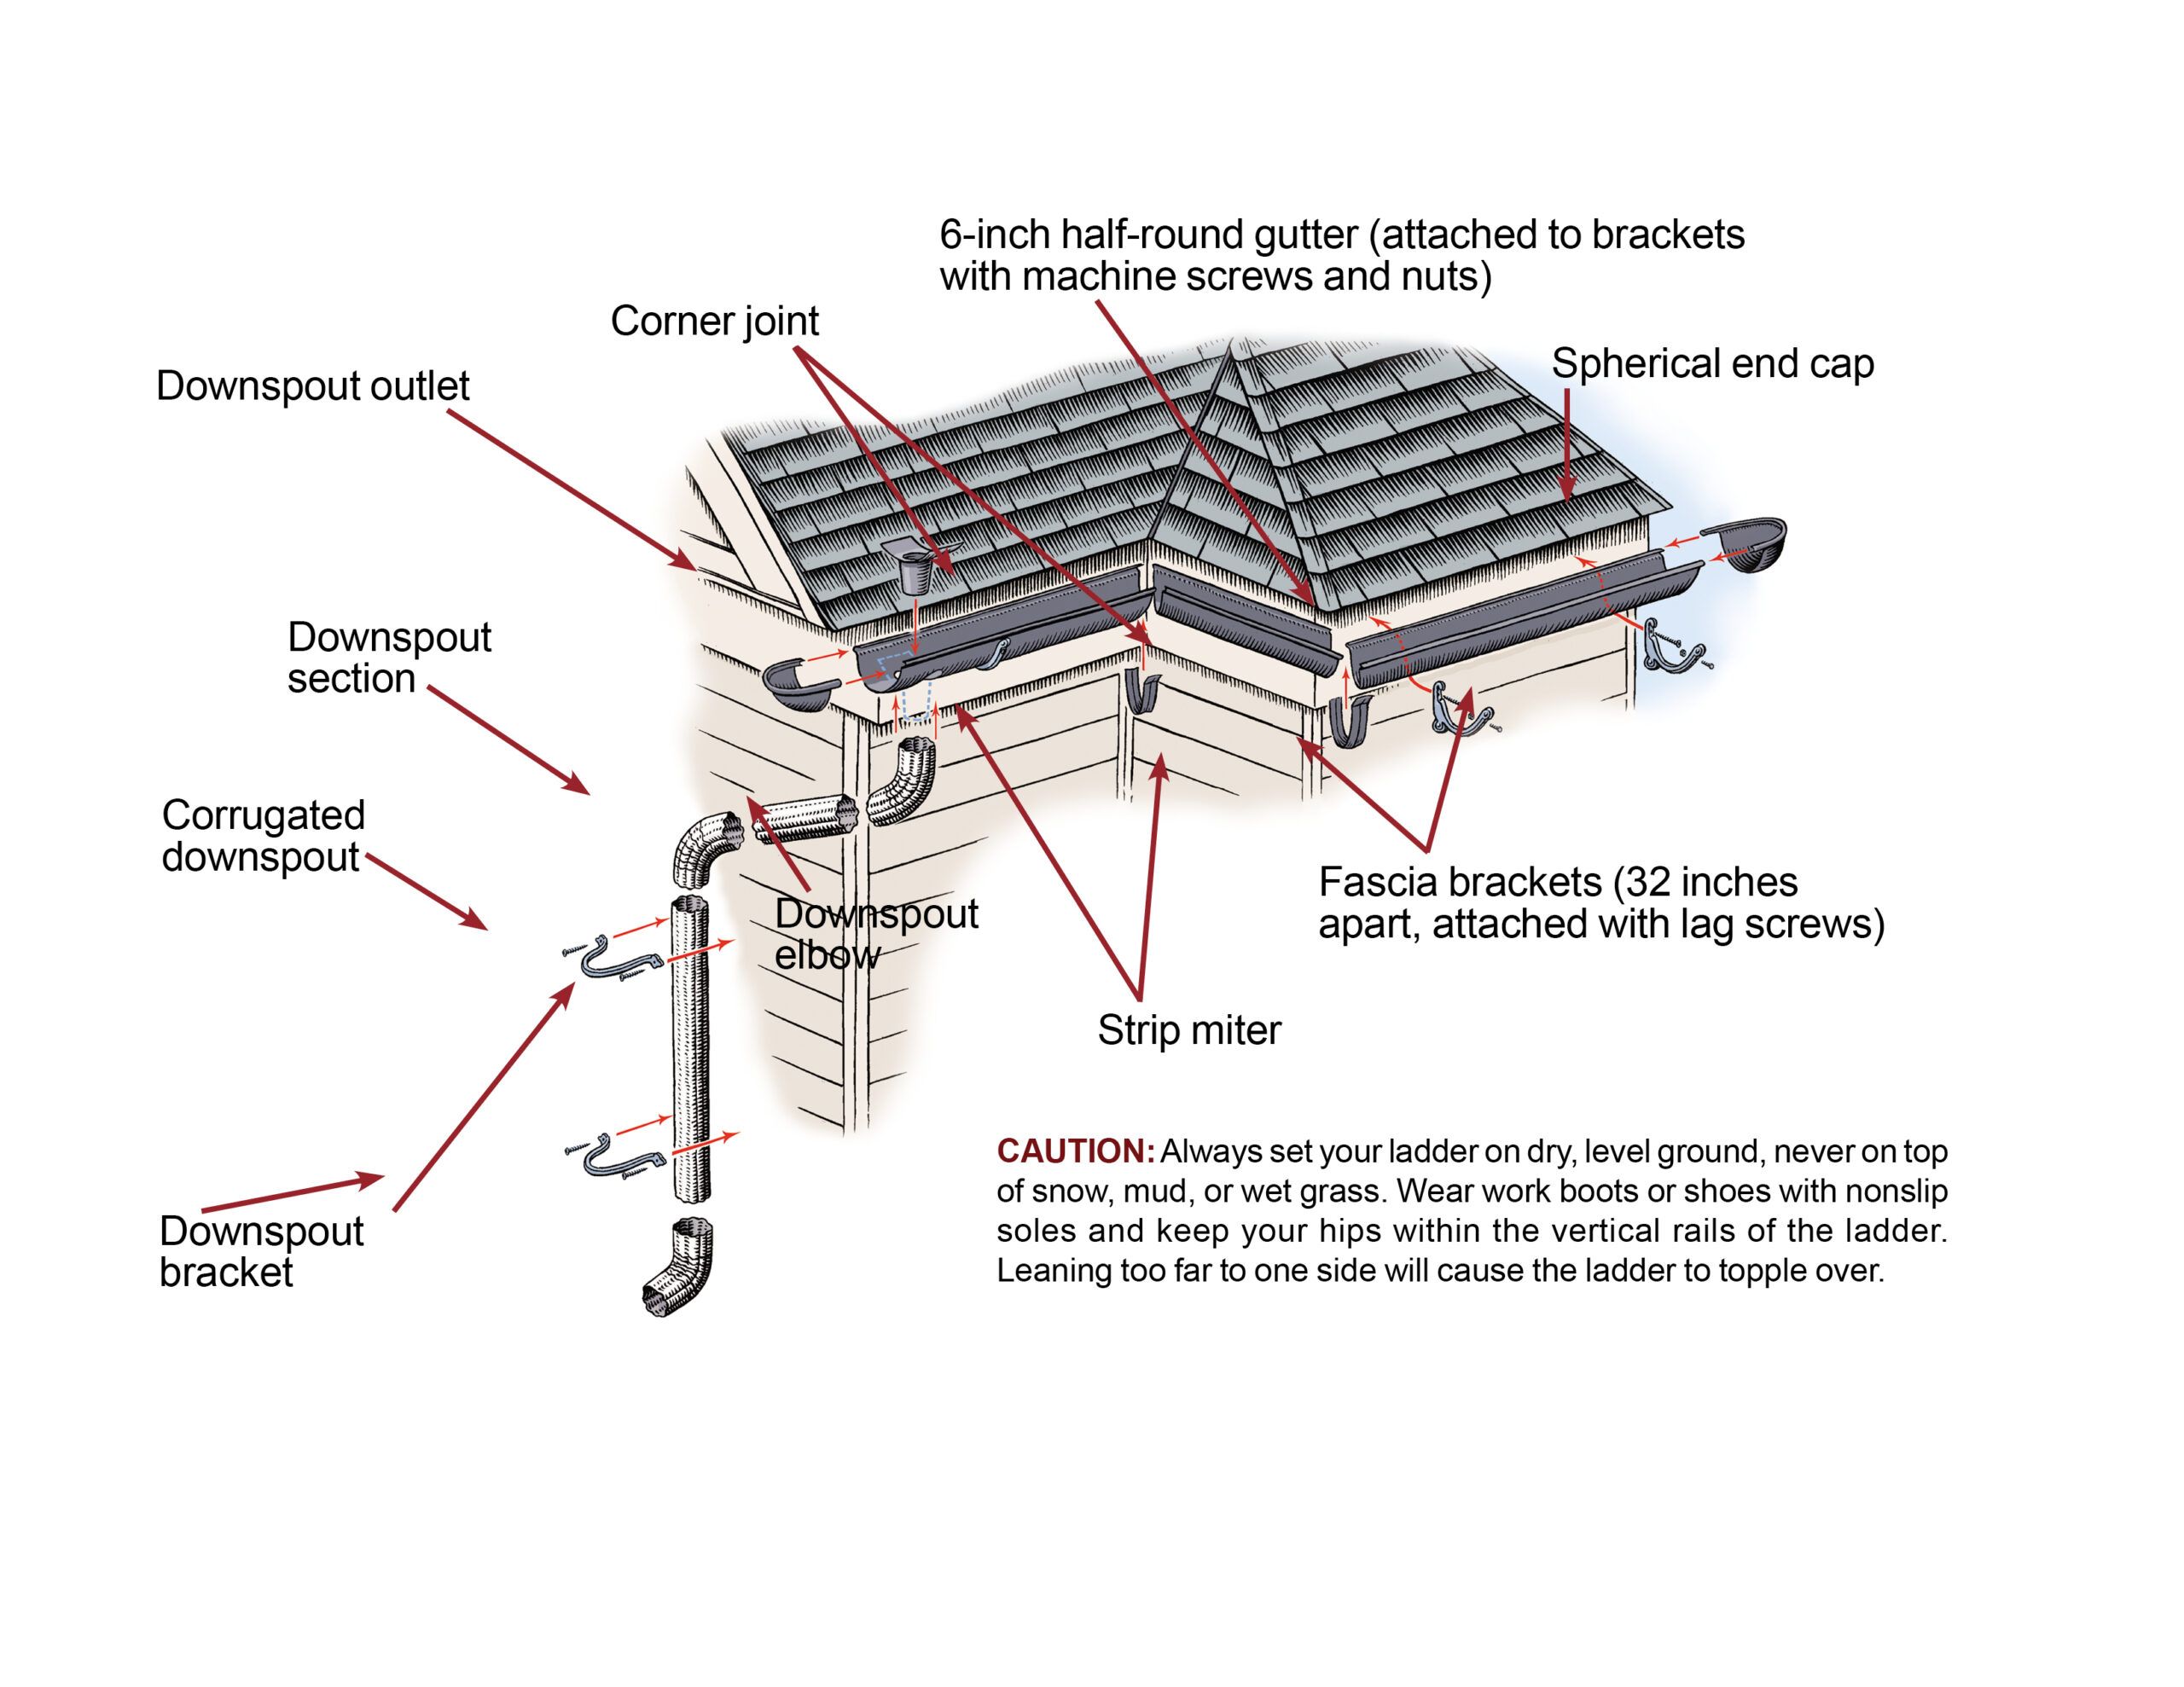
To ensure you have the right amount of gutter material and proper placement of downspouts, start by measuring your roof's dimensions. Measure the length of each roof edge where gutters will be installed, noting any corners or angles. Also, identify locations for downspouts, typically near corners and at least every 40 feet along the gutter run. How can you install sectional gutters properly? plan your installation: before assembling your gutters, carefully plan the layout to minimize seams. Fewer seams mean fewer potential leak points, so planning is crucial. Plan downspout locations: choose downspout positions where water can be directed safely away from the foundation of the house. Avoid locations that require working around obstacles. Gather materials: collect the required gutter sections and mounting hardware before beginning your installation. Cut gutters to size: use tin snips to cut the gutters to the appropriate lengths. Cut notches for connections: when joining gutter sections, cut a 2-inch notch for inside or outside corner pieces, and a 4-inch notch for splicing two straight sections together. Fig. A (below) shows an example of a rain gutter system for a typical house. Record the length of the rain gutter runs and mark the

How to Install Gutters in 8 Steps
Success in gutter installation comes from careful planning and precise execution. Follow these steps in order, taking time to double-check measurements and ensure proper alignment at each stage. planning and preparation calculate the proper slope (1/4 inch per 10 feet of gutter) mark bracket locations every 24 inches ensure downspout locations align with proper drainage areas installing gutters mount brackets following your slope calculations install end caps and seal thoroughly place gutter sections into brackets connect sections using sealant and screws test for proper water flow attaching downspouts install outlet tubes at predetermined locations measure and cut downspouts to proper length attach downspout brackets to house connect downspouts to outlets add extensions if needed for proper drainage. Installing a drip edge on your roof is a straightforward process. Still, it is important to do it correctly to ensure it effectively directs water into the gutters. Here are the basic steps for installing a drip edge: measure the length of the eaves on your roof and purchase enough drip edges to cover the entire length. Begin by installing the drip edge along the roof’s eaves, starting at one end and working your way to the other. Ensure that the drip edge is flush against the roof deck and that the edge of the
How to Install Gutters
So there you have it. A 15 diy step by step guide for you to be able to install your very own guttering system. Yeah, yeah, we know it’s a lot and seems a bit complicated– but we never said what we do is easy! here at rain guard we can take the stress out of installing your gutters by yourself because we are pros. We have over 40 years of experience in installing gutters on residence buildings , commercial buildings, as well as providing sunesta product installation services. Check out our website to learn more about us , our gutter services , sunesta products, or to schedule a free estimate ! however you contact us , we look forward to it. For homes in most regions of the country, rain gutters and downspouts are necessary to collect and carry away rainwater. Without them, water would erode the soil around the foundation, splash dirt onto the siding, and likely leak into the basement or crawlspace. Gutters are most often installed by professionals , but there’s no reason you can’t do it yourself. Even many common gutter repair needs can be done by homeowners.