Last Updated: 2021-06-13
This is the second part of a tutorial that guides you through the process of building a Koivu Cloud database app. As it's always helpful to focus on a concrete example, we are building an app for sales personnel who need a tool to create quotes. The other parts of this tutorial series are:
Creating a full Solution in Koivu Cloud is a straightforward process, and you can use your existing Excel data sheets as a starting point. We've already begun to set up the cloud tables for our solution, and in this second part we'll continue to expand the application.
What you'll learn
In this tutorial we'll create a full Solution with the Koivu Cloud Excel add-in. You'll learn how to:
- Create cloud tables for your data
- Relocate cloud data fields in spreadsheet
- Learn more about search fields and data validations
- Add functionality with action forms
- Configure Koivu Cloud to take advantage of Excel's grouping features
What you'll need
Creating a Koivu Cloud solution is a relatively easy task, however, you should at least have the following:
- Koivu Cloud account
- Basic knowledge of the Koivu Cloud Excel add-in - see Introduction to Koivu Cloud Excel add-in
- Working knowledge of Excel, including tables
- You know what cloud tables are and can create one - see Get your spreadsheet into a database - Cloud Tables
Before going through this tutorial, you might want to view the tutorial videos at the Koivu Cloud support pages.
As we continue our quote builder design, we need to create more tables for our application. The main goal of the application is to build quotes, therefore, we need a table for quotes. Next, we'll define a table for quotes and turn it into a cloud table.
Overview of the quote table
Firstly, if you do not already have a spreadsheet ready for your quote table, you should either download the sample workbook (you'll find a download link here), or create your own.

The above image displays a quote table that has 12 columns. Our goal now is to build a Quote sheet, where the end-user can select a customer from the header section located above the table, and start adding items to their quote. Therefore, we'll move the Customer column along with some other fields from the table to the header section of the Quote sheet. The columns of the Quote table are mostly self-explanatory, such as Customer and Quote ID. However, we also have columns with less obvious names, such as Position. We'll discuss what these are and how we use them in the following sections, but for now you'll need to take them as given.
In the end, you should have a Quote template sheet, where columns such as Customer and Quote ID have been moved from the table to the header section, and that looks something like this:
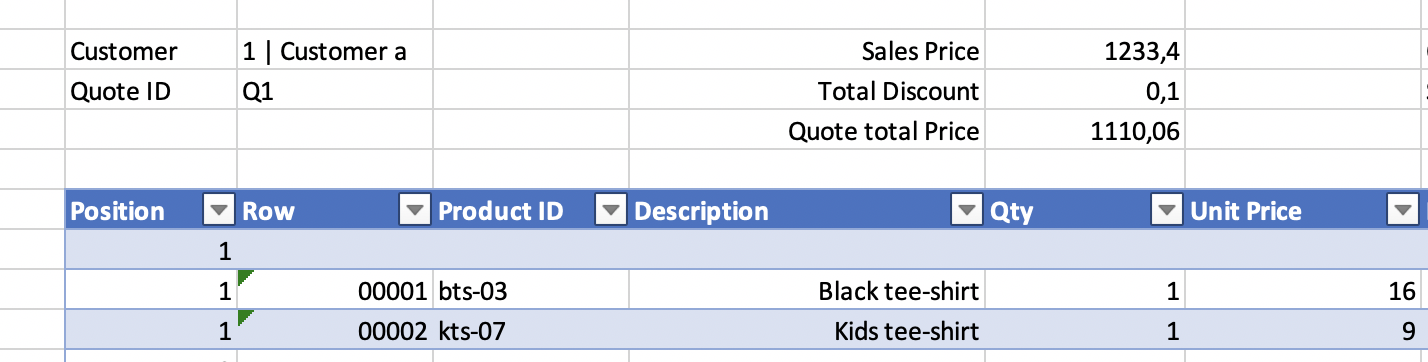
We can move, for example, the Customer column to the header because its value would be the same for each row in a given quote. In other words, a quote can have only one customer. Therefore, the customer information is listed only once in the header. The same applies to the Quote ID.
However, before going further into the details, let's start building the Quote table.
Creating the quote cloud table
We'll begin by transforming our Excel table into a cloud table.
To convert your data into a cloud table:
- On the Quote sheet of the template, select the data and choose Insert > Table.
- Give a meaningful name to the table, such as
Quote, Table Design > Table Name.
Next, transform your table into a cloud table. Our cloud table will need four key columns: Customer, Quote ID, Position, Row. We chose these columns to function as keys, because the customer and quote ID have the same value for each row within a single quote. Therefore, it makes sense to move them to the header of the template, and display the customer and quote ID information only once instead of listing the same values on each row. On the other hand, the keys need to be unique for each row, which is why we need the row and position as keys. Additionally, we'll use these keys to group the rows later on.
- Select a cell from each key column:
Customer,Quote ID,Position,Row. - Select Tools > Development Tools > Create Cloud Table, which opens the Column Definitions.
- Click Save to save your column definitions.
- Again, click Save to save the data, once you're back at the main sheet, and the column definitions have been submitted.
You can use the Column Definitions sheet to configure how the columns behave, and you could make your changes when you create the table. However, our aim is to walk through the steps one at a time, and we'll make the necessary modifications at the time they're required.
Not all cloud table fields need to be in a spreadsheet table. Especially in a multi-level table, like our Quote, some of the columns can be moved above the table. As a result, the header information is visible only once, and the spreadsheet does not need to repeat the same information, such as customer, on each row of the table. Also, this approach makes it easy to create a copy of the data; if you change one header key value to a new value, you have made a new version of a quote, for example.
We're going to start from a situation, where all columns are included in the table:

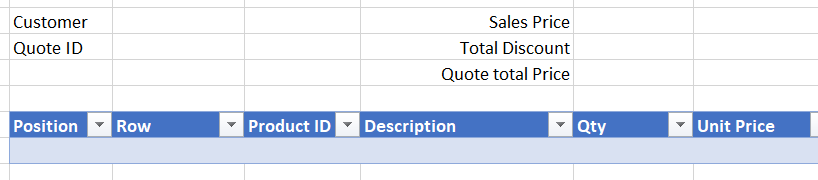
Our goal is a layout where specific columns, such as Customer and Quote ID, have been relocated to the header area of the spreadsheet:
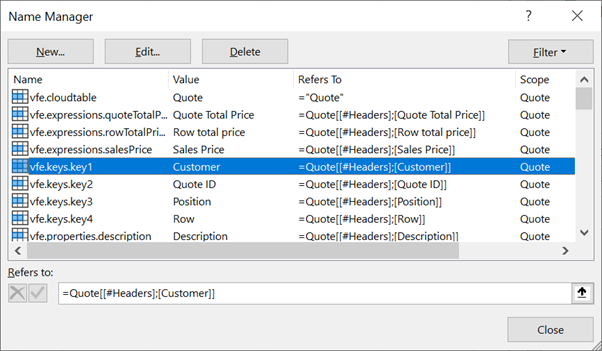
First, we need some way to identify and locate a field in the workbook, and for this purpose Koivu Cloud uses Excel's names. Excel names enable you to refer to a cell, or a group of cells by a given name, instead of the location of the cell, such as C2. For example, the name of the Customer field is vfe.keys.key1, as it is the first key column of the cloud table. You can view the names in Excel's Name manager, Formulas > Name manager:
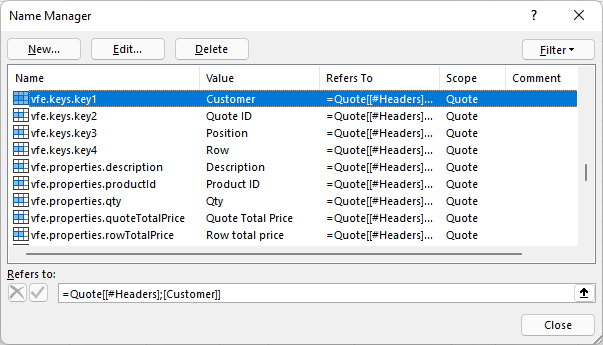
The scope in our example is the current worksheet. That is, Name manager's Scope column has Quote for the customer because we are working with a sheet titled Quote.
To relocate the fields:
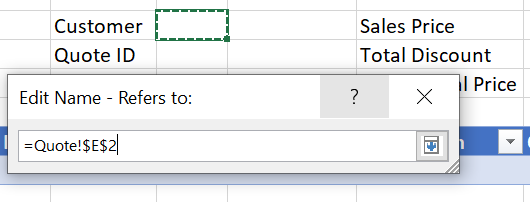
- In the header section of the Quote sheet, create entries for Customer, Quote ID, Sales Price, Total Discount, and Quote Total Price, as illustrated in the image above. You can create new rows above the table, if needed.
- In Excel, select Formulas > Name manager.
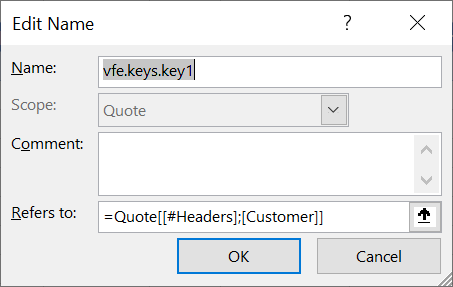
- To edit the name, such as
Customer, double-click the entry, or select it, and click Edit. - In the Refers to field, change the reference to refer to the cell next to the new Customer cell, and click OK.
- Remove the Customer column from the table: select a cell from the Customer column, right-click and select Delete > Table Columns. The column is no longer needed in the Excel template, as the customer information will be displayed in the header section.
- In the add-in, click Search to refresh the data. The value that you had in the Customer column should now be next to the Customer cell in the header section.
- Repeat the above steps for the other fields in the header: Quote ID, Sales Price, Total Discount, and Quote Total Price. Note that these fields currently do not have a value, and we'll return to these later. However, you can still change their references, so that when they do have values, these are populated to the cells in the header.
- Finally, in the add-in, click Clear to remove the data from the sheet, and save the new customized Excel workbook. If you don't clear the data first, you'll save it along with the workbook, which might cause problems later.
We'll continue our initial setup by defining search fields and data validations for the Quote. Firstly, we'll want to be able to search for a quote by customer and quote ID. As before, we'll use the Search Field Builder. You'll need to create two search fields: Customer and Quote ID. See the image below for the final result.
To define a search field for the Customer:
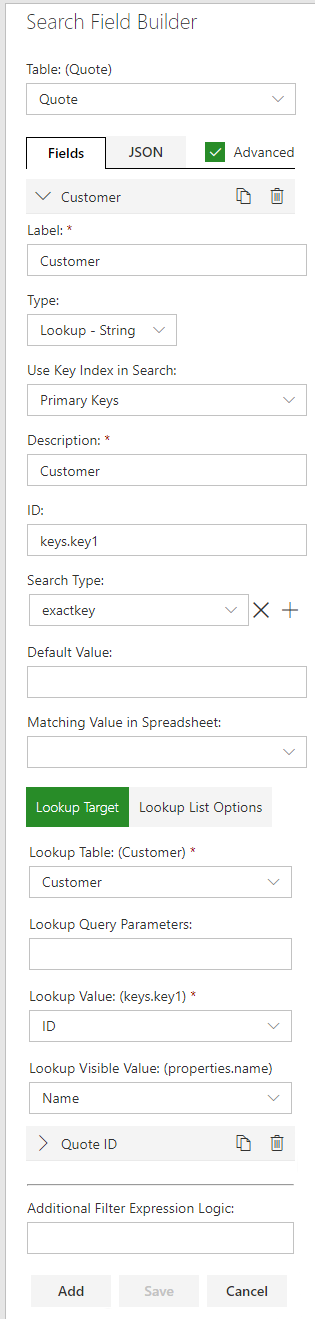
- On the Quote sheet, select Tools > Development Tools > Search Field Builder to define the search field for the customer. Koivu Cloud automatically creates default search fields for the first three key columns: Customer, Quote ID and Position. We'll need to customize the Customer search field to use the Customer cloud table in the lookup. That is, we'll use the customers that are listed in the Customer cloud table as the search criteria for this search field.
- We need search fields only for the Customer and Quote ID fields, and you can delete any additional search fields that may have been automatically created. For example, a field for the
Positioncolumn. To delete a field, click the trash can icon. - Select the Advanced option to see more search field options.
- Expand the Customer search field section.
- Edit the following fields (see the image below):
- Label:
Customer- The label above the search field in the add-in - Type:
Lookup - String- This creates a dropdown selection for the search criteria. Also, at the bottom of the add-in, you can now define Lookup Target and Lookup List Options. - Use Key Index in Search:
Primary Keys - Description:
Customer- Displayed inside the search field before any selections - ID:
keys.key1- A unique name for the SearchField. By default the Search Builder gives the name of the key or property in question. - Search Type:
exactkey- The type of the search. excactkey returns all rows that fully match the query keys. - Default Value: no value.
- Matching Value in Spreadsheet: no value.
On the Lookup Target tab:
- Lookup Table:
Customer.The system retrieves the values from the Customer cloud table. - Lookup Query Parameters: no value.
- Lookup Value:
ID - Lookup Visible Value:
Name
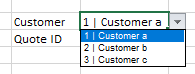
- Click Save to create the search field. You should now have two search fields with dropdown lists. The Customer dropdown list should include all customers that are included in the Customer cloud table. Also, if you add more customers, these will appear in this list. However, we still need to configure the second dropdown for the quotes.
To define a search field for the Quote ID:
- Again, select Tools > Development Tools > Search Field Builder to define the search field for the Quote ID. This field will use the previously defined Customer search field to filter its results.
- If a search field does not already exist for the Quote ID, click Add to create a second search field.
- Make sure the Advanced checkbox is selected, and you can see more search field options.
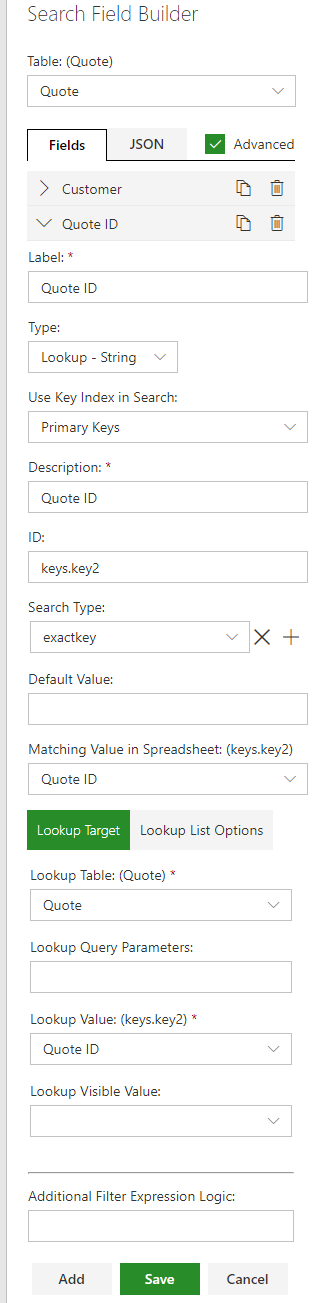
- Expand the Quote ID search field section.
- Edit the following fields:
- Label:
Quote ID- The label above the search field in the add-in - Type:
Lookup - String- This creates a dropdown selection for the search criteria. Also, at the bottom of the add-in, you can now define Lookup Target and Lookup List Options. - Use Key Index in Search:
Primary Keys - Description:
Quote ID- Displayed inside the search field before any selections - ID:
keys.key2 -A unique name for the SearchField. By default the Search Builder gives the name of the key or property in question. - Search Type:
exactkey- The type of the search. excactkey returns all rows that fully match the query keys. - Default Value: no value.
- Matching Value in Spreadsheet:
Quote ID- Updates the search criteria based on the value in the spreadsheet during the Save-Refresh workflow. The new value is taken from the first row of the spreadsheet table. This setting is needed in hybrid spreadsheets, like our quote builder, where you can create new records by editing the key value in the header above the table. That is, once the Quote cloud table is finished, you can create a new quote by entering a new Quote ID value in the header section of the Quote, and clicking Save in the add-in. Once you have saved the new quote, it is set as the search criteria in the Quote ID search field, and opened in the Quote sheet.
On the Lookup Target tab:
- Lookup Table:
Quote - Lookup Query Parameters: no value.
- Lookup Value:
Quote ID - Lookup Visible Value: no value.
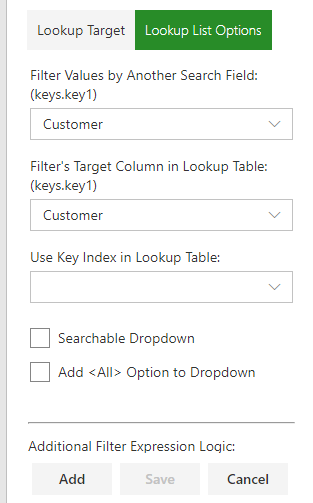
On the Lookup List Options tab
- Filter Values by Another Search Field:
Customer. Creates a cascading drop-down list, where the selection of Quote ID is dependent on the Customer selection. - Filter's Target Column in Lookup Table:
Customer - Use Key Index in Lookup Table: no value.
- Add <All> Option to Dropdown: make sure this is not selected, as we only want to open a single quote on the sheet.
In the end, you should have something like this:
|
|
|
Defining search fields requires many steps to complete, and alternatively, you can use JSON to define the search fields. For example, to quickly define the above search fields, simply copy and paste the following into the text box in the JSON tab of the search builder:
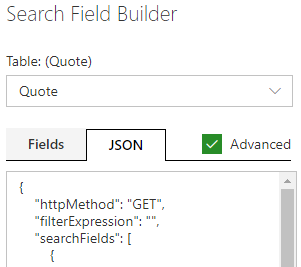
{
    "httpMethod": "GET",
    "filterExpression": "",
    "searchFields": [
        {
            "queryParameters": [
                "exactkey"
            ],
            "label": "Customer",
            "description": "Customer",
            "default": "",
            "type": "string",
            "keyIndex": 1,
            "id": "keys.key1",
            "lookup": {
                "url": "/valueflow/v1/properties/Customer",
                "value": "keys.key1",
                "visibleValue": "properties.name",
                "optional": false
            }
        },
        {
            "queryParameters": [
                "exactkey"
            ],
            "label": "Quote ID",
            "description": "Quote ID",
            "default": "",
            "type": "string",
            "keyIndex": 1,
            "id": "keys.key2",
            "lookup": {
                "url": "/valueflow/v1/properties/Quote",
                "value": "keys.key2",
                "optional": false,
                "filter": {
                    "targetField": "keys.key1",
                    "by": "keys.key1"
                }
            }
        }
    ]
}
The end result is the same:
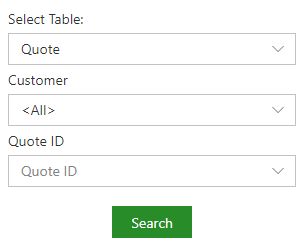
Of course, you cannot yet search for anything because no quotes exist for the defined customers, and we still need to further expand the features of the quote builder. Before moving on to cloud scripts, we'll add a data validation to the Customer column of the Quote cloud table. Previously, we moved the Customer field into the header section of the Excel sheet. Therefore, the validation will make sure that you can select a customer for a quote only from the given drop-down list.
Similarly to the search configuration above, the Customer cloud table functions as the lookup table for the validation.
To define the data validation:
- In the Excel add-in, select Tools > Development Tools > Data Validation Builder. The Data Validation Builder opens.
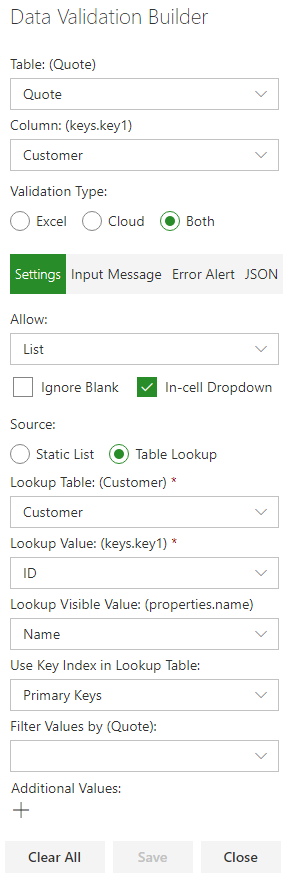
- Define the following values (see the data validation section in Design a Solution - Part 1 for more information about the fields). In summary, we define that for Customer field of the Quote cloud table, you can only set values that are listed in the ID column of the Customer cloud table:
- Table:
Quote - Column:
Customer - Validation Type:
Both - Allow:
List - De-select Ignore Blank and select In-cell Dropdown.
- Source:
Table Lookup - Lookup Table:
Customer - Lookup Value:
ID. Now the drop-down list will have all the values from the ID column of the Customer cloud table. - Lookup Visible Value:
Name. Defines which values are displayed.
- Finally, click Save to save your data validation, and refresh changed sheets.
Your data validation settings should now look something like this:
After you refresh your data, your quote sheet might be completely empty, use the new search field to retrieve the sample values into the sheet. We'll get back to this later on, but for now let's move on to cloud scripts.
We have now built the main components to our Quote builder solution; we have cloud tables for customers, products, and quotes. We've also defined search fields that enable us to search both products and quotes. Additionally, we've made data validations to ensure our data safety. However, in order for our quote builder to work, we need to be able to add products to a quote, so we need to bring information from the Products table into the Quote table.
Our aim now is to create a button in the Excel add-in that copies selected rows from the Products cloud table to the Quote cloud table. Koivu Cloud provides several techniques for building logic in your solution, and we'll use Koivu Cloud's action forms to create the button. The action forms are used to create buttons that are placed on the Open page of the Koivu Cloud add-in, under the Search button. You can define the action that the button performs using the Koivu Blocks editor in the web app.
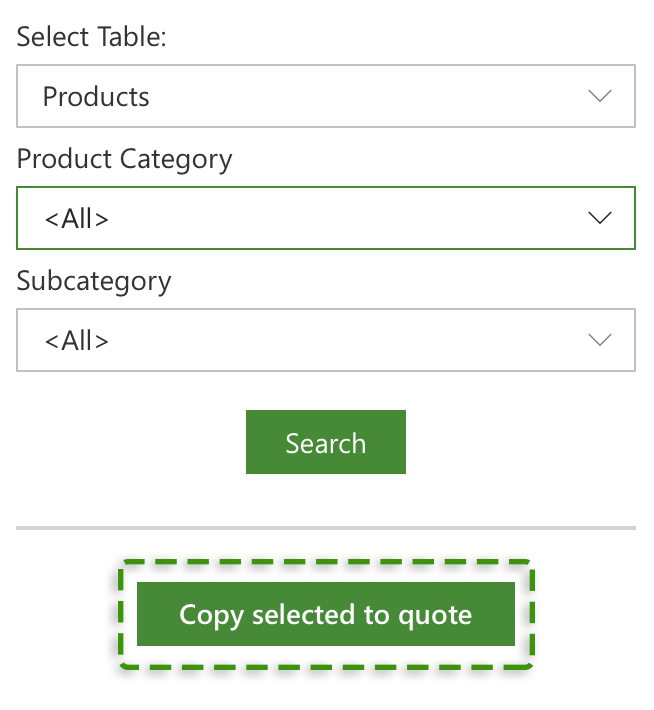
The end result should look something like this:
Buttons with action forms
First, you need to create a new column in the Products table of the Excel template that we'll use to select which product rows will be added to the quote.
To create a new column for the product selections:
- Access the Products table, for example, on the Products sheet of the Excel template.
- Create a new column only in the Excel template titled
Selected. For example, right-click the last column, and select Insert > Table Columns to the Right. We'll use this column to mark which products will be added to the quote.

- In Excel, select Formulas > Name manager. We need to give a name to the column, so we can access it with the cloud script.
- Click New to create a new name that refers to the column.
- Set the header cell of the new column as the reference and the scope as
Products:
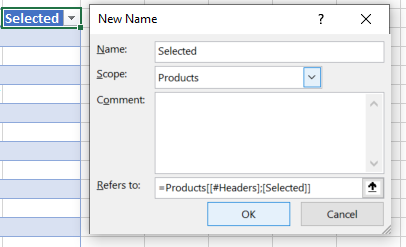
- Save the changes.
Next, we'll make an action form that will create the button to the add-in. We'll use Koivu Blocks to define the button. Koivu Blocks enable you to create functionality using color-coded and interlocking block elements. You don't need to worry about syntax, and you can simply drag-and-drop elements and select properties from drop-down lists. Only compatible blocks fit into each other.
To create an action form button with Koivu Blocks:
- Access the Koivu web app, and select your quote builder solution.
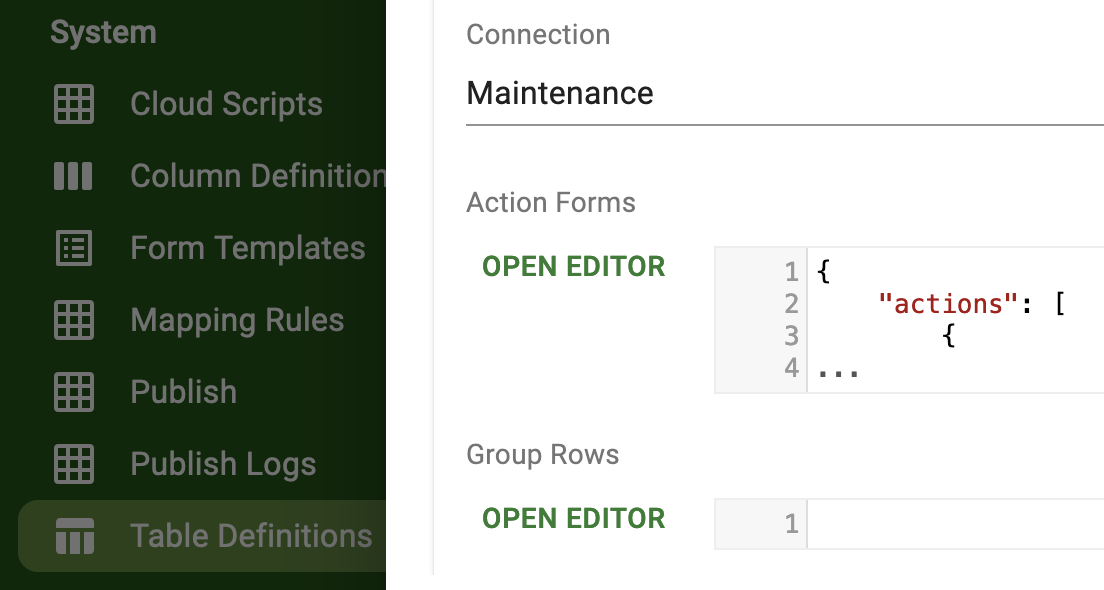
- From the left pane of the web app, select the Table Definitions cloud table, it is listed under the System heading. The rows of the table are listed in the main section. You'll define the action for a specific table, which is why you need to access the table definitions.
- Click the pen icon (
 ) in front of the Products row to open the detail view.
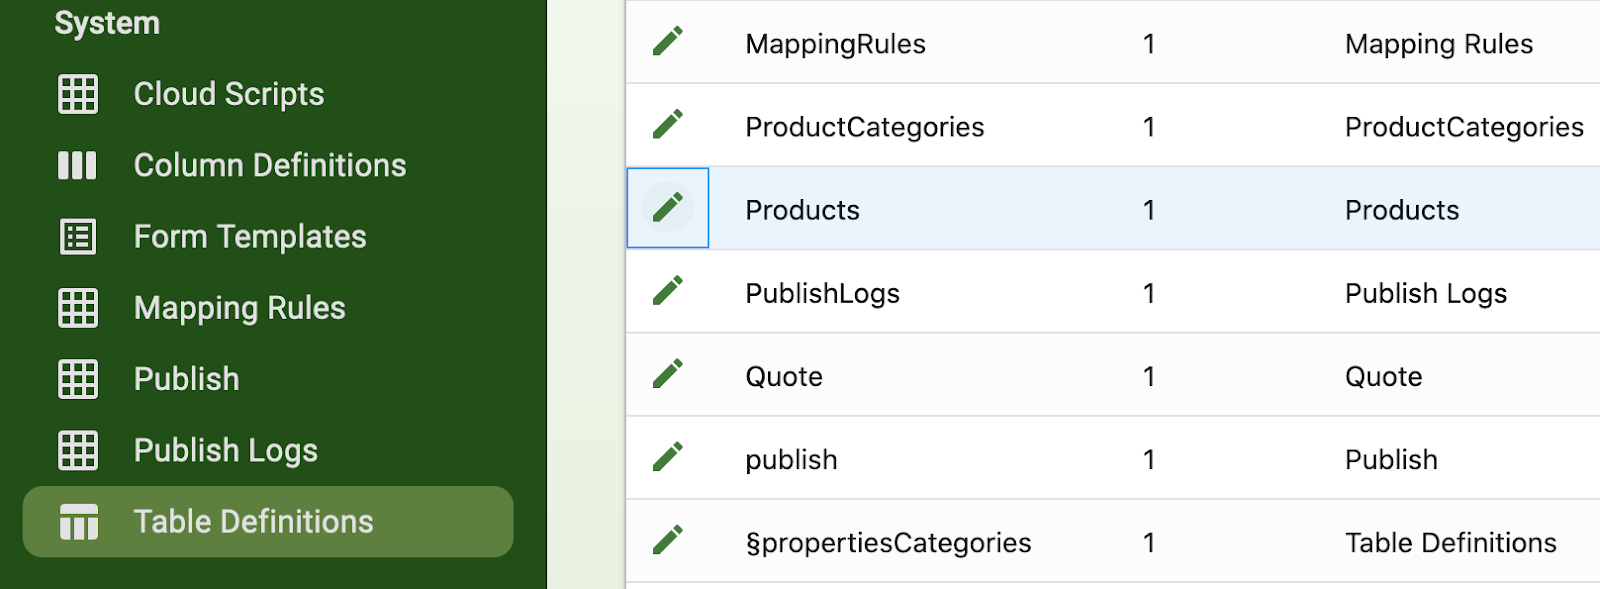
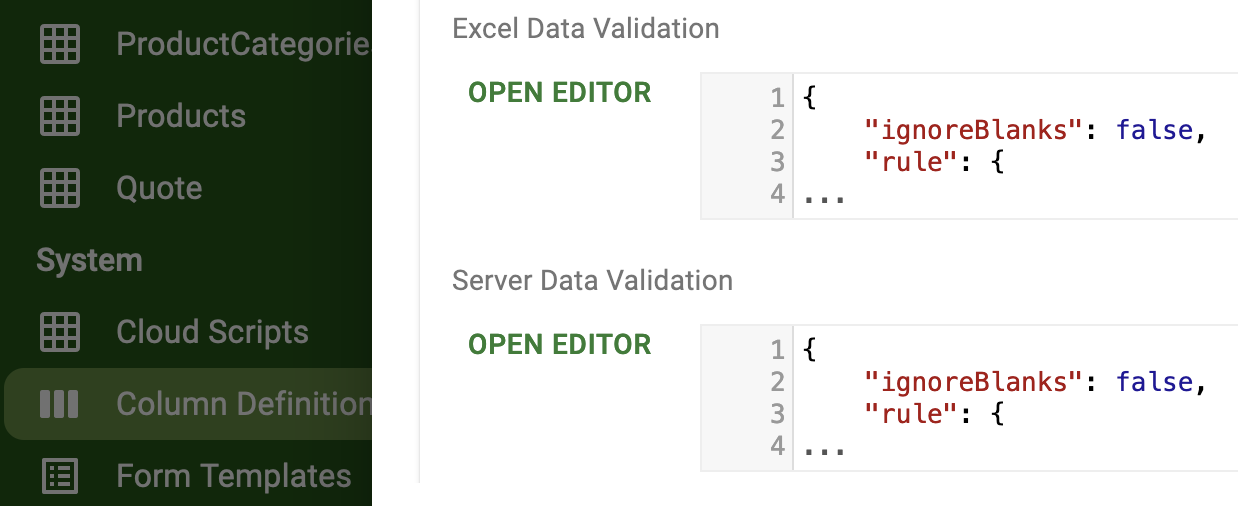
- Under the Action Forms heading, click OPEN EDITOR. The Koivu Blocks editor opens with the default block stub on the grid. The left pane of the Koivu Blocks editor lists the color-coded block elements, such as Add Row. You can create an action form by dragging the interlocking blocks to the grid. Only compatible blocks fit into each other. You can remove blocks by dragging them to the trash can:
- In summary, an action form consists of two sections:
actionsandforms. Theactionssection defines what happens after you click the button, while theformssection defines the properties of the button, e.g. the text that appears on the button. Build the following action, starting with anactionblock from the Actions menu followed by thecopy rowsblock from the Copy Rows menu:
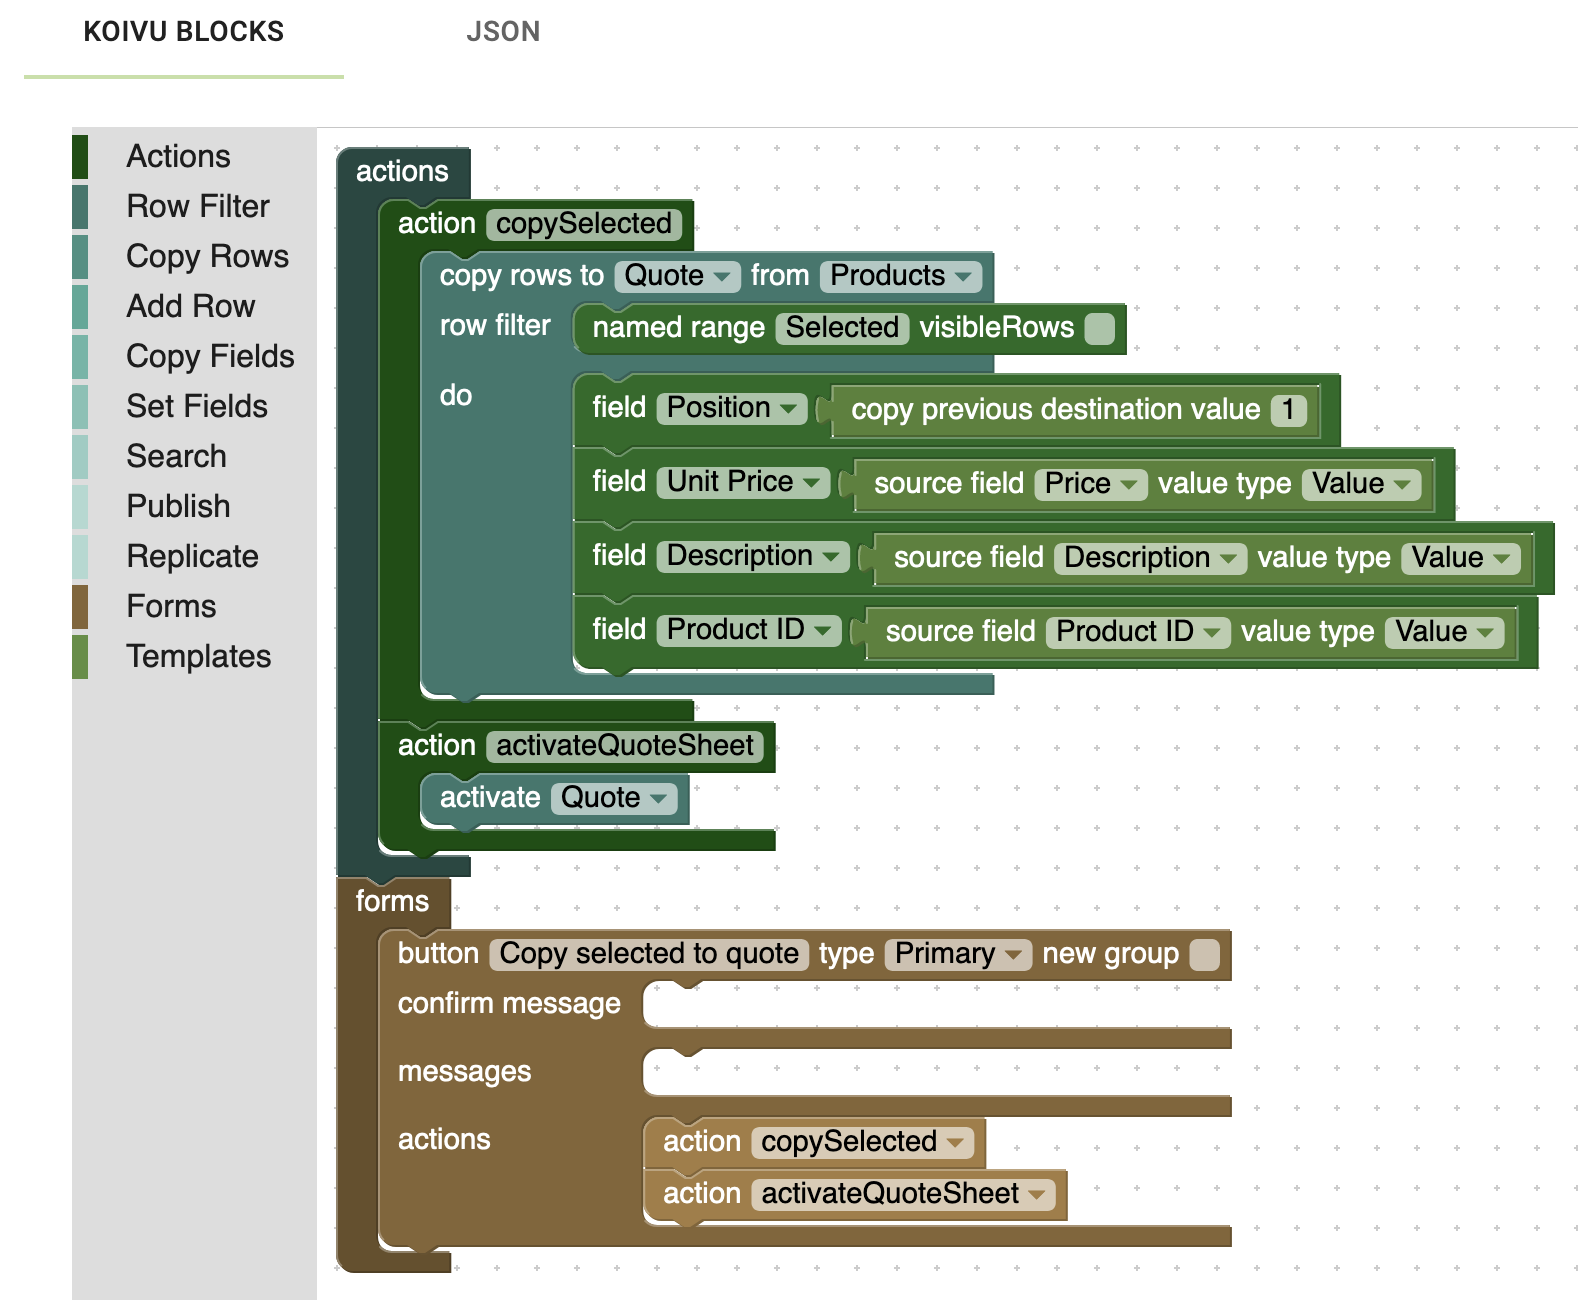
The field blocks that are inside the copy rows element list the target columns and define what is copied into the new row. The Unit Price, Description and Product ID simply get values from the given source fields. On the other hand, the Position field copies the preceding position value, and if none are found, the default value is set to 1. The activateQuoteSheet action moves you from the Products sheet to the Quote sheet after you click the button and the items have been copied.
- Alternatively, you can use JSON to define the button. However, note that you cannot access the JSON tab if you have errors in your action form blocks. That is, you need to add at least some blocks, before you can access the JSON tab. The following action form JSON creates the same button configuration:
{
    "actions": [
        {
            "name": "copySelected",
            "steps": [
                {
                    "copyRows": {
                        "destinationCloudTableViewKey": "Quote",
                        "sourceCloudTableViewKey": "Products",
                        "rowFilter": {
                            "namedRange": "Selected",
                            "visibleRows": false
                        },
                        "fields": [
                            {
                                "destinationFieldName": "keys.key3",
                                "copyPreviousDestinationValue": {
                                    "defaultValue": "1"
                                }
                            },
                            {
                                "destinationFieldName": "properties.unitPrice",
                                "sourceField": {
                                    "fieldName": "properties.price",
                                    "valueType": "value"
                                }
                            },
                            {
                                "destinationFieldName": "properties.description",
                                "sourceField": {
                                    "fieldName": "properties.description",
                                    "valueType": "value"
                                }
                            },
                            {
                                "destinationFieldName": "properties.productId",
                                "sourceField": {
                                    "fieldName": "keys.key3",
                                    "valueType": "value"
                                }
                            }
                        ]
                    }
                }
            ]
        },
        {
            "name": "activateQuoteSheet",
            "steps": [
                {
                    "activate": {
                        "cloudTableViewKey": "Quote"
                    }
                }
            ]
        }
    ],
    "forms": [
        {
            "components": {
                "button": {
                    "id": "buttonId",
                    "type": "primary",
                    "name": "Copy selected to quote"
                },
                "newGroup": false
            },
            "actions": [
                "copySelected",
                "activateQuoteSheet"
            ]
        }
    ]
}- Save the changes.
In summary, the action form creates a button, defined under the forms element, that is named Copy selected to quote and has actions for copySelected and activateQuoteSheet. These actions are defined in the actions element. For example, copyRows defines a copy operation that copies data rows from one spreadsheet to another. You can find a detailed explanation of the action form elements together with examples in the Koivu Cloud Configuration sheets.
The add-in should now have the button when you're on the Products sheet (you may have to reload the add-in, select Tools > Reload):
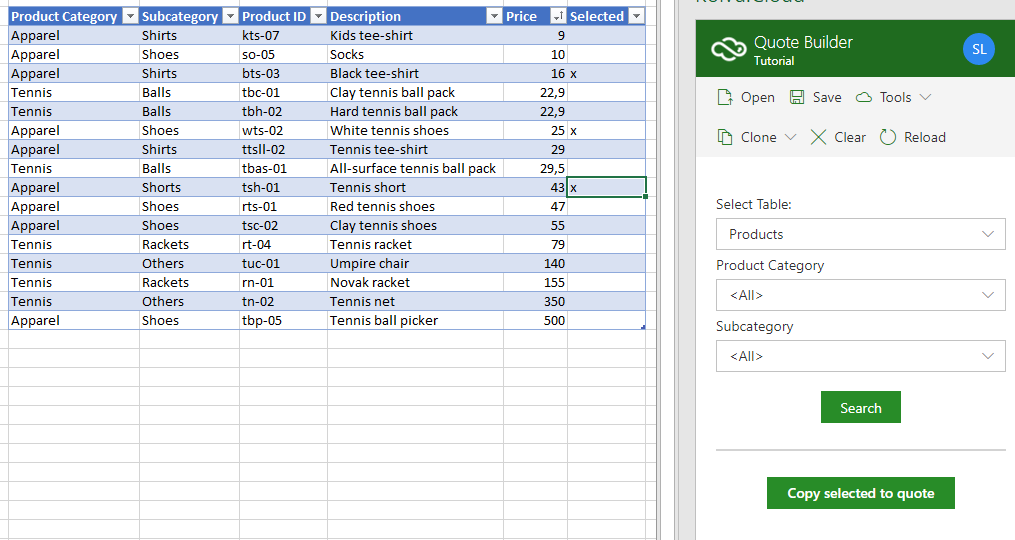
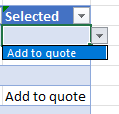
If you add, for example, an x in the Selected column, and click the Copy selected to quote button, each row that has been selected, is copied over to the Quote sheet, and the Quote sheet is activated. The user can then define the quantity, and save the quote. You could make the UI nicer by, for example, adding a list data validation in Excel to the Selected column that only allows for blank values or a value selected from a dropdown list:
You can now copy products to the quote. However, there's a problem. You cannot save the quote after adding new products because the table will have duplicate values, and you'll get an error:

The Row column for the new rows is empty, which means that more than one row has the same key values, i.e. the same value in the Customer, Quote ID, Position, and Row columns. Therefore, we need a way to update the row value. There are plenty of ways you could fix this, but we'll use a column data type that will automatically increment its value.
Data Types
The data type of a column specifies the type of information that you can store in the column. Koivu Cloud includes several different data types from which you can choose, such as text, number, date and boolean. When you create a new column, and it is empty, the system considers it as text. Additionally, you can use data types that are meant for special purposes, and we'll use one of these next.
Our aim is to make the value in the Row column to increment by one for each position:
Koivu Cloud includes a hierarchical row ID, hRowId, that will increment the value by one (00001, 00002, 00003, and so on) if all of the key columns of the row have the same value. In our example, we'll use this data type to create an incremental value for each product row in the quote. For example, if we set the data type of the Row column to hRowId, and the other key columns of the row (Customer, Quote ID and Position) have the same value on multiple rows, the system generates a sequential number to the Row column that starts with 00001, as in the image above. As a result, this incremental value makes sure that each row has unique key values, and we'll get no errors complaining about duplicate values.
To change the data type of a column, edit the column definition:
- Access the Column Definitions table. You can use either the Column Definitions sheet of the template, or the web app. Note that it might be easier to finde the correct row, if you search for the entries only for the Quote cloud table.
- Change the Data Type of the Row field (which is the key4 of the table) to
hRowId.

- Save the changes.
If you now go to the Products sheet in the template, use the action button to copy products to the Quote and then save the quote, the value in the Row column is updated for the new rows, and you'll get no errors for duplicate key values.
However, we cannot currently add new positions to the quote, so this is what we'll do next.
A single quote can contain a long list of products, which is why we want to divide the products into separate groups or sections in the quote table. We'll use the previously created Position column together with the Row column to determine a section. As a result, these two columns create a numbered hierarchy, and we can use Excel's features to collapse and expand sections in the quote table. For example, a quote table that has three positions with the second one collapsed:

However, before going further into groups, we need a way to add new positions, and again we'll create an action button.
Adding rows with action forms
Before the row grouping can fully function, we need a way to add new position rows to our quote. Therefore, we need to create an Add Position button in the add-in. We'll use Koivu Cloud's action forms to create the button. As mentioned, the action forms are buttons that are placed on the Open page of the Koivu Cloud add-in, under the Search button. The easiest way to define an action form is to use the Koivu Blocks editor in the web app.
We are aiming to achieve something like the following:
To create the action and the button:
- Access the Koivu web app.
- From the left pane of the web app, select the Table Definitions cloud table, it is listed under the System heading. The rows of the table are listed in the main section.
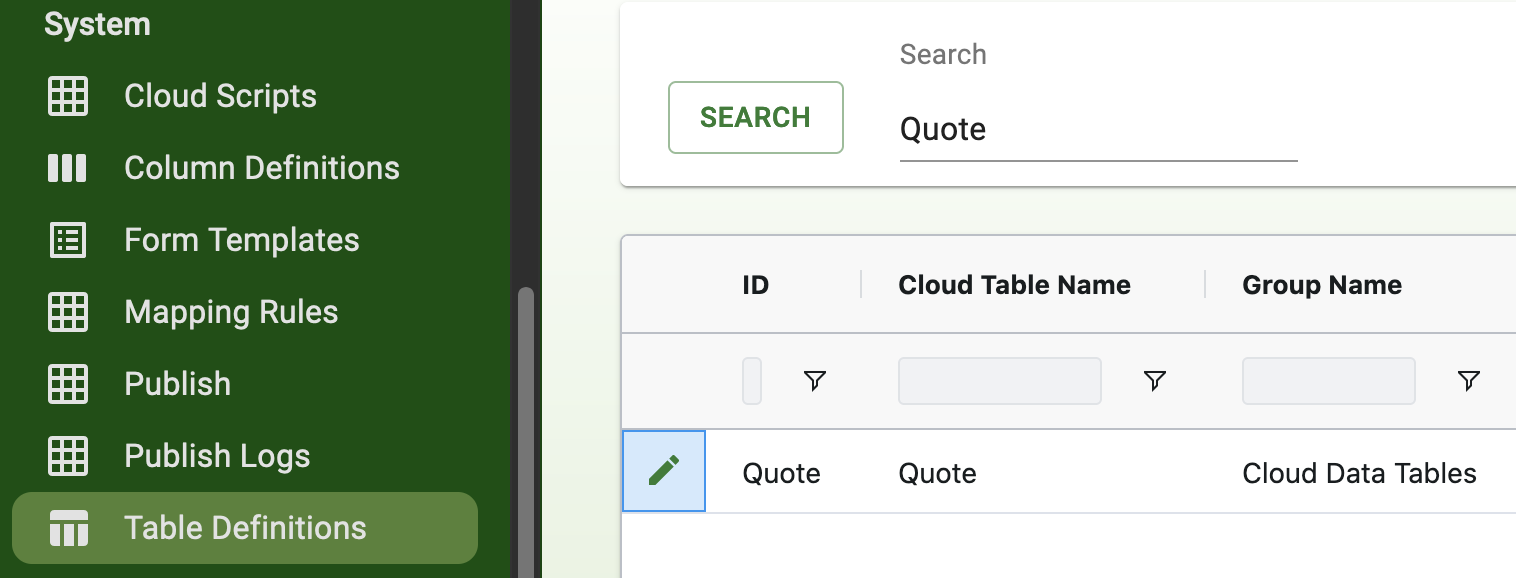
- Click the pen icon () in front of the Quote row to open the detail view.
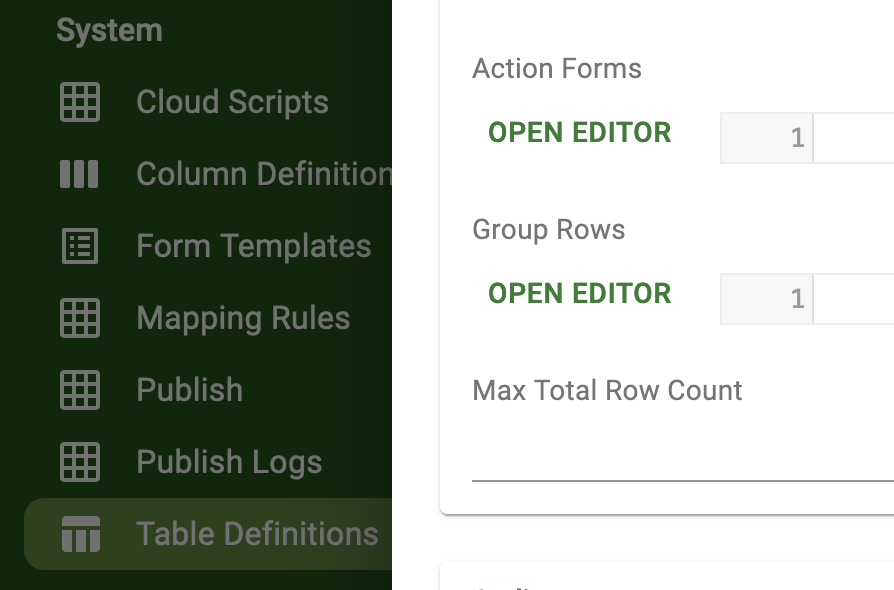
- In the detail view, click OPEN EDITOR below the Action Forms heading. The Koivu Blocks editor opens with the default block stub on the grid. The left pane of the Koivu Blocks editor lists the color-coded block elements, such as Copy Rows and Add Row. You create an action form by dragging the interlocking blocks to the grid. Only compatible blocks fit into each other. You can remove blocks by dragging them to the trash can:

- Build the following action form:
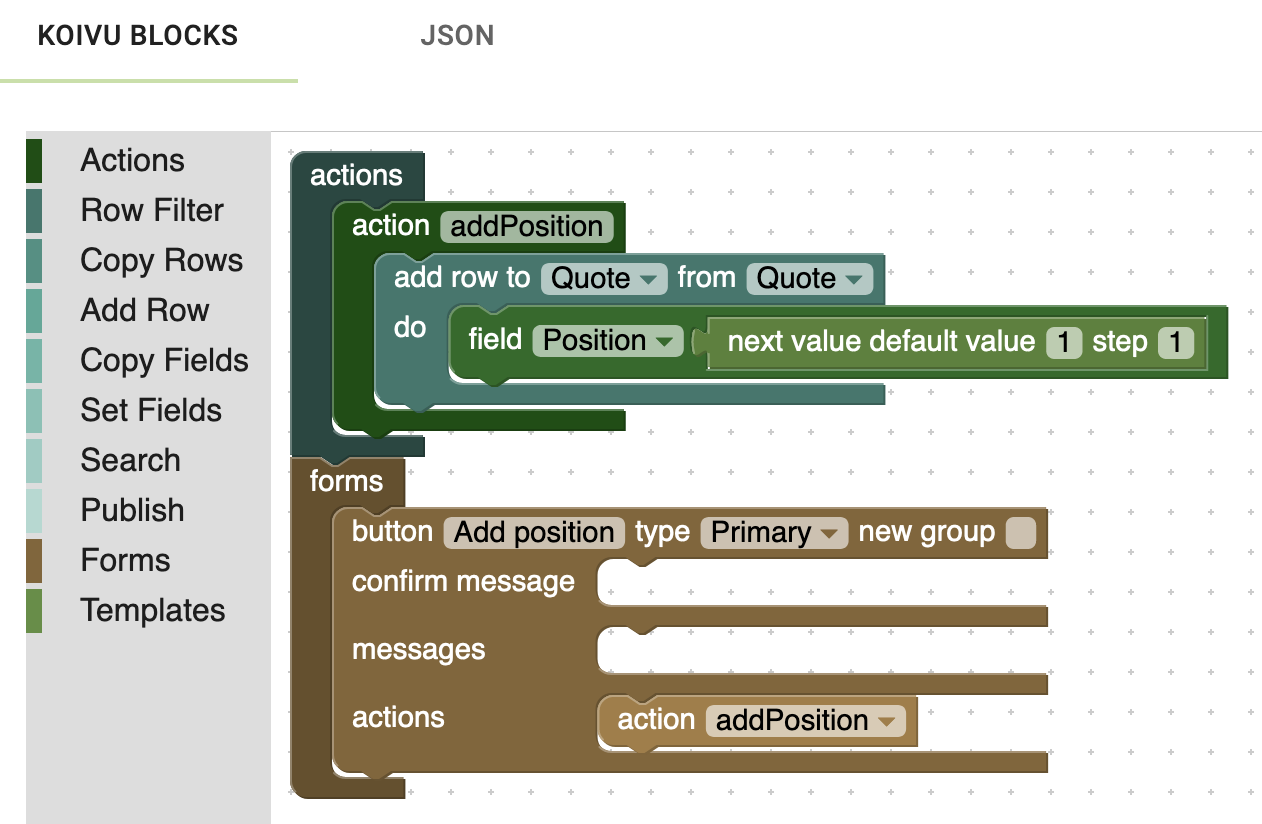
As mentioned, the actions section defines what happens after you click the button, while the forms section defines the properties of the button, e.g. the text that appears on the button. A button whose type is primary is highlighted with a green color, while a normal button is gray. The add row to block unsurprisingly adds a row to a table. Its parameters specify the spreadsheet pages that are used as the source and target for the operation. We've defined both the source and target to be the same, because we do not need to copy the values from one sheet to another. The next value element defines a rule that increments the position value; the default is 1, and the step value is 1.
- Koivu Cloud implements the action forms in JSON format, and if you prefer a more technical approach, you can enter the action form data directly as a JSON entry on the JSON tab of the editor. Again, note that you cannot access the JSON tab if you have errors in your action form blocks:
{
  "actions": [
    {
      "name": "addPosition",
      "steps": [
        {
          "addRow": {
            "destinationCloudTableViewKey": "Quote",
            "sourceCloudTableViewKey": "Quote",
            "fields": [
              {
                "destinationFieldName": "keys.key3",
                "nextValue": {
                  "step": 1,
                  "defaultValue": 1
                }
              }
            ]
          }
        }
      ]
    }
  ],
  "forms": [
    {
      "components": {
        "button": {
          "id": "addPosition",
          "type": "primary",
          "name": "Add position"
        }
      },
      "actions": [
        "addPosition"
      ]
    }
  ]
}
In the editor, you can press Ctrl + Space to bring up suggestions while building the JSON. For a detailed explanation of the various JSON elements that make up the action form, see the Koivu Cloud Configuration Sheets.
- Click Save and close to save the changes.
- In the add-in, if you cannot see the button, select Tools > Reload.
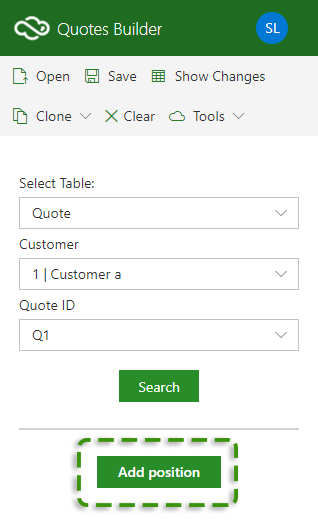
You should now have the Add position button under the Search button on the Open page of the add-in. Therefore, you can add a new position row at the bottom of the quote table by clicking Add position. Also, we can now group each position as its own section in the table.
Group rows based on value
In Excel, you can create groups of rows with nested inner layers. The adjacent rows are grouped in a hierarchical manner, and as a result, you have a structure where you can hide the inner rows of your group. For more information about Excel groups, also called outlines, see the Excel online documentation.
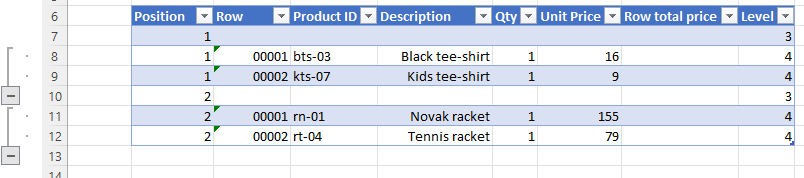
In our quote builder, we want to use the Position column, which we defined to be one of the keys of the Quote cloud table, to function as a grouping row. We can use the Position field as a grouping row, since if the Position field has a new value, the Row column of the same row is empty. Our goal is a grouping where the Position is the first level, and the individual products under the Position rows are on the second level. This grouping enables you to collapse sections per position in your Quote:
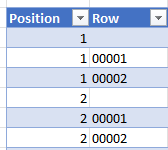
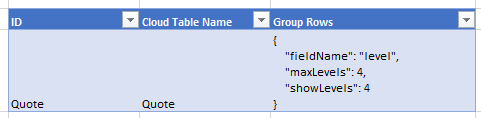
In Excel, to create a group, you first select an outline, a group of cells, and then select Data > Outline > Group. From the group dialog box, you need to select Rows. And to create a sub-level, you select another group of cells that are inside the first group. However, we'll define our grouping in Koivu Cloud as a JSON object. The Group Rows configuration uses the Level column of the table to create the grouping, as its value is generated automatically based on how many keys have a value in a single row. For example, the image below displays the key columns of the Quote table; Customer, Quote ID, Position and Row. The first row has values in three key columns, so the system sets Level to 3, and the second row has values in all four key columns, so the Level is 4:

To define a grouping in Table Definitions:
- Access the Koivu web app.
- Open the Table Definitions cloud table. The Web app provides an editor that helps you to define a JSON object with the required key-value pairs.
- Click the pen icon () in front of the Quote row to open the detail view.
- Under the Group Rows heading, select OPEN EDITOR.
- In the editor, use
Ctrl + Spaceto bring up the suggestions:
- Alternatively, if you are using the example template workbook, you can use the Table Definitions sheet to enter the expression for the Quote cloud table in Excel. Enter the following in the Group Rows column:
{
   "fieldName": "level",
   "maxLevels": 4,
   "showLevels": 4
}
The Group Rows configuration defines how rows are grouped for an outline in Excel. In summary:
fieldName- defines the name of the field (i.e. column) that is used to group the rows. The value of the field must be a number.maxLevels- defines the number of levels in the outline.showLevels- defines how many levels of the outline are displayed by default.
For more information, see the Koivu Cloud Configuration Sheets.
- Save the changes.
However, if you now open your template workbook and in the add-in first choose Tools > Reload, and then click Search on the Quote table, the outline group does not work because Excel cannot find the Level column:

The reason is that the level field is not included in the table. Therefore, we'll need to add the Level column to the Quote table on the sheet.
Adding existing columns to a table
We could use any column to create the outline group, but the system generated Level field is the most convenient way to achieve this. As mentioned, its value is based on how many key columns in a row have a value. Next, let's attach the column to the Quote table. Note that it already exists in the cloud, and you can see all of the columns in the web app, including the system generated columns, such as Last Modified By and Level.
To add a system generated column:
- In the Quote sheet, add a new column to the table. For example, right-click the rightmost column of the table, which should be Row total price, and select Insert > Table Column to the Right. Note that the order of the columns in the table doesn't really matter, and you can rearrange them, if needed.
- In the header of the new column, enter a name, e.g.
Level. - Select a cell in the newly created column, and choose Tools > Development Tools > Attach Column.
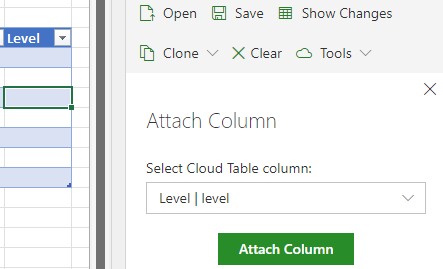
- In the Attach Column dialog of the add-in, select the
Levelcolumn from the dropdown menu and click Attach Column. - Click Search to refresh the table data. The Level column now has values, and the outline selection appears to the left side of the Excel screen.
Excel will now group the rows according to the value in the Quote table's Level field. Each new Position row is defined as a level 3 row, and the positions are grouped together.
You can use the Attach Column and Detach Column commands to add and remove existing cloud table columns to and from an Excel table. For example, you could attach other system generated fields in the same way, these columns include Last Modified By and Change time.
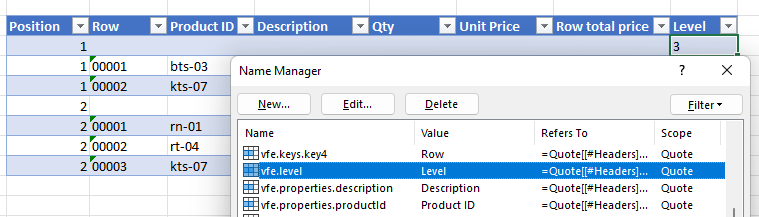
In fact, when you attach a column the system actually creates a new name in Excel, which is the same as choosing Formulas > Name Manager > New, and setting vfe.level as name for the new Level column:
Similarly, when you select Detach Column, the system removes the name but leaves the column in the table. Also, nothing is removed from the cloud table when you choose to detach a column.
As a recap, we now can add products to the Quote table, and create new sections for these products with the position row. Additionally, the Quote sheet now automatically creates outline groups for each new position in the table.
However, as you've probably noticed, when you add new products or change the quantity of an item, the Row total price is not calculated. In the next tutorial, we'll begin to configure the pricing using Koivu Cloud's scripting possibilities.
Congratulations, you have now completed the second step in creating your own Koivu Cloud Solution!
You know how to create various cloud tables, and have an overview of how Koivu Cloud enables you to implement functionality in your Solution using action forms.
In the next part of this tutorial, we'll discuss how you can further expand the quote builder with Koivu Cloud's scripting possibilities.
Additional training material
Explore these tutorials to learn more about what you can do with Koivu Cloud:
- Introduction to Koivu Cloud Excel add-in
- Get your spreadsheet into a database - Cloud Tables
- Design a Solution - Part 1
- Design a Solution - Part 3
Further information
Make sure to visit our community site and learn more about Koivu Cloud.