Last Updated: 2021-10-11
This is the third part of a tutorial that guides you through the process of building a Koivu Cloud spreadsheet-database app. As it's always helpful to focus on a concrete example, we have been building an app for sales personnel who need a tool to create quotes. The previous parts of this tutorial series are:
This third part continues our tutorial, and at the end, you should have an overview of how to design and implement a new Solution using the Koivu Cloud platform. By now you should have noticed that the cloud tables function as the backbone of a solution, and that you can use, for example, action forms to build functionality into these tables. Also, you've probably noticed that each column of every table in your solution is listed in the Column Definitions table. Similarly, each cloud table is listed in the Table Definitions table, which itself is also a cloud table. These two tables are essential when you're configuring your app, and in this final part we'll continue to set up our app using these cloud tables.
What you'll learn
In this third part we'll add functionality to our quote builder with the Koivu Cloud Excel add-in. You'll learn how to:
- Define Excel formulas in the cloud
- Create a secondary key index
- Add logic with cloud scripts
What you'll need
Creating a Koivu Cloud solution is a relatively easy task, however, you should at least have the following:
- Koivu Cloud account
- Basic knowledge of the Koivu Cloud Excel add-in - see Introduction to Koivu Cloud Excel add-in
- Working knowledge of Excel, including tables
- You know what cloud tables are and can create one - see Get your spreadsheet into a database - Cloud Tables
Koivu Cloud provides several techniques for building logic in your solution. You can, for example, create read expressions that search values from other cloud tables and combine these with the values of the current table. Next, we're going to configure the Quote sheet to calculate the total prices for the rows and the entire quote. The easiest way would be to use Excel's formulas, and this is exactly what we're going to do. However, instead of defining the formulas in Excel, we'll define them in Koivu Cloud, which means that every time you load data from Koivu Cloud into an Excel table, you'll also load the formulas together with other row data. As a result, we'll have a safer way to store the formulas, and make sure that each user will always have the latest version in their workbook template.

Formulas in Koivu Cloud
Koivu Cloud offers you the possibility to save Excel formulas to the cloud, which are then loaded into Excel when you open a table. This approach ensures data safety, makes it easier to manage formulas, and you can use a script to automatically populate the formula into many cells in several spreadsheets and workbooks.
Next, we'll define Excel formulas that will calculate the total prices for our quote, each row, and the sales price. Firstly, we need to enable the feature, and secondly, we'll define the scripts that will insert the formulas into the Excel table. Lastly, we'll make sure that the calculated prices are also saved into the cloud.
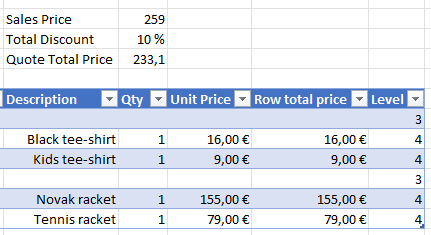
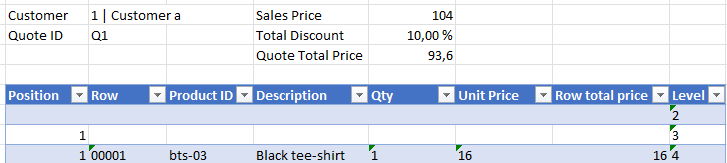
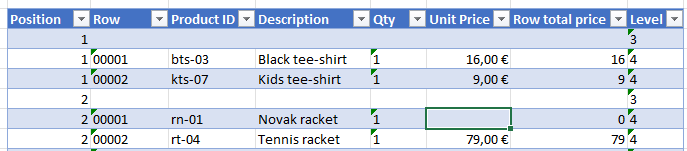
In the end, we should have a Quote sheet that calculates the Row total price of each row, the Sales Price of the entire quote, and lastly enables you to enter a Total Discount percent before calculating the quote's total price:
We'll begin by defining read expressions that will populate Excel formulas into the given cells of the Quote sheet. Read expressions are small scripts that are executed when you retrieve data from the cloud. Generally, you should use read expressions for values that are not stored in the database and are not complex to calculate, however, we'll use an expression to insert a formula from the cloud into a cell in the template.
Allow formulas
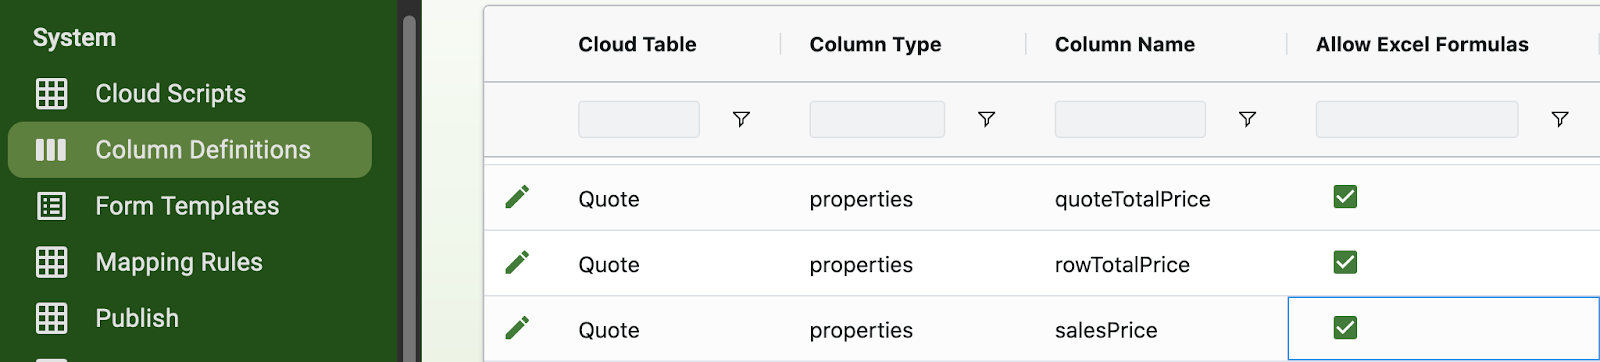
Excel's formulas start with the equals sign (=), such as =A1+B1. However, Koivu Cloud normally manages these strings as text, and therefore, you'll need to use Koivu Cloud's Allow Excel Formulas setting to allow Excel formulas for a column.
The aim is to calculate the total prices and the sales price, so we'll begin with the Row Total Price and allow Excel formulas for it.
To allow Excel formulas for a column:
- Access the Koivu web app and select your solution. Alternatively, you can use the Excel template.
- Open the Column Definitions cloud table. Alternatively, if you are using the example template workbook, you can use the Column Definitions sheet.
- In the entry for the Quote cloud table's
Row Total Pricecolumn, select the checkbox in the Allow Excel Formulas field to enable the use of Excel formulas:

- Save the changes.
Alternatively, you can use Excel to configure the value, it is either TRUE or FALSE. If you set the value to true, the system returns the defined value as a formula into a cell in Excel.
Define read expression
We can now begin to define the actual price calculations. As mentioned, we'll use a read expression that will return an Excel formula to the sheet. We'll use an expression that populates the cell based on the level property, which we used previously to group the rows.
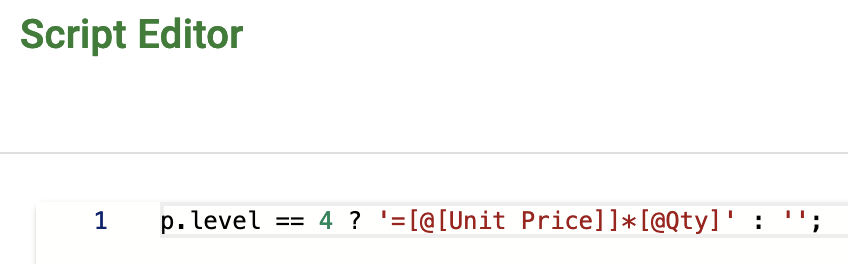
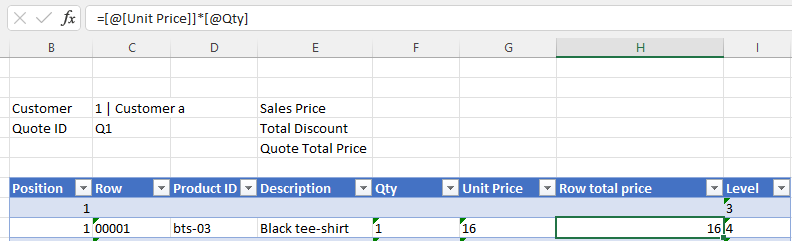
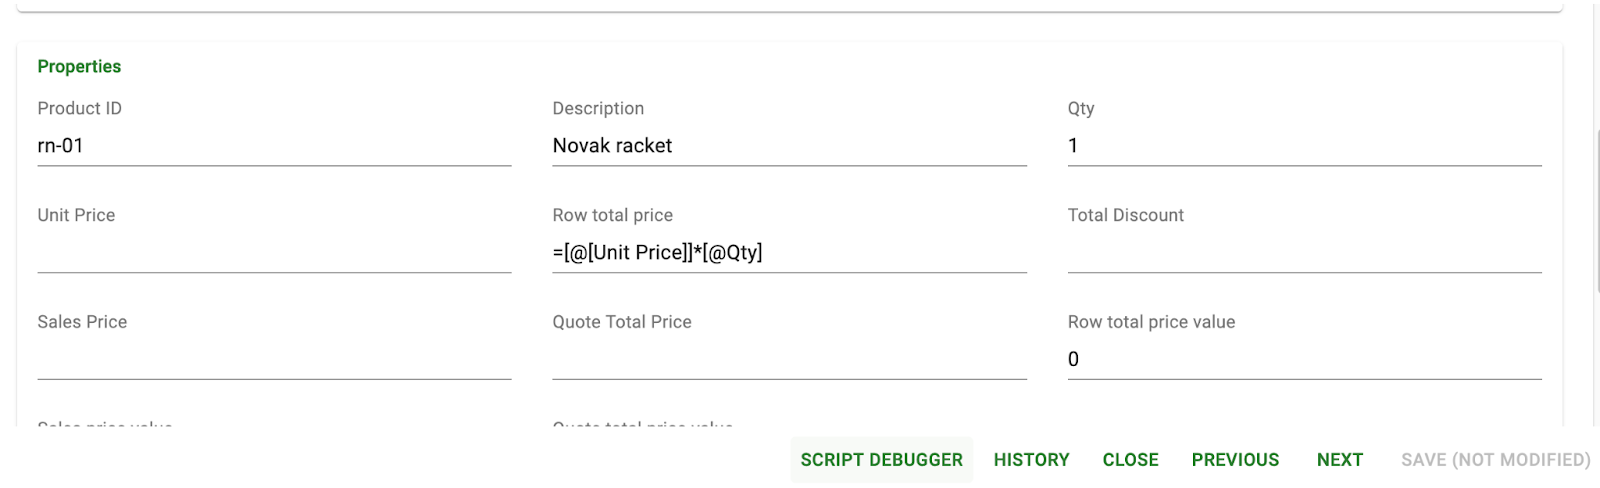
The script outputs the formula that calculates the total price of a row. The level is 4 for a table row that has a product (these rows have values in four key columns):
- rowTotalPrice:
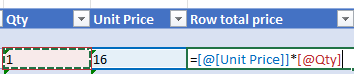
p.level == 4 ? '=[@[Unit Price]]*[@Qty]' : '';
The script uses the ternary operator to either return a formula, if the level of the row is 4, or a blank value, if the level does not match. Also, note that the Excel formula for a table uses a combination of table and column names, so called structured references, instead of explicit cell references. An easy way to create such a formula is to create it in Excel and then copy it into the script:
For more information about Excels structured references, see the Excel online help.
To create read expressions:
- Access the Koivu web app and select your solution.
- In the Column Definitions table, click the pen icon (
 ) in front of the appropriate Quote row to open the detail view. We'll need to define the read expressions to the
 Row Total Pricecolumn:

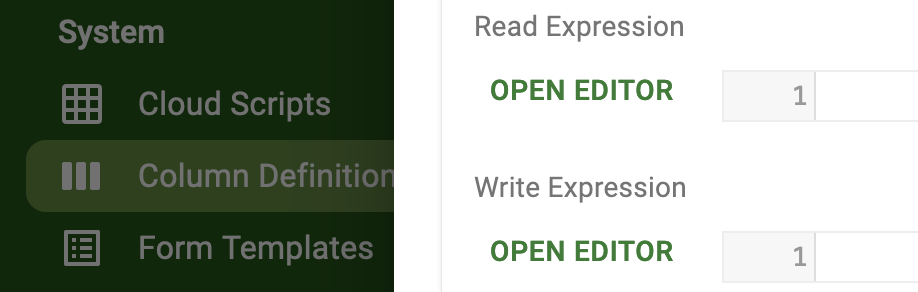
- Under the Read Expression heading, click OPEN EDITOR to access the Koivu Cloud script editor. Note that you can also define write expressions that will be evaluated when you save data into the cloud. However, we want our script to be evaluated when we retrieve data from the cloud, so we'll use read expressions.
- In the Script Editor, enter the expression for the
Row Total Pricecolumn:
- Click OK.
- Save the changes.
If you open the Quote sheet of the Excel template and search for a quote, the Row total price column should now include the formula for each level 4 row:
Note that if you can see the formula itself in the cells of the Row total price column instead of the result of the calculation, make sure you've allowed Excel formulas for the column, as instructed above. You'll know that the formula is inserted as text, if you see a single apostrophe in front of the formula: ‘=[@[Unit Price]]*[@Qty].
We still need to calculate the total price of the quote and the sale price. However, we already moved both of these to the header area of the quote, so we cannot use the same level value as with the row total price. Therefore, we need to add a row to our quote that has a lower level value, i.e. has less values in its key columns. Also, we always need to have values at least for the customer and the quote ID (the keys that are used in the search), so we'll create a new empty row with only these values.
Secondly, we'll use the new row to store data that will only be displayed in the header area of the table, such as the sales price and the quote's total price. Therefore, we need to define a property level value for the fields that we have moved to the header area of the Quote sheet.
In summary, we'll need to
- create a new row for header values, such as sales price
- allow Excel formulas for the
Sales PriceandQuote Total Pricecolumns - define read expressions for the
Sales PriceandQuote Total Pricecolumns - define property levels for the
Sales PriceandQuote Total Pricecolumns
Header row
Start by creating a new row to the quote; we'll need to be able to create a new expression for level 2 rows.
To create a new row:
- Open the Quote sheet.
- Right-click on the first row of the table, and select Insert > Table Rows Above from the context menu to add a new blank row at the top of the table.
- In the add-in, click Save to save the new row to the cloud.
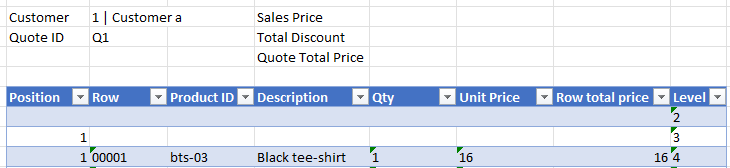
Note that even though the row in the table appears to be completely empty, the Customer and Quote ID columns of this row are displayed in the header, and therefore its level is 2, i.e. it has two key values. As a result, we have another level in the table that we can use in the read expressions. However, you'll also need to allow Excel formulas for the target columns.
Allow formulas
Again, we need to make sure that Excel will use the formula instead of displaying it as text.
To allow Excel formulas:
- Access the Koivu web app and select your solution. Alternatively, use the Column Definitions sheet of the Excel template.
- In the Column Definitions table, set the Allow Excel Formulas columns to true also for the
Quote Total PriceandSales Pricecolumns:
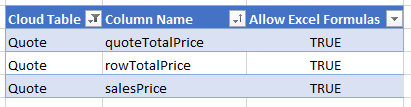
- Save the changes.
Define read expressions
Now we can define the expressions that will return the formulas, and they should function correctly, instead of being displayed as text.
Next, define the following scripts:
- salesPrice:
p.level == 2 ? '=SUMPRODUCT(Quote[Qty]*Quote[Unit Price])' : ''; - quoteTotalPrice:
p.level == 2 ? '=vfe.properties.salesPrice * (1 - vfe.properties.totalDiscount)' : '' ;
You can create the formulas in Excel and once you've gotten what you wanted, copy the resulting formula into the script. For example, we'll use the SUMPRODUCT function that returns the sum of the products of the given ranges:

In the second read expression, for the Quote Total Price field, we're using the Excel names as references to the values in the sheet.
To create a read expression:
- Access the Koivu web app and select your solution.
- In the Column Definitions table, click the pen icon () in front of the appropriate Quote row to open the detail view.
- Under the Read Expression heading, click OPEN EDITOR to access the Koivu Cloud script editor.
- Enter the appropriate expressions, see above.
- Save the changes.
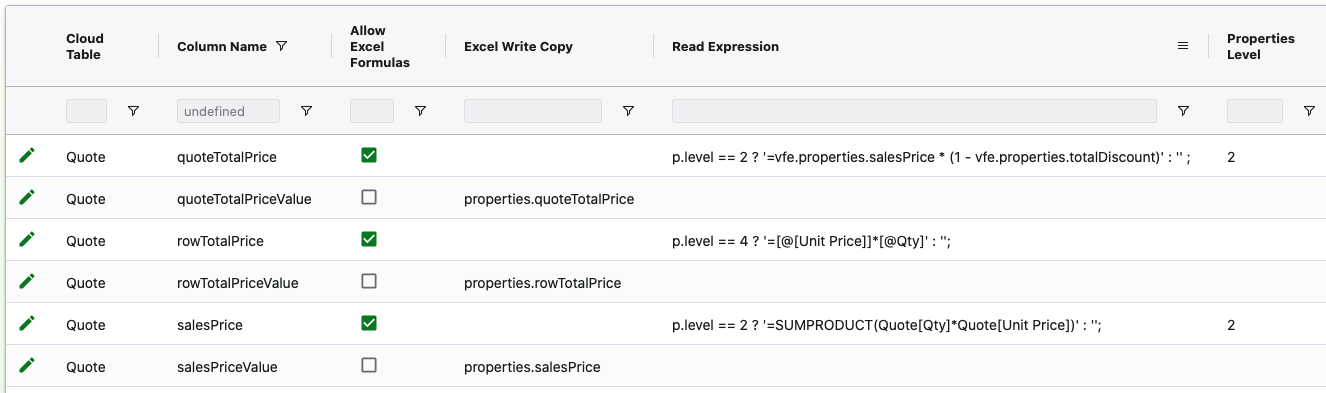
In the end, you should have the following read expressions for the Quote Total Price, Row total price, and Sales Price columns:
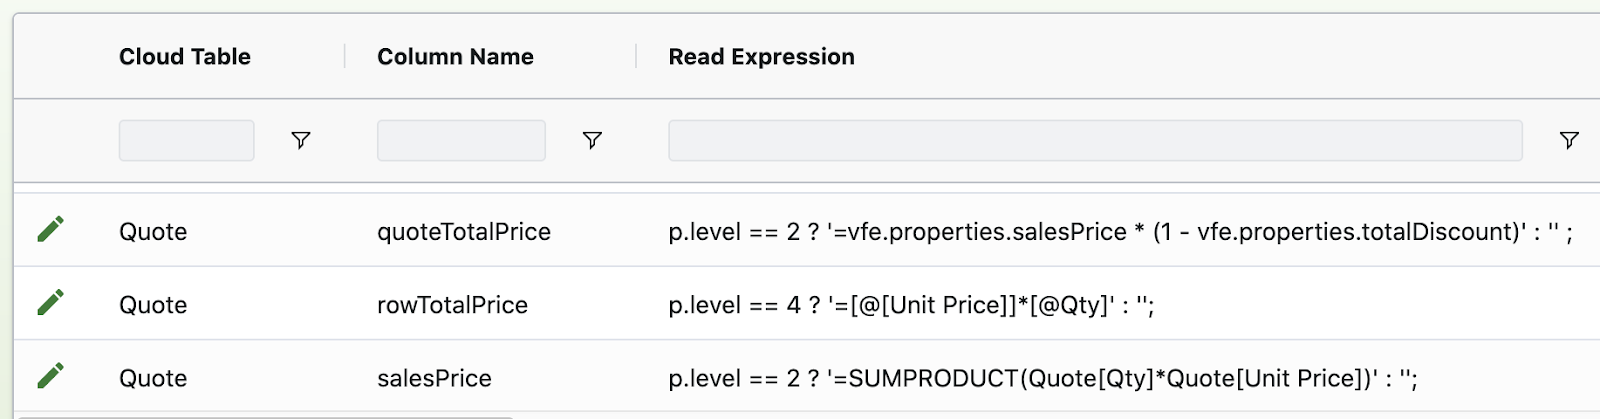
The Read Expressions will return the formulas based on the level. Also, the scripts use the ternary operator to either return a formula or a blank value, if the level does not match. Your template should now look something like this:
Again, if you see the formula instead of the result of the calculation in the Sales Price or the Quote Total Price fields, and you have allowed Excel formulas as instructed above, make sure that the cell format is General, for example. Also, the value in the Total Discount cell must be between 0 and 1 for the formula to function correctly, so you can change its format to Percentage, as above.
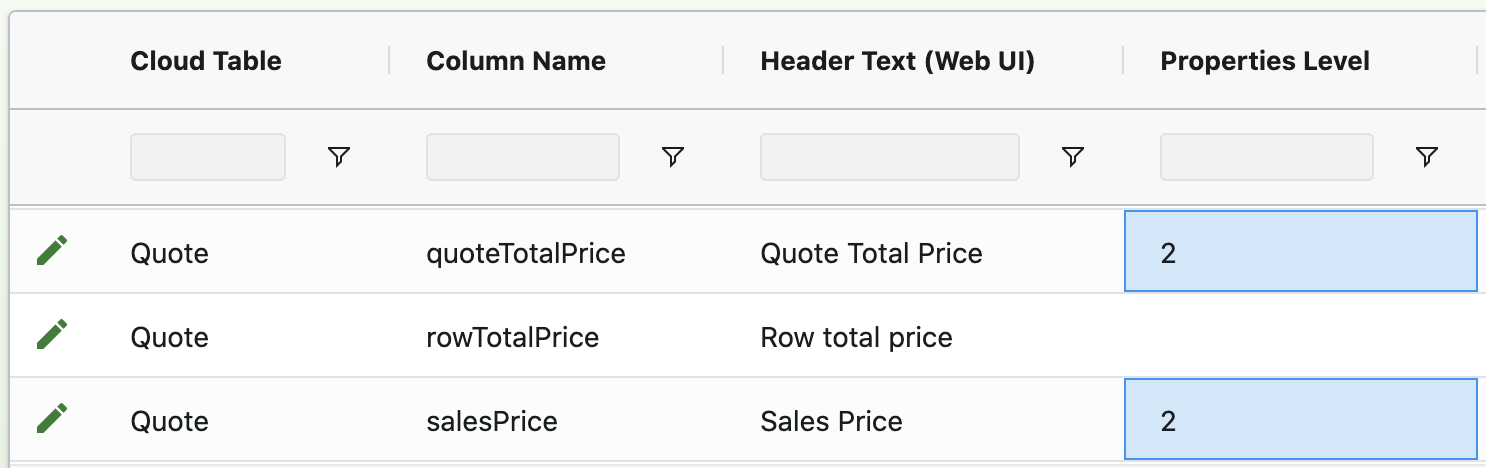
Properties Level
However, the empty row is still displayed in the table, and we can fix this with the Properties Level setting, which enables us to determine which fields are located outside of the Excel table, i.e. in the header of the sheet.
To define the property levels:
- Access the Koivu web app and select your solution.
- In the Column Definitions table, set the Properties Level values for the Quote Total Price and Sales Price columns to
2. As a result, when the row's level is 2, these columns are used:
- Save the changes.
- In the add-in, you may need to select Tools > Reload to see the changes.
If you now click Search to refresh the data in the Quote sheet, you'll notice that the empty row has disappeared, and that the sales and quote total price are still displayed in the header. For more information about the properties level setting, refer to the Koivu Cloud Configuration sheets documentation.
However, we're not done yet, because we also want to capture the calculated values into the cloud.
We now have functionality that calculates prices. However, we also want to capture the calculated values. The original fields that we used previously, such as Row total price, now hold the formulas, we need to create another field, i.e. column, that is used to store the resulting value. Therefore, we need to take advantage of Koivu Cloud's Excel Write Copy setting, which is normally used together with the Allow Excel Formulas setting, when you want to save the resulting value of an Excel formula into another field.
In summary, in order to save the formula results, we need to
- add a new columns to the cloud table that will store the resulting values
- save the result into the new columns
Also, after we've configured the system to save the results, we can
- modify the layout of the template by removing unnecessary columns
- make a small modification to a previous action button to improve the Quote sheet's functionality.
Add new columns
First, we need to create new columns to the Quote cloud table that will store the results of the formulas, and therefore, we need to create temporary columns to the Quote spreadsheet table.
To add new columns:
- Open the Quote cloud table on the Quote sheet of the Excel template.
- In Excel, add a new column to the table. There are a number of ways you can do this in Excel. For example, you can right-click a cell in the table and select Insert > Table Columns to the Left / Right.
- Enter a name for the column heading. See the table below.
- Pick any cell that is in the new column, and from the Koivu Cloud add-in select Tools > Development Tools > Create Column. The add-in opens the Create Column view, for example:
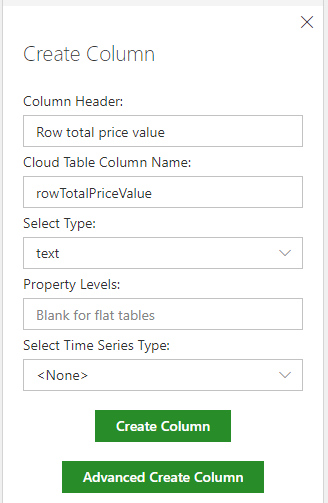
- Enter the appropriate information. We need three new columns,
Sales Price Value,Quote Total Price ValueandRow Total Price Value, so you need to repeat the previous steps for each column. - Click Create Column after you've entered the required data. Alternatively, click Advanced Create Column to access the Column Definitions sheet, where you can specify more detailed settings.
Save formula result into another column
Next, to save the value into the new fields, we'll use the Excel Write Copy setting that is located in the Column Definitions table. This is normally used with Allow Excel Formulas when you want to capture the value of an Excel formula into another field, because the original column holds the Excel formula.
To save Excel's calculation result into another field:
- Open Column Definitions, for example, use the Koivu Web app. Alternatively, use the Column Definitions sheet of the Excel template..
- Define which properties are copied. You need to define a value for all three columns. In the web app, you can either open the details of the row, or enter values directly in the main grid view. In the Excel Write Copy column of each row, define the properties from which you want to copy values. For example, we want to copy a value from the
salesPricefield to thesalesPriceValue. That is, from the field that has the Excel formula, to the new field we created above. All three fields need a copied value:
- quoteTotalPriceValue - properties.quoteTotalPrice
- salesPriceValue - properties.salesPrice
- rowTotalPriceValue - properties.rowTotalPrice
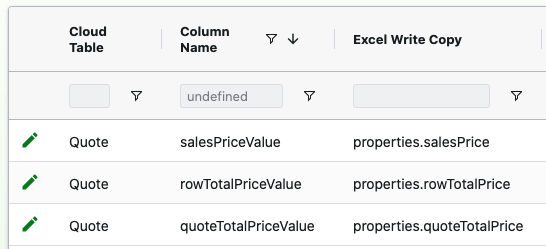
The Excel Write Copy has the source value, and the Column Name field defines the target property.
- Save the changes.
- In the add-in, select Tools > Reload to refresh the settings.
If you now click Show Changes, you'll see that the values from the source columns, such as Row total price, are copied into the target columns, such as Row total price value, and by clicking Save, the results of the formulas will be saved into the cloud. For example, after changing the quantity of an item:

A recap of the previous steps: We first created the new columns in the Excel table. Next, we converted the columns into new cloud table columns. And lastly, we defined the copied properties. In the end your Column Definitions should have these settings:
Modify the layout
Finally, we'll make some changes in our quote builder template file, and remove the new columns from the Excel table, because they are longer needed.
To detach and remove the temporary columns:
- In the Quote sheet, select a column and from the add-in choose Tools > Development Tools > Detach Column. You can detach all three columns,
Sales Price Value,Quote Total PriceandrowTotalPriceValue. - To remove a column, right-click it and select Delete > Table Columns.
If you delete a column without detaching it, the name reference does not have target, and the result is an erroneous reference, which you should avoid:

If you click Show Changes in the add-in, you'll see that these values are still shown on the Change sheet and their values are saved.
Your Quote sheet should look something like the following:

If you now change, for example, the quantity of an item, the Sales Price and Quote Total Price are updated immediately, and their calculated values are persisted into the cloud when you click Save in the add-in. You can view the saved Excel values with the Koivu Web app.
You've probably noticed that one item is missing a unit price, and maybe even tried to fix it by manually entering it on the Quote sheet. However, next we'll discuss how you can fix it, and simultaneously enhance the data safety of the quote. But before going further into price fixes, we also have another problem while adding new products to the quote.
Add a formula with an action form
If you now add a new product to the quote, the Row total price column of this new row is empty and does not have the formula that calculates the total price of the row. Instead, you'd have to save and refresh the quote, and that way the read expression that we defined earlier would populate the formula into the Row total price column. However, we want the price calculation to function directly, so we'll make a small addition to the action form in the Products table, and also populate the formula when you add a product.
To add a formula with an action form:
- Access the Koivu web app, and select your quote builder solution.
- From the left pane of the web app, select the Table Definitions cloud table, it is listed under the System heading. The rows of the table are listed in the main section.
- Click the pen icon () in front of the Products row to open the detail view.
- Under the Action Forms heading, click OPEN EDITOR.
- Add a new field to the existing action form that will add the formula (
=[@[Unit Price]]*[@Qty]) to theRow total pricecolumn:
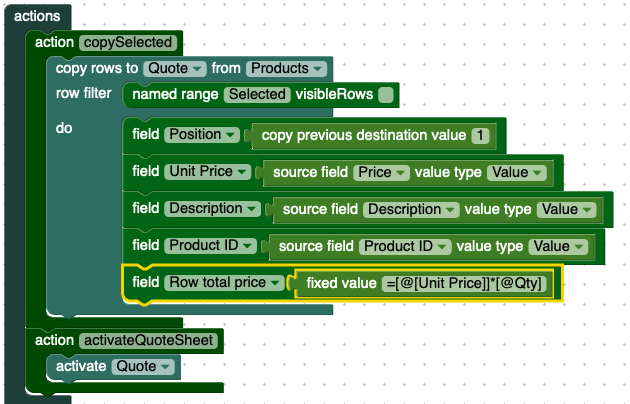
Now, if you click Copy selected to quote on the Products sheet, the Row total price column calculates the row's total price in the quote correctly, since the action form now copies the formula into the field.
As mentioned, one item in the sample data is missing a price. Therefore, we need the system to check that each item in a quote has a price, and if it's missing, get it from the Products table. Again, we'll use expressions to automate this task, and use more of Koivu's scripting features.
One of the most common uses of read expressions is to get data from another table using the CloudTableLookup functions. Next, we'll create an expression that uses the vfe.CloudTableLookup.get function to get the missing price from the Products table into the Quote table.
In summary, the next sections describe how you can
- use the script debugger to write a lookup function that gets data from another table
- create secondary indices that enable you to define your own search index
- create a script that gets data from one table to another using the secondary index
- design your solution in a way that ensures data safety
Creating cloud scripts
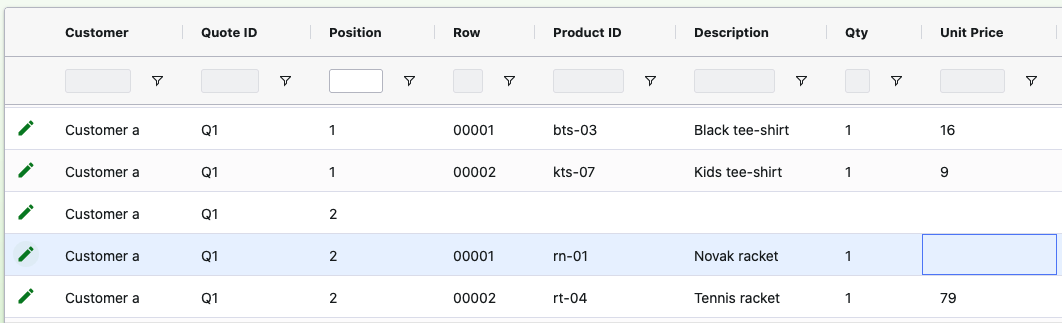
Our aim is to check that an item in the quote has a price, and if it doesn't, get the price from the Products table. For example, our quote now has an item that does not have a price, which are listed in the Unit Price column:
When you begin to write cloud scripts, you can use Koivu Cloud's Script Debugger to make sure everything is working properly. You can access the debugger in any row detail view of your solution.
We can use the Script debugger to try and fetch the price for the row that's missing the price:
- Access the Koivu web app, and select your quote builder solution.
- From the left pane of the web app, select the Quote cloud table. The rows of the table are listed in the main section.
- Click the pen icon () in front of the row that has the missing price to open the details view.
- Click SCRIPT DEBUGGER at the bottom of the dialog box, to access the debugger for this row.
We can now begin to construct the script.
The vfe.CloudTableLookup.get function needs four parameters in order to get the data:
vfe.CloudTableLookup.get("tableName", [keyArray], "expression", "defaultValue")
- tablename – the name of the target table that has the data of interest. In this case it's the Products table.
- key array – an array of keys that match the row of the table. The key array needs to be an exact match to the keys of the row in the table. The Products table has three keys,
Product Category,SubcategoryandProduct ID, so we need to enter each one to be able to get data. - expression – an expression that is evaluated in the target table row. The expression can be as simple as just referring to a property, like "p.properties.salary", or a complex one that uses multiple properties, conditions, and mathematical calculations. For example, to add two properties together and then average it: ‘(p.properties.salary + p.properties.bonus)/2'. The expression can also be another function call.
- default value – the default value is returned if a row is not found from the table.
In the Products table, the row that we're interested in looks as follows:

Therefore, we can get the data with the below script, which stores the result in a variable:
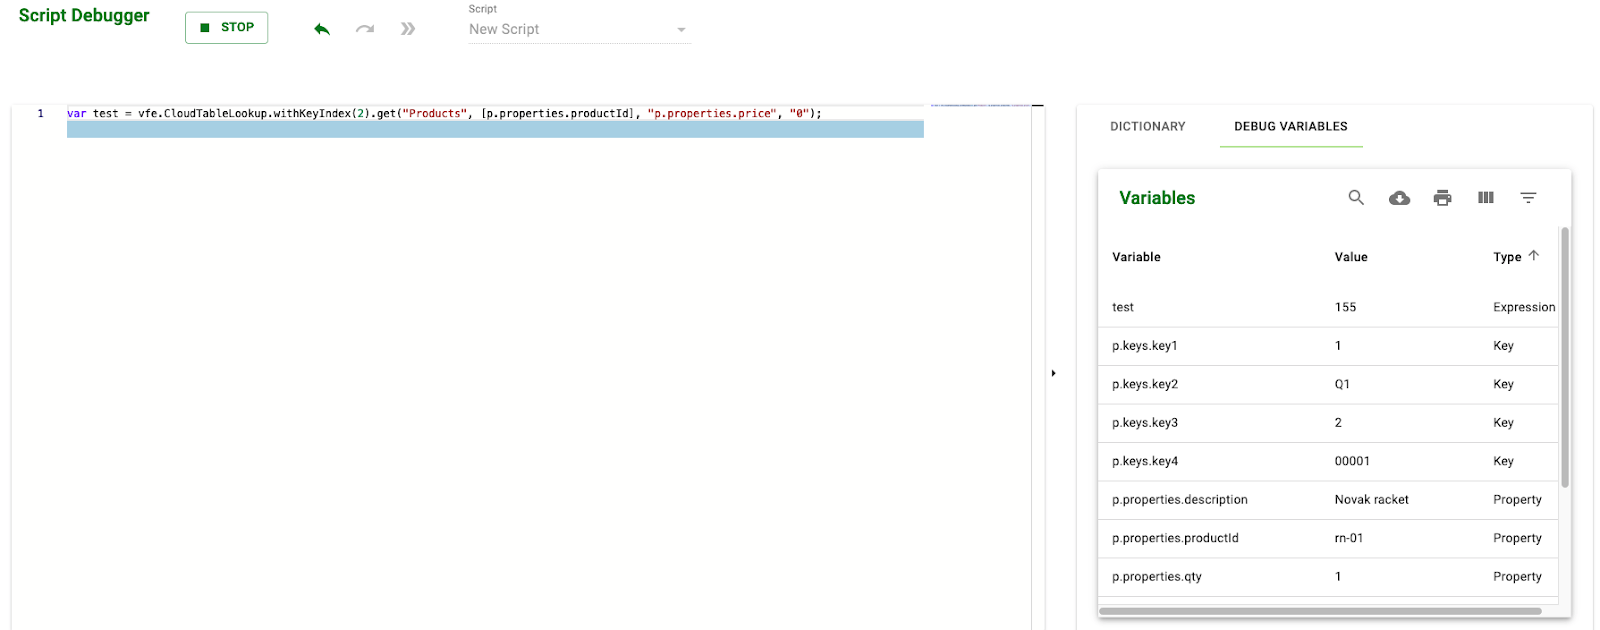
var test = vfe.CloudTableLookup.get("Products", ["Tennis", "Rackets", "rn-01"], "p.properties.price", "0");
You should have the script debugger open, so copy-paste the above script to the editor. You can begin to debug it by clicking Start, and use the right arrow ( ) to step forward in the script:
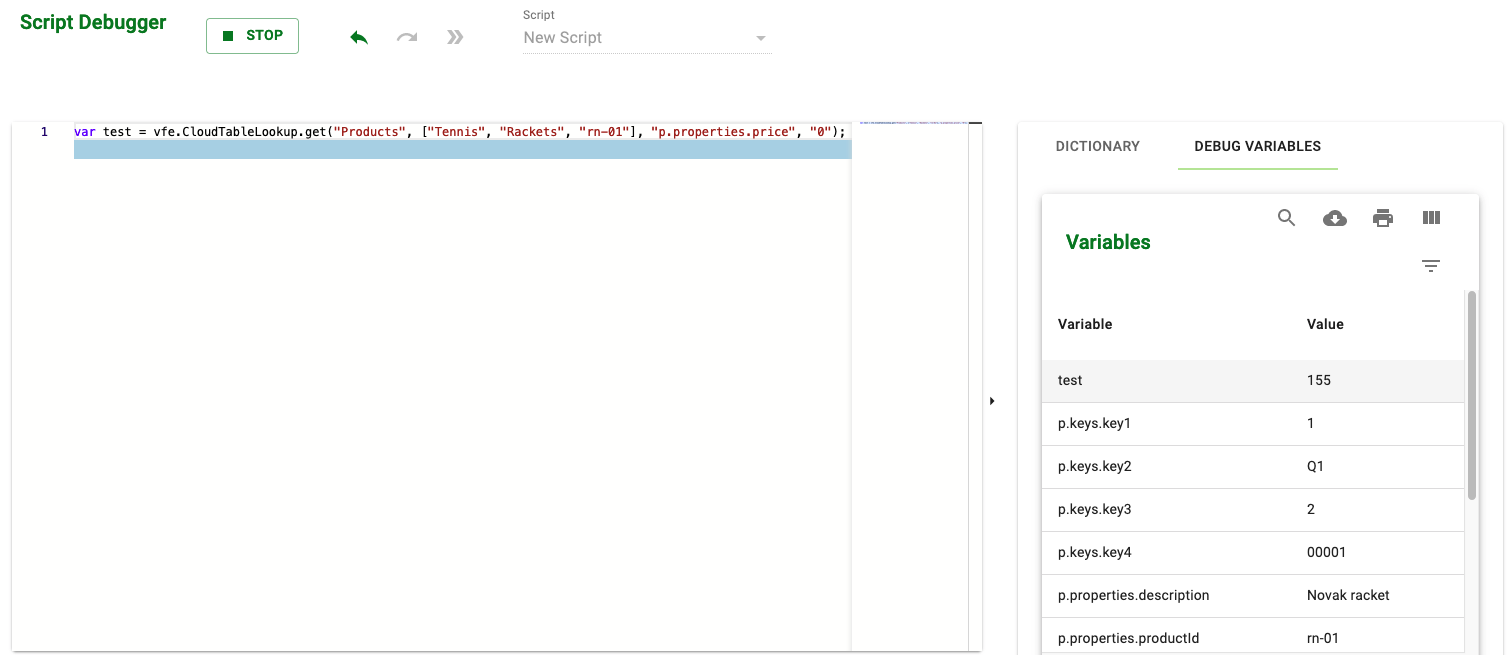
You can see that the script returned the correct value, 155, in the DEBUG VARIABLES tab. Note that Koivu Cloud always runs a script for a database row, so the context for execution is a single row in a cloud table. Therefore, if you access the script debugger, for example, in the Quotes table, as above, the context will be the row from which you launched the debugger. Consequently, you'll have access to the row's variables, i.e. keys and properties. In the image above, in addition to the variable that we declared, the DEBUG VARIABLES tab lists the keys and properties of the row, whose details you accessed. Additionally, you can use the DICTIONARY tab to browse the tables and functions. For more information about the script debugger, see the Koivu Cloud Implementation Guide.
In summary, you use the column, i.e. property, names to get and set values for the row properties, and the key columns identify the row. Koivu Server refers to objects and their attributes using the dot (.) notation. For example, you can refer to a property named 'product' as p.properties.product. Note that this differs from the names in Excel because of environment specific reasons. In Excel, you'd refer to the same as vfe.properties.product. After the object abbreviation (p.) comes an attribute class name (properties.) followed by the attribute name (.myProperty).
However, our goal is to create a read expression for the Unit price column of the Quote table, and in this context we do not have access to the required key information in order to get data from the Products table; we can only see the Product ID of the item (p.properties.productID in the image above). Therefore, we cannot search with the key values, as in our example script. Instead, we need to use Koivu Cloud's secondary key indices, which allow you to define an alternative set of keys that you can use to search data. Next, we'll define a secondary index that will allow us to search items from the Products table using only the product ID.
Secondary key index
First, we need a way to query products in the Quote table. Previously we made a cloud table for the products, and we defined three key columns for it: Product Category, Subcategory, Product ID. These three keys form the key index array that we used as a parameter in the CloudTableLookup function above. However, the Quote table contains only the Product ID column, which is also the third key of the Products table, and you cannot search a third (or a second) key without specifying a value for the previous keys, i.e. key 1 and key 2. Therefore, we need to search data according to different keys than the primary keys. To achieve this, we have to define a secondary index, which is basically another set of keys that you can define yourself.
To define a secondary index:
- Access the Koivu web app, and select your quote builder solution.
- From the left pane of the web app, select the Table Definitions cloud table, it is listed under the System heading.
- Click the pen icon () in front of the Products row to open the detail view. Alternatively, use the Excel add-in to open the Table Definitions cloud table.
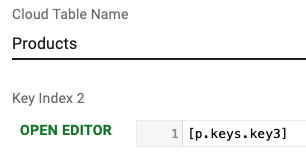
- Under the Key Index 2 heading, click OPEN EDITOR.
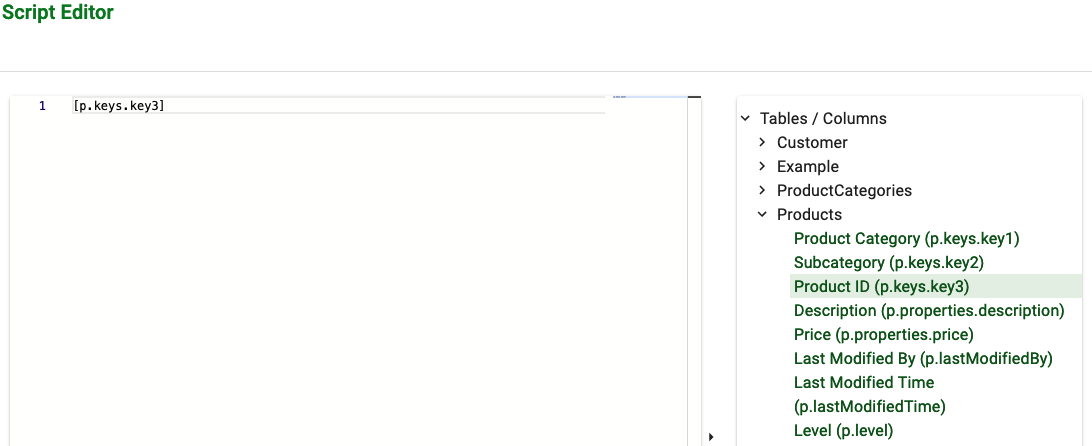
- Enter
[p.keys.key3]in the editor. Since Product ID is the third key of the Products table, we'll set this as a secondary key in the Key Index 2 column. You can browse the tables or your solution in the script editor:
- Click OK.
- Save the changes. The secondary key indices are defined as arrays in the Key Index 2, Key Index 3 or Key Index 4 fields. You can enter properties, keys, or expressions as a value. Unlike primary keys, the secondary indices do not need to be unique for a row, and the number of key elements does not need to match the primary keys. However, it is best practice to keep all keys unique to avoid any unpredictable behavior.
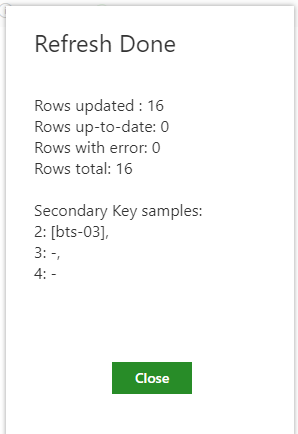
- In the add-in, select Tools > Development Tools > Refresh secondary indices.
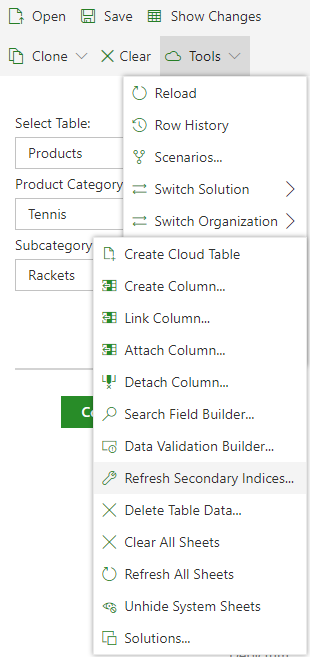
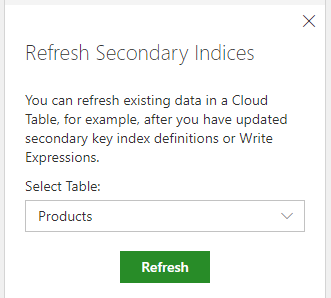
- From the select table choose
Productsand click Refresh. - Click Close once the refresh process has finished.
We can now use the Product ID to look for missing item unit prices in the Quote sheet. Previously, we gave three key array parameters to the CloudTableLookup function; the three key columns of the Products table. Now, we can use the secondary key as the key array parameter for our lookup function, and therefore, we can search for an item even if we only know the product ID.
Getting data from another table
We'll continue to develop the previous example script, but this time we'll use the secondary index as the parameter for the lookup function.
As mentioned, our aim is to look for the price of a product from another cloud table. We'll start by defining the function, and then create a read expression that is executed whenever you open a quote. As a result, we'll have a read expression that checks whether a row has a price, and if not, the script retrieves the price from the Products cloud table.
First, let's make sure our secondary index works, and modify the previous script. Instead of using the original key index as the parameter, we'll use the secondary index. Therefore, we need to suffix the function to determine that we're using the secondary index and replace the previous key array with the Product ID column of the quote:
vfe.CloudTableLookup.withKeyIndex(2).get("Products", [p.properties.productId], "p.properties.price", "0");Again, you can use the script debugger to make sure that the script works: open the Quote table in the web app, access the details of the row that's missing the price, and click SCRIPT DEBUGGER:

In the image above, we can see that the secondary index works because the test variable has the correct price. In other words, it gets the value for the key array parameter of the function from the Product ID column (p.properties.productId) of the row, and uses it to locate the correct row in the Products table, and finally gets the price from the Price column (p.properties.price) in the target table. Now, when we turn this script into an expression, it will be run for each row of a quote, and because the product ID will be different for each row, we can be sure that we'll get the right price for each item.
To create a read expression:
- Access the Koivu web app, and select your quote builder solution.
- Open the Column Definitions cloud table. If you are using the example template workbook, you can use the Column Definitions sheet.
- To limit the rows only to the Quote cloud table, enter
Quoteinto the search field and click Search.
- Click the pen icon () in front of the
unitPricerow to open the detail view. - Under the Read Expression heading, click OPEN EDITOR to access the script editor.
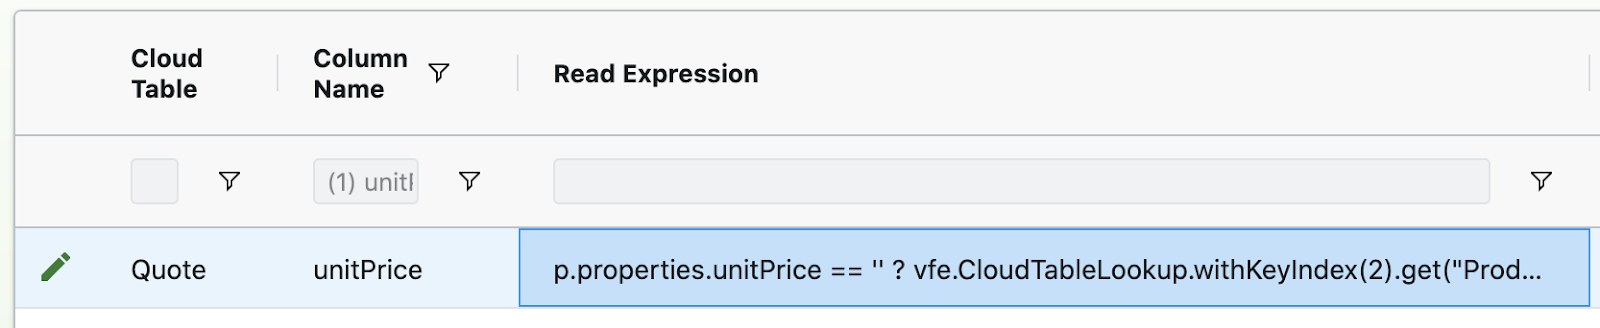
- Enter the following expression in the editor:
p.properties.unitPrice == '' ? vfe.CloudTableLookup.withKeyIndex(2).get("Products", [p.properties.productId], "p.properties.price") : p.properties.unitPrice;- Save the changes.
Like in the earlier read expression, the above script uses a ternary operator as shorthand for an if-else structure: a boolean comparison ? do this if true : do this if false. Firstly, the script checks whether the unitPrice property is empty by comparing it to empty quotes. If it is, we search from the cloud table. If it isn't, we return the property value itself. In essence, vfe.CloudTableLookup.withKeyIndex(2).get("Cloud table name", [Keys array], "Property to look up", "default value if lookup fails");
If the value is empty, the script will use the secondary key to look it up from Koivu Cloud and display it in Excel. You can find more information about the read and write expression in the Cloud Scripts documentation.
If you now use the Search button on the Quote sheet to retrieve the values from the cloud, you'll notice that the empty price values are replaced by the item price from the Products cloud table.
Data safety issues
Our example solution now works quite nicely. However, we could still make many improvements and modifications, and you're encouraged to do so. One of the issues is related to data safety.
Although the expression will now get the correct price from the Products table, and the formula is populated from the cloud to calculate the row's total price, the users can still manually manipulate the prices, accidentally or on purpose. For example, they could set the unit price to 0 or an empty value in the template, and then save the changes. Once the template is refreshed from the cloud, the template still shows the correct price, because the expression gets the price from the Products table. However, if we remove the expression from the Unit price column, the modifications made by the user are still stored in the cloud, and these will be displayed once you open the quote without the expression in place.
Alternatively, the user could modify the Row total price, which is also stored in the cloud in the Row total price value column. In other words, the modifications made by the user may be stored in the cloud, even if it does not appear so, and they will be retrieved, if the expressions are removed. Therefore, it might be a good idea to make sure that the user cannot persist changes to the cloud data for some fields.
Column types
We've already discussed key and property columns while creating and configuring the cloud tables. Koivu Cloud also includes a column type called expressions. The expression columns are similar to read-only fields, and their value is evaluated when data is saved or retrieved from the cloud. You could, for example, use an expression field to refer to a value in another table using a cloud script, and whenever you open the main table into a sheet, the referred value is retrieved from the other table, like we've already done.
We can increase the data safety of our solution by changing the column type of certain fields to be expressions. However, we will not be changing everything, but as an example, let's change the type of the Row total field to be an expression.
To change the column type:
- Access the Koivu web app, and select your quote builder solution.
- Open the Column Definitions cloud table. If you are using the example template workbook, you can use the Column Definitions sheet.
- In the Column Type column of the
Row total pricerow, change the type to expressions. You can either access the details view, or double-click the type field:
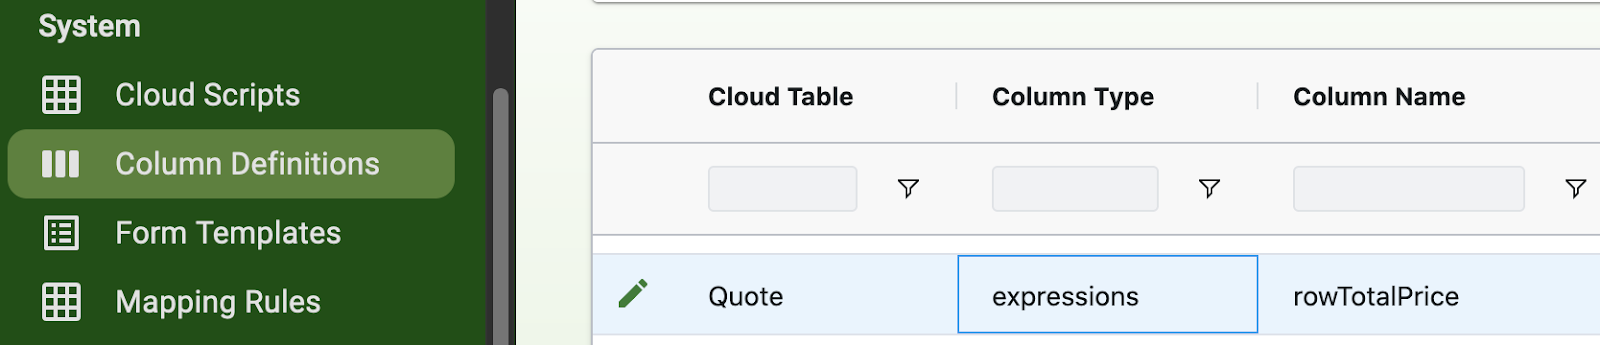
- Save the changes.
However, if you now reload the solution in the add-in, Tools > Development tools > Reload, and click Search to open a quote, the Row total price column displays the formula, not the result of the calculation. Therefore, you need to change the Excel's name reference of the column in the Name manager.
To change the fields name reference in Excel:
- In Excel, choose Formulas > Name Manager.
- Select the name definition for the
Row total pricecolumn, and change fromvfe.properties.rowTotalPricetovfe.expressions.rowTotalPrice:
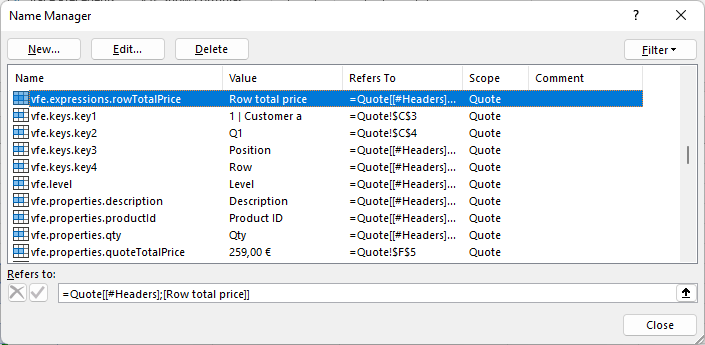
- Save the changes.
Now, if you change the values in the Row total price, and click Show Changes, the add-in notifies that no changes are found, which is what we want because now the user cannot save any changed values for this field. Of course, it would have been easier to initially set the column type to expression, but at that point we didn't yet know our requirements.
Similarly, the Excel Write Copy setting that we made earlier refers to a property column, and needs to be changed as well in order to save the calculation results to the cloud:

Congratulations, you now have a good overview of how you can use Koivu Cloud to define Excel formulas and create expressions that get data from another table. You're well on your way to building fully functional solutions with Koivu Cloud!
Additional training material
Explore these tutorials to learn more about what you can do with Koivu Cloud:
- Introduction to Koivu Cloud Excel add-in
- Get your spreadsheet into a database - Cloud Tables
- Design a Solution - Part 1
- Design a Solution - Part 2
Further information
Make sure to visit our community site and learn more about Koivu Cloud.