ProductCreate
AI IMAGE STUDIO

Product photography that sells.
Without the photo shoot.

Put every product on a model in a real setting, give your catalogue clean white-background packshots, and turn any product into a sale graphic built on your real Shopify discount. All from the products already in your store.

WATCH IT IN THE APP

From product photo
to finished image.

A narrated walkthrough recorded in the ShopiVision AI Studio app. Choose a product, set up a photo on a model or a packshot, find the result in My Creations and turn it into an offer banner.

Image Studio walkthrough · 4 min 36 s · narrated, with on-screen captions
AI IMAGE STUDIO

Studio photography,
without the studio.

Pick a product and choose what to make. Image Studio reads the product and fills in a sensible choice for every setting, so a great image is one click away. When you want to direct the shot, every detail is there.

Photo on a model

Your product worn or held by a model in a real setting, with the model, pose, scene and fit all under your control. 3 credits per image.

Packshot

A clean white-background photo, ready for your catalogue, marketplaces and Google Shopping. 1 credit per photo. See Packshots.

Offer banner

Your Shopify discount, a headline and a button on a ready-to-post sale graphic. Free on your own photo, 3 credits on a new AI picture. See Offer Banners.

SET UP FOR YOU

Everything is set. Change only what matters.

Every setting starts with a recommendation based on your product. The AI chooses whatever you leave alone, so open a row only when you want to change it.
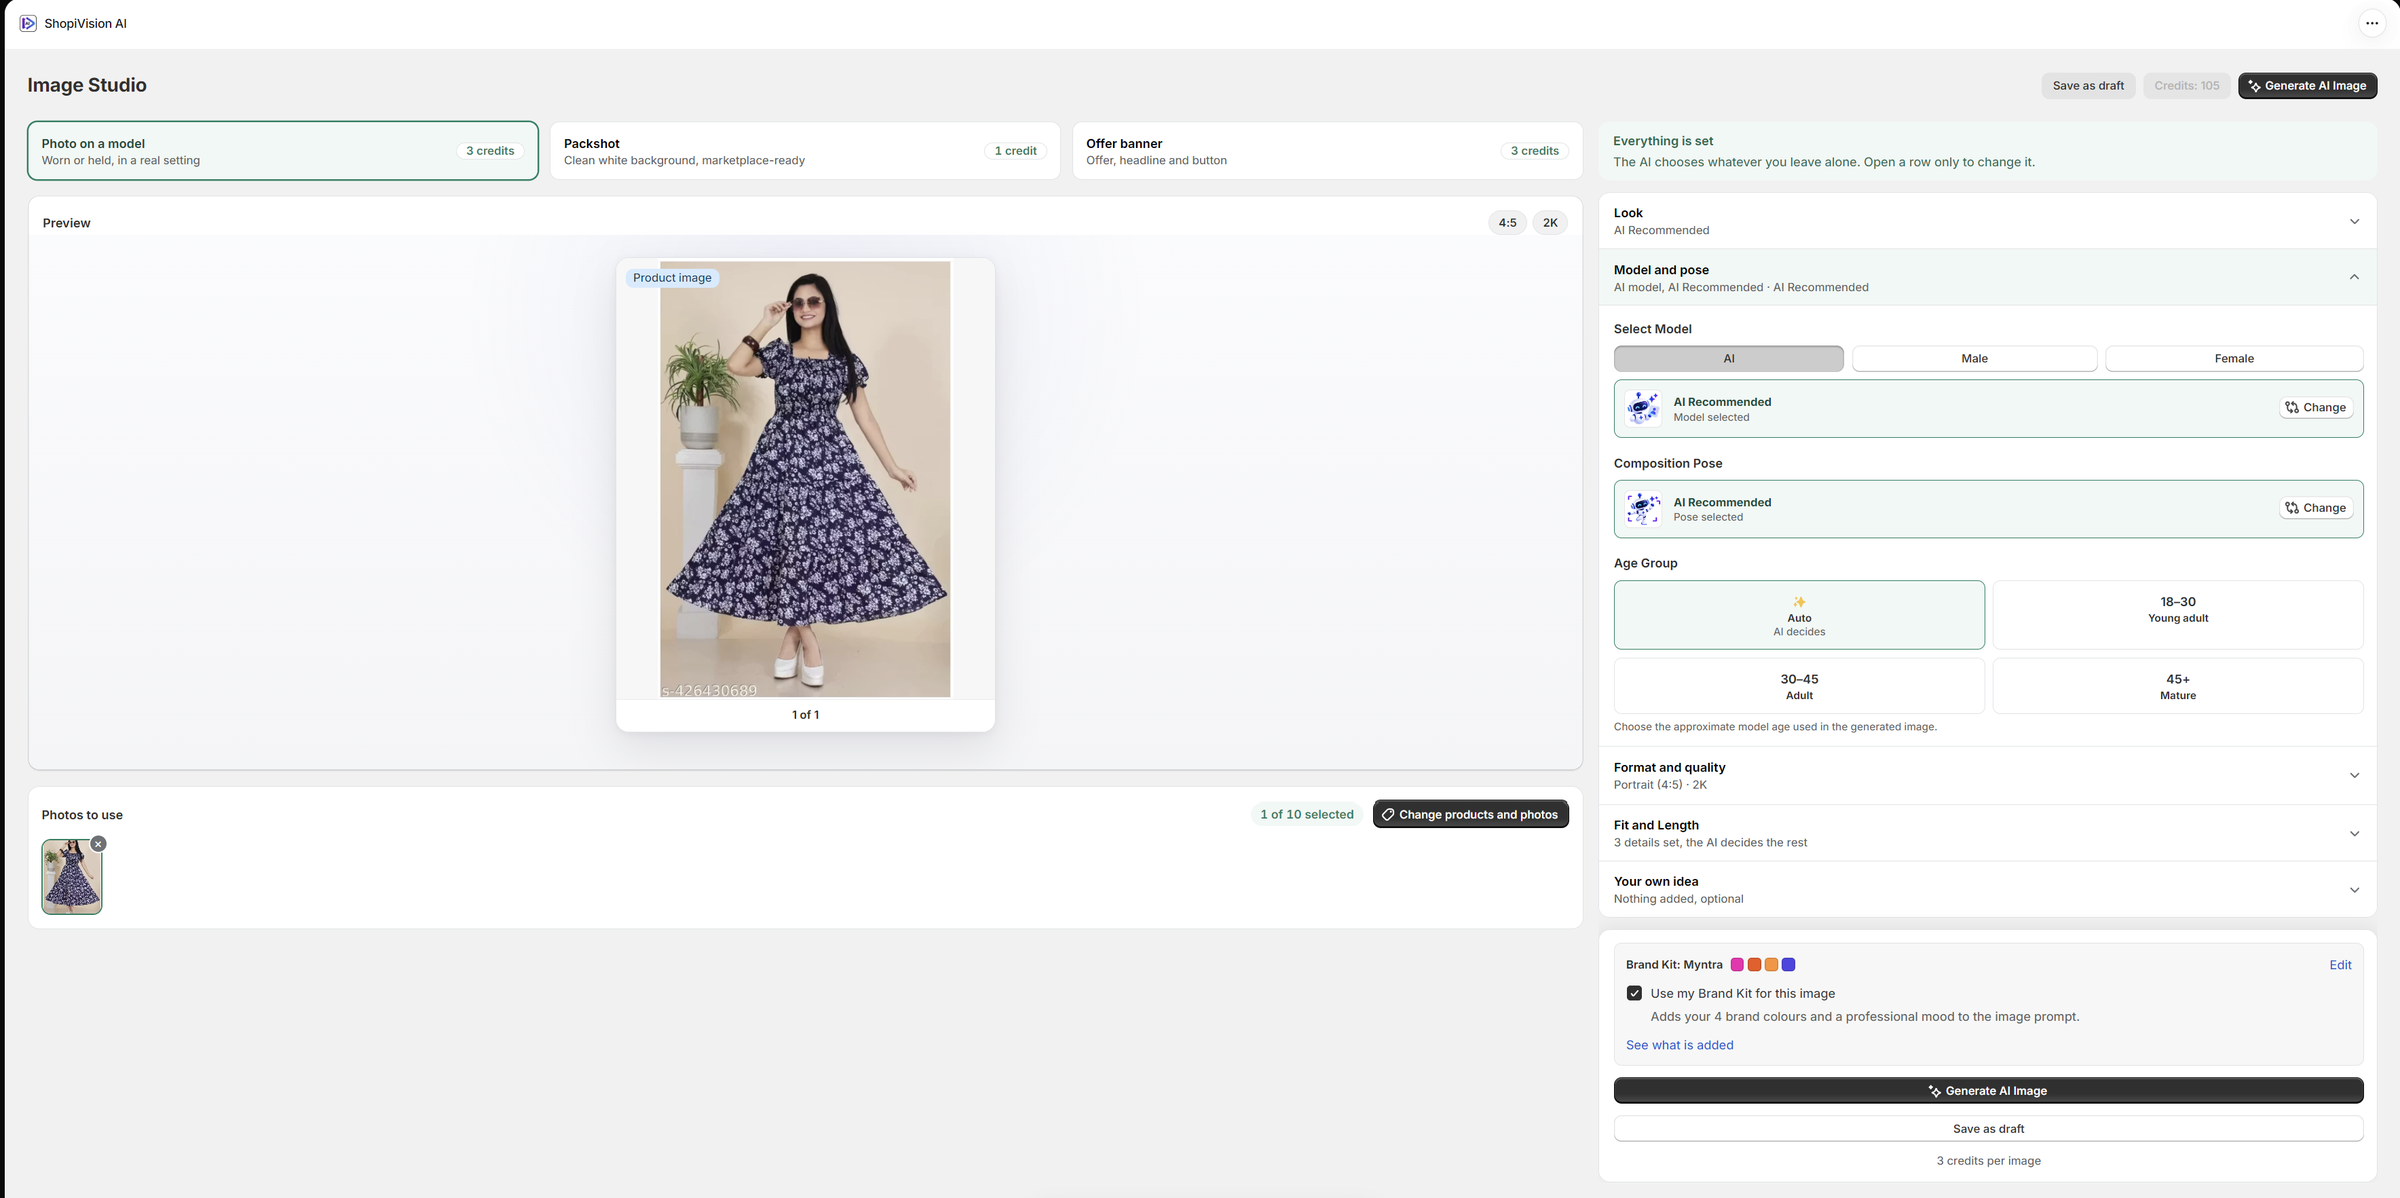
  • Know when you are readyA status at the top says Everything is set, or tells you exactly what still needs you, such as which shoe views to add, with a link straight to it.
  • LookPick a scene for your product from the library of backgrounds, or keep the AI recommendation.
  • Model and poseLet the AI choose, or pick a male or female model and a composition pose from the library. Set the model’s age group (18–30, 30–45 or 45+), or leave it on Auto.
  • Poses that suit your productA long dress is not shown sitting, shoes get poses with legs and feet in view, and jewellery, watches, glasses, hats, bags and beauty products get close-up poses such as Ear Profile, Wrist Check and Frame Portrait.
  • Format and qualityChoose the aspect ratio for the channel you are posting to, such as portrait 4:5, and the resolution, up to 2K.
Image Studio set to Photo on a model, with a dress preview and the Model and pose panel showing AI, male and female models, composition pose and age group options
Image Studio · Model and pose
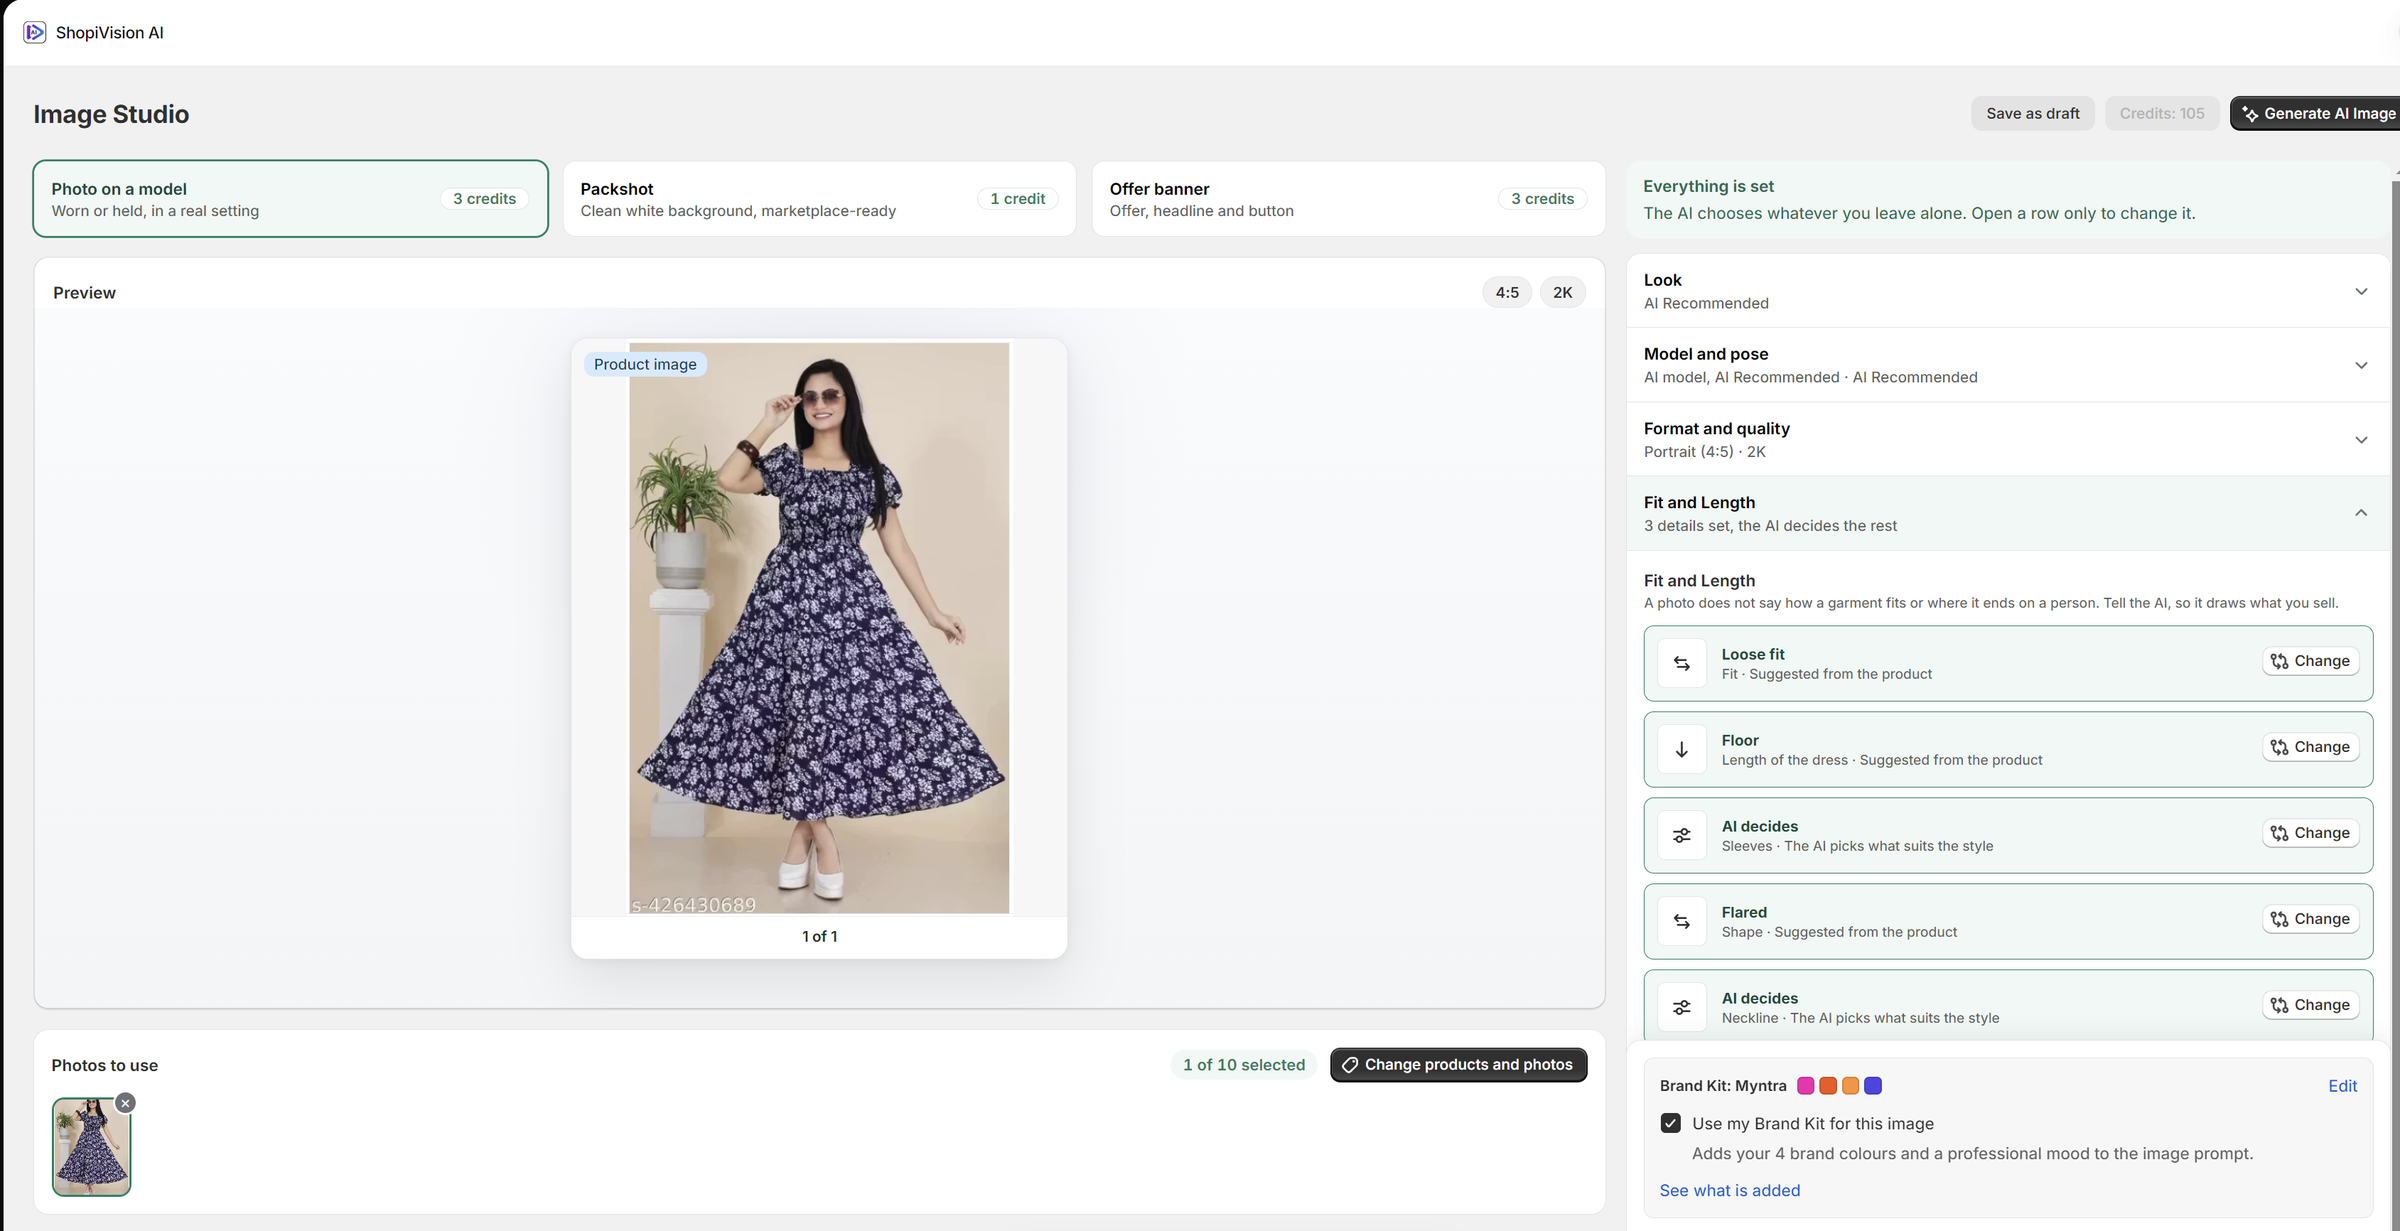
Fit and Length panel for a dress, with loose fit, floor length and flared shape suggested from the product, and sleeves and neckline left to the AI
Image Studio · Fit and Length
FIT AND LENGTH

Show the garment you actually sell.

A photo does not say how a garment fits or where it ends on a person. Tell the AI, and it draws your product the way your customer will wear it.

  • The details that change the pictureFit, length, sleeves, shape and neckline, plus how it is worn. A floor-length, flared, loose-fit dress stays exactly that.
  • Suggested from your productEach detail starts with a suggestion read from your product. Keep it, change it, or leave it to the AI, and the summary shows how many details you have set.
  • Size and placement for accessoriesFor jewellery, bags, watches, glasses, hats, scarves and dupattas, belts, hair accessories, sarees, footwear and beauty products, a few short questions set how big the product is on a person and how it is worn. Choices come with real sizes, so “small” means what you mean.
SHOE VIEWS

Every side of the shoe, exactly right.

Shoes look different from every angle. Tell the AI which photo shows which side, and it never has to guess.
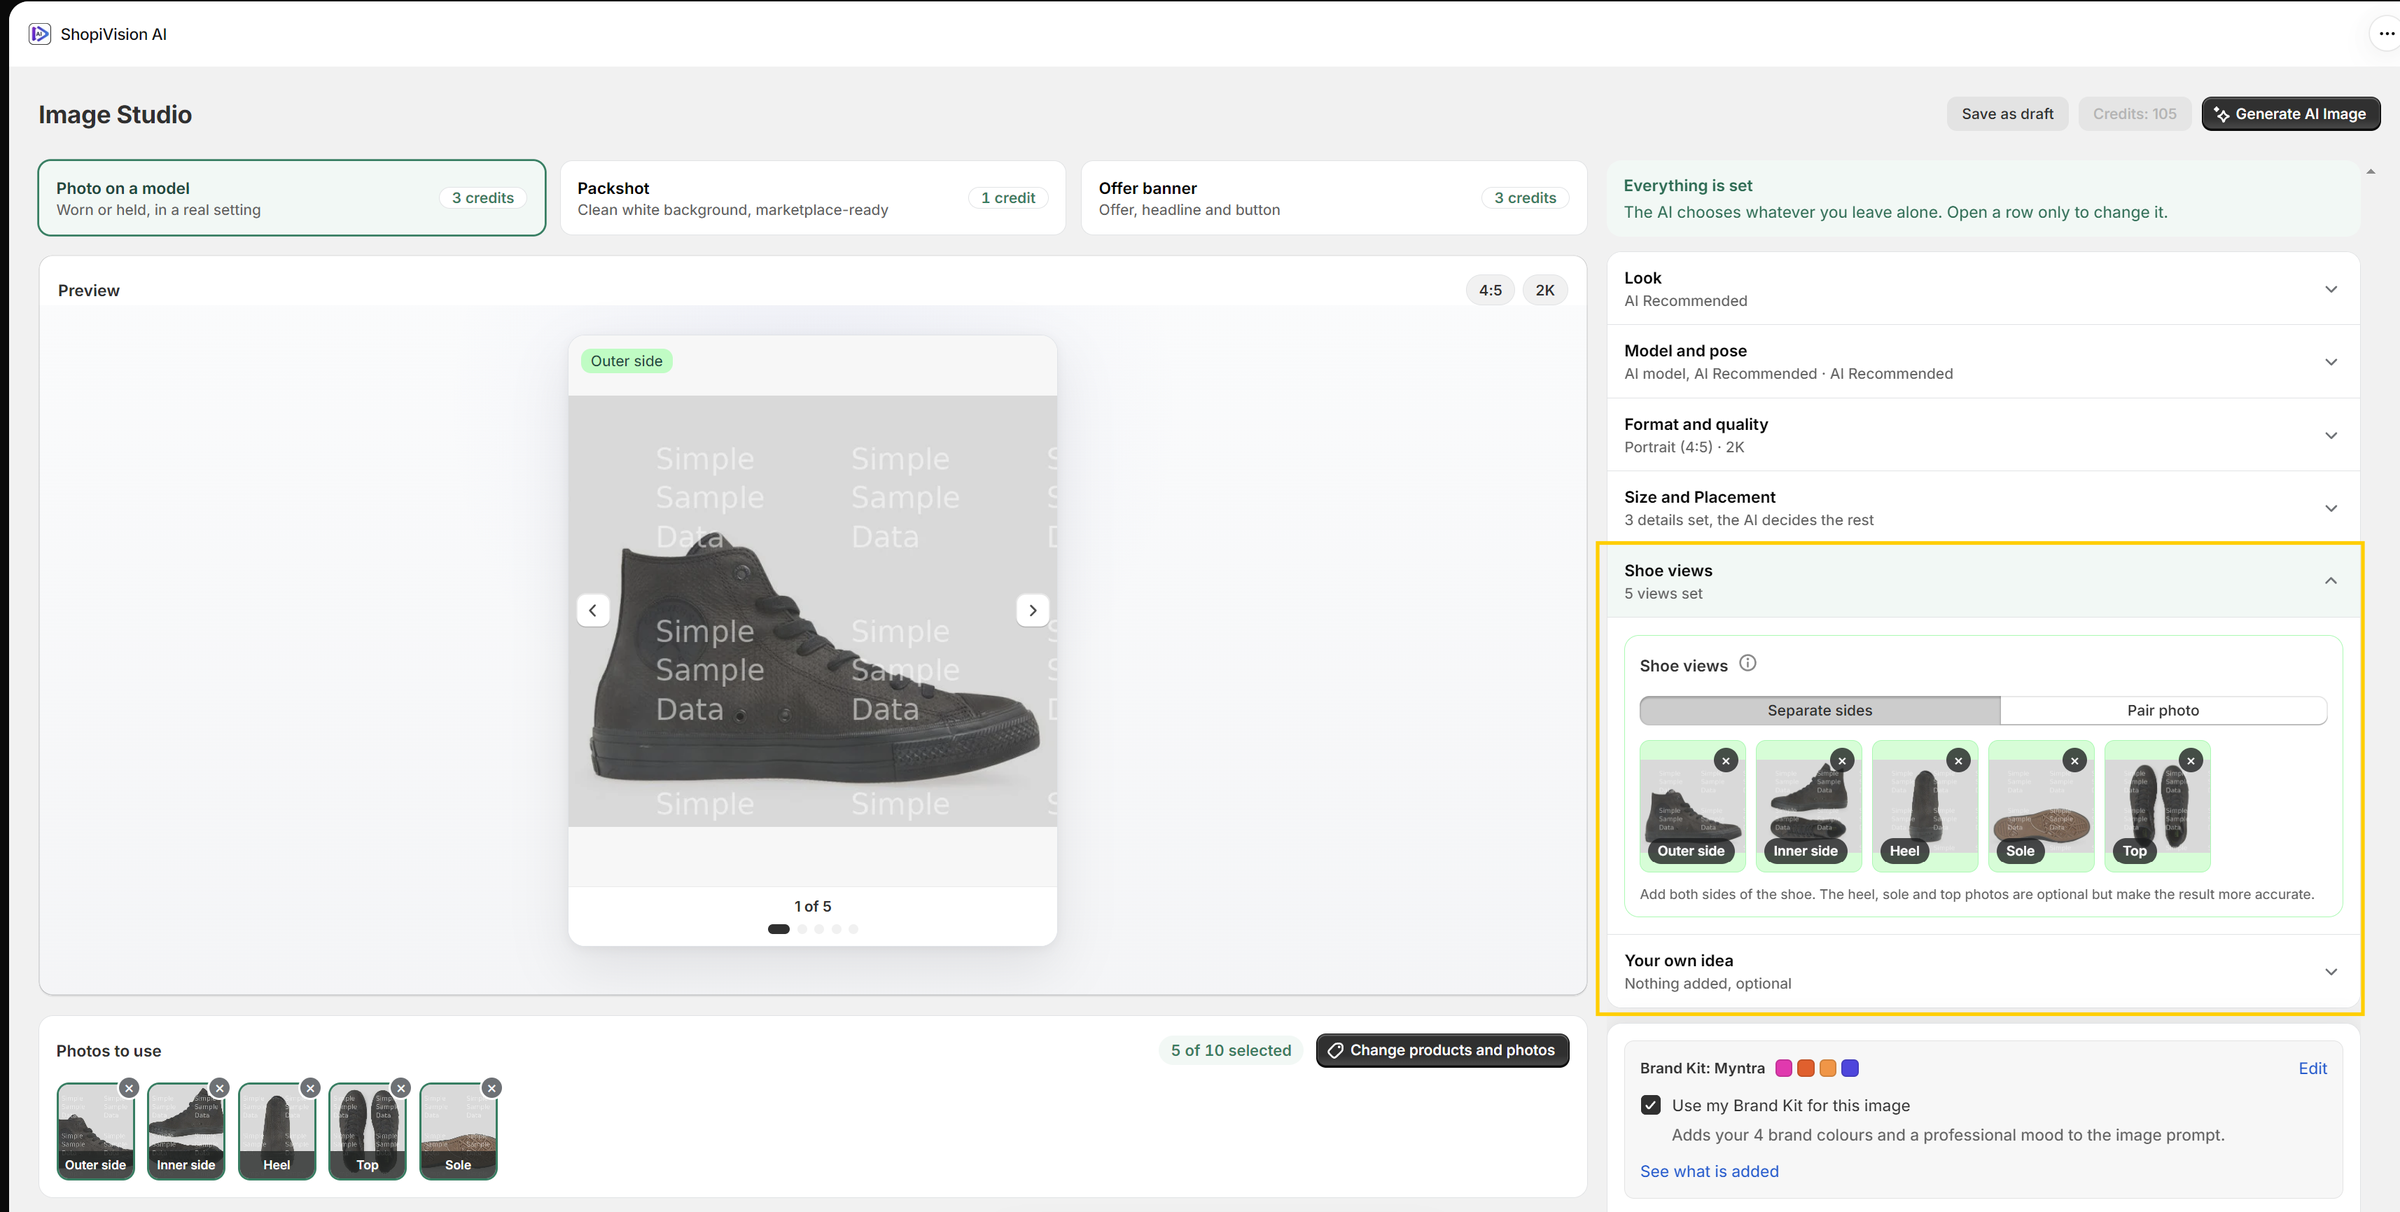
  • Label each photoMark your photos as the outer side, inner side, heel, sole or top. The labels appear on every thumbnail and in the preview.
  • Separate sides or a pair photoUse one photo per side, or a single photo of the pair. Both sides are needed; the heel, sole and top are optional but make the result more accurate.
  • One pair, one chargeAll the views of one pair of shoes are used together for a single image and charged once.
Shoe views panel with five photos of one sneaker labelled outer side, inner side, heel, sole and top, and a choice between separate sides and a pair photo
Image Studio · Shoe views
Choose products and photos window with products and collections tabs, five of ten photos selected for a sneaker, and a search box
Image Studio · Choose products and photos
PHOTOS TO USE

The right photos, straight from Shopify.

Your catalogue is already there. Choose the product and the photos the AI should work from, with nothing to upload.

  • By product or collectionSearch your products, or browse by collection, and pick up to 10 photos at a time.
  • Preview before you spendFlick through every selected photo in the preview. A photo that will not be used, such as a shoe photo without a view set, is clearly marked.
  • A heads-up when a photo is missingChoose a back or side pose with only a front photo, and the studio tells you which photo to add, so the AI is not left to guess.
YOUR OWN IDEA & BRAND KIT

Add your creative direction.

Describe the lighting, textures or mood you want, or start from an idea written for your product. It is entirely optional.
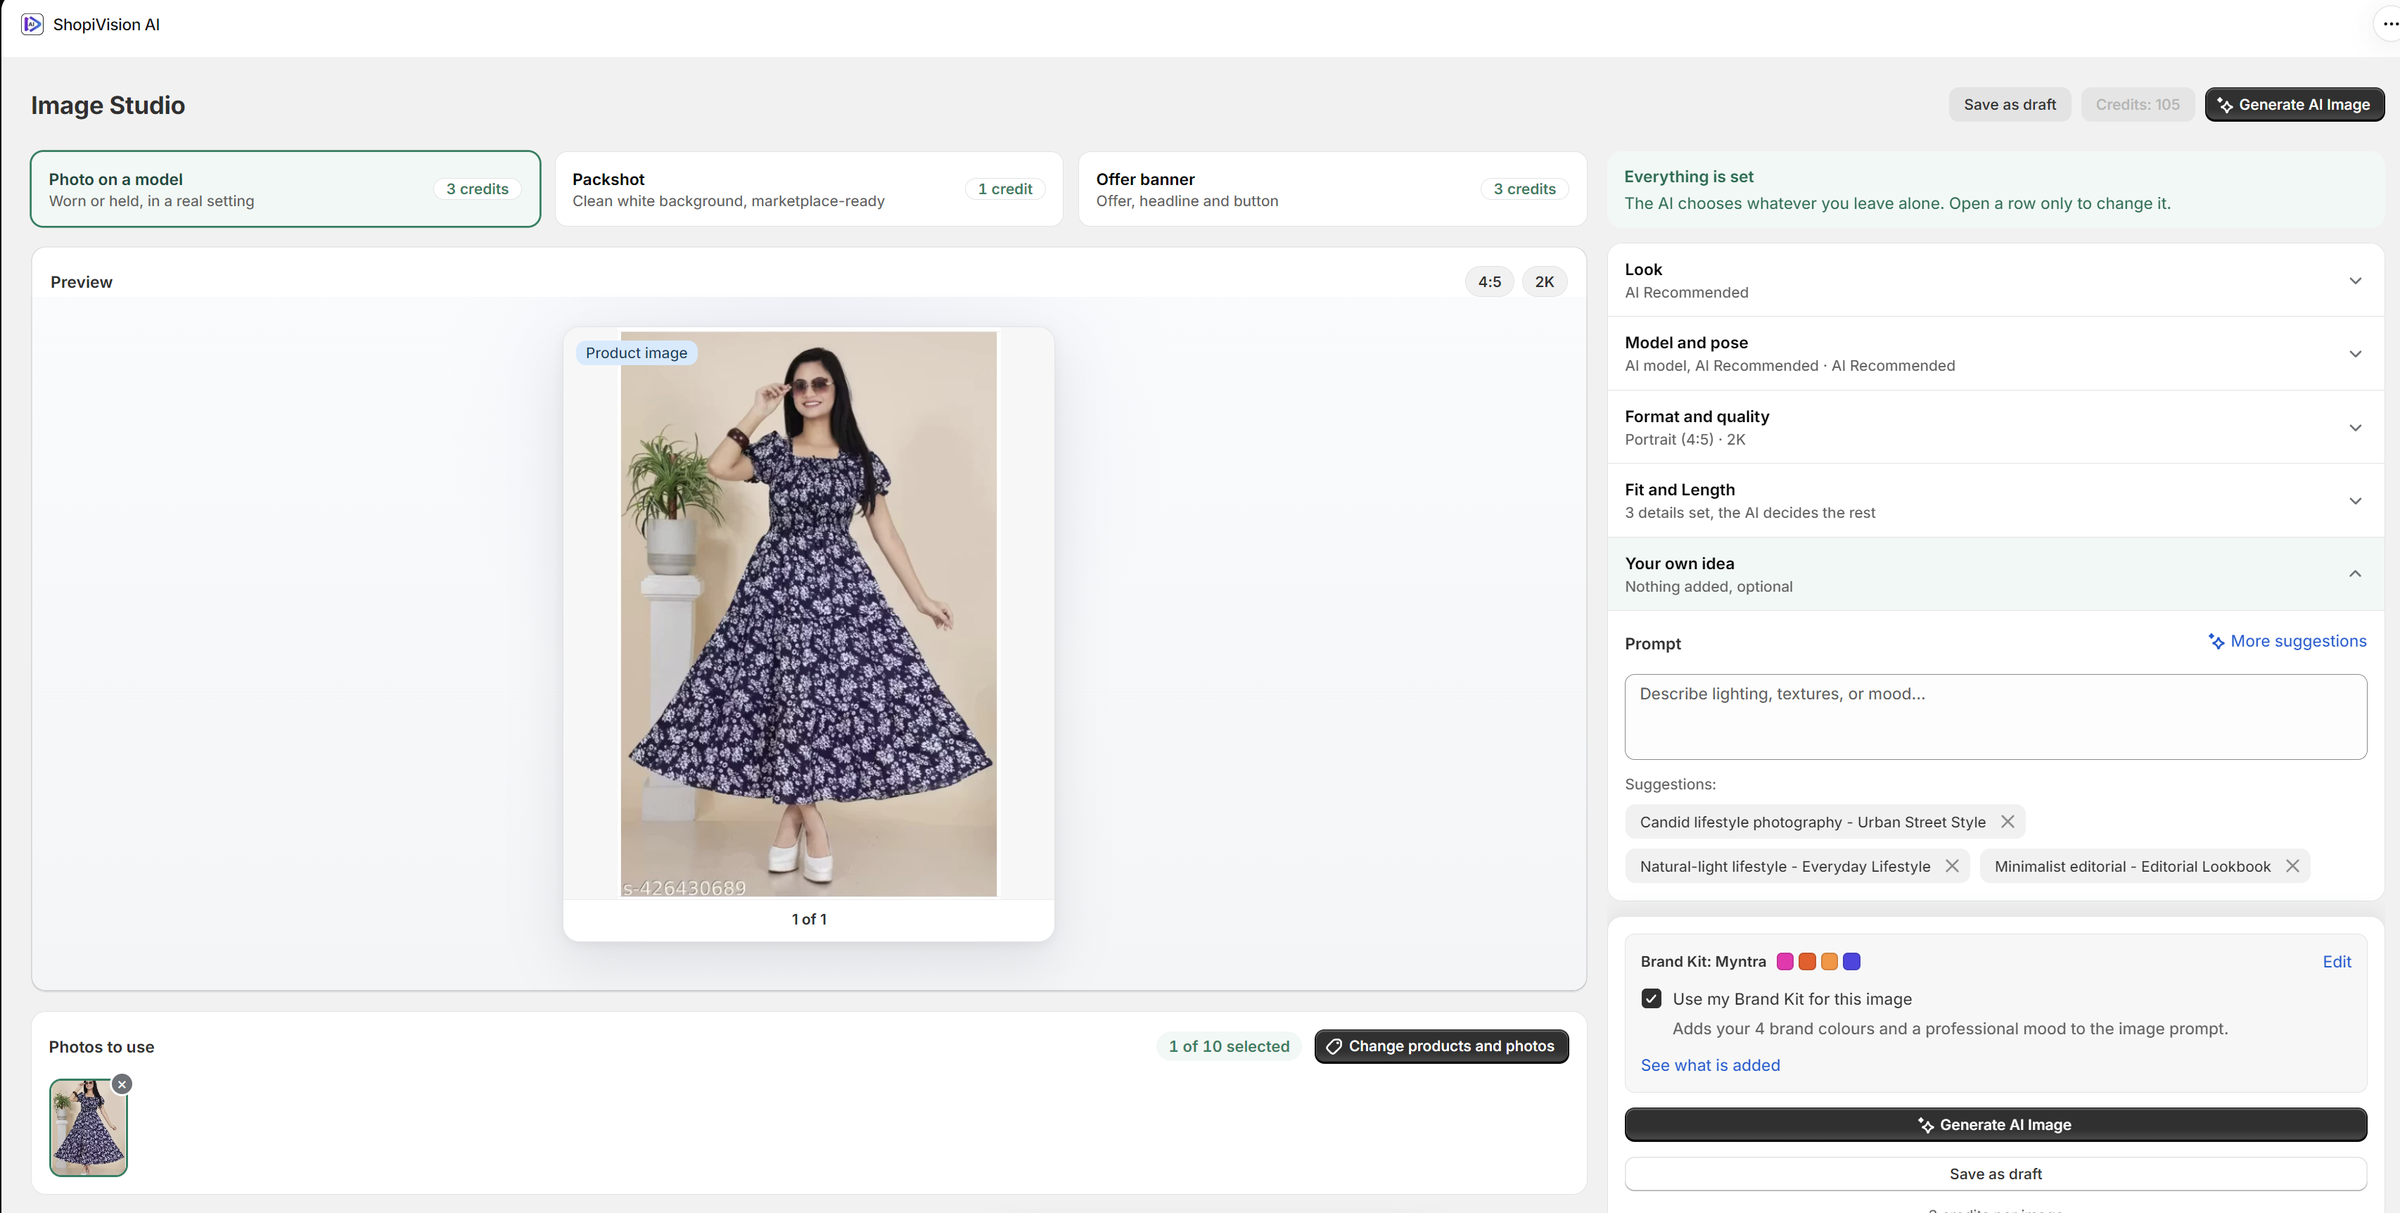
  • Prompt suggestionsIdeas such as Candid lifestyle, Urban Street Style or Minimalist editorial, Editorial Lookbook are written for each product. Tap one to use it, ask for more, or write your own.
  • Your Brand Kit, on every imageYour brand colours and a professional mood are added to the image prompt. See exactly what is added, or switch it off for a single image.
  • Save as draftNot ready? Save your choices and carry on later. Drafts use no credits until you generate.
  • Watch it being madePress Generate and the preview shows each step as it happens. When it is ready, it is waiting in My Creations. If a creation fails, its credits come back and you can retry it.
Your own idea panel with a prompt box, More suggestions link and three suggested prompts, above the Brand Kit option and Generate AI Image button
Image Studio · Your own idea and Brand Kit
FRONT + BACK NEW

Both sides of the garment, in one go.

Choose Front + back under Views to generate, and one press makes a front view for your main image and a back view for the second, on the same model, in the same scene, ratio and quality, so the two sit together in your product gallery.

  • The same design in bothEach view is made from your original product photos, never from another generated view, so the print, colour and details do not drift between them.
  • The real back, not a guessMark which photo shows the back under Photos, or use a product sheet that shows the front and back side by side. The AI copies the actual neckline, closure and back of your product.
  • Offered where it mattersFor clothing, outerwear and sarees, whose back differs from the front. Each view is its own image at 3 credits, so a front and back pair is 6.
CHILDREN’S CLOTHING NEW

Kids’ clothes, on a child of the right age.

A toddler’s romper looks wrong on an adult, and it does not sell. When a product is made for children, the AI creates a child model of the age the clothes are made for, in a natural pose for that age.

  • Five age groupsBaby (0–2), Toddler (2–4), Kid (5–8), Tween (9–12) and Teen (13–17), as a girl, a boy or either. The first choice is read from your product name, such as “Baby romper” or “Girls party frock”.
  • Safe by designAlways fully clothed, with no make-up, jewellery or adult styling, in family-friendly settings such as a playroom, a garden or a park. Your saved models are adults and are never used.
  • Some products stay off a childChildren’s swimwear, underwear and nightwear are never shown on a child. Make a packshot of them instead.

Photo on a model: 3 credits per image, and a Front + back pair is two images. Packshot: 1 credit. Offer banner: 3 credits, or free on your own product photo. Failed creations are refunded. Every idea and photo passes a content safety check first.

PACKSHOTS NEW

Marketplace-ready photos.
From 1 credit.

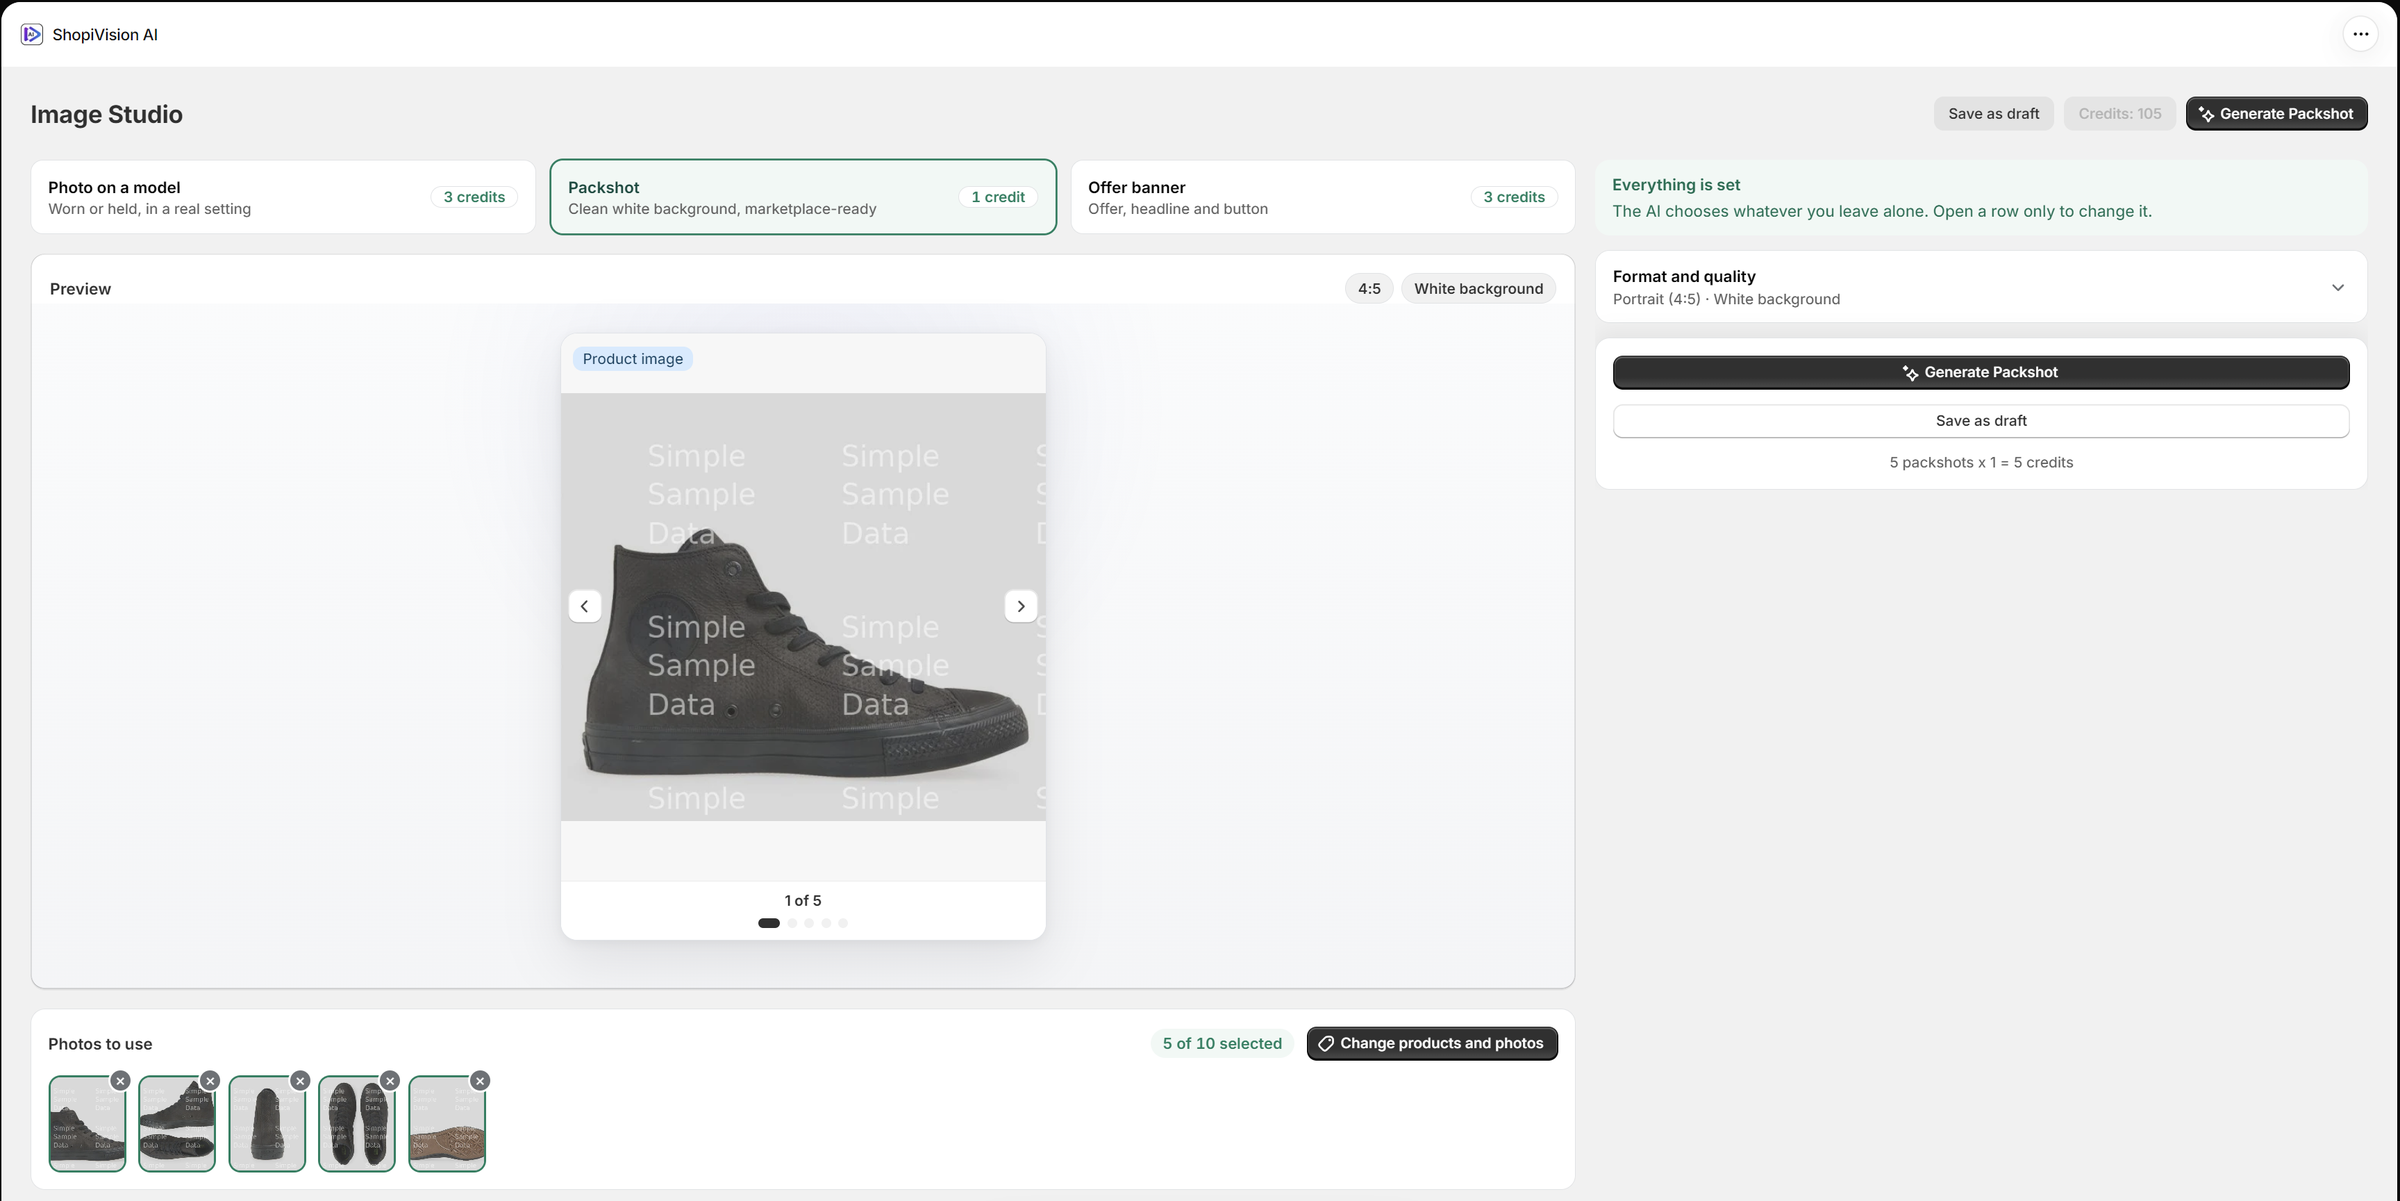
Need a clean white-background photo for your catalogue, a marketplace listing or Google Shopping? Choose Packshot in Image Studio. Your product stays exactly as it is, and only the background is replaced with clean white.

  • Clean white backgroundEverything behind your product is replaced with white, so photos look consistent across your whole catalogue.
  • One photo in, one photo outSelect several photos and each becomes its own packshot. The cost is shown before you start, for example 5 packshots × 1 = 5 credits.
  • Nothing else to setNo model, pose or scene. Just choose the format and generate.
  • In Bulk Studio and Autopilot tooGive a whole selection, or every new product, a white-background photo automatically.
  • A great start on the free trialThe 12 trial credits cover one Fast video and seven packshots.
ImageCredits
Packshot · clean white background1
Photo on a model · model, pose and scene3
Offer banner · on a new AI picture3
Offer banner · on your own product photoFree
Image Studio set to Packshot with a white background format, five sneaker photos selected and a cost of 5 packshots for 5 credits
Image Studio · Packshot
OFFER BANNERS & DISCOUNTS NEW

Sale graphics with
prices you can trust.

Choose Offer banner in Image Studio to turn a product into a ready-to-post sale graphic in five short steps. Every number on it comes from your real Shopify discount, and the preview updates as you go.

My product photo · Free

Put your offer on the photo you selected, even an AI picture that is already on the product.

New AI picture · 3 credits each

Your product in a fresh AI scene, with your offer, headline and button on top.

STEP 1 · OFFER

Linked to your real Shopify discount.

Pick the deal you are promoting and connect it to the discount your checkout will honour.
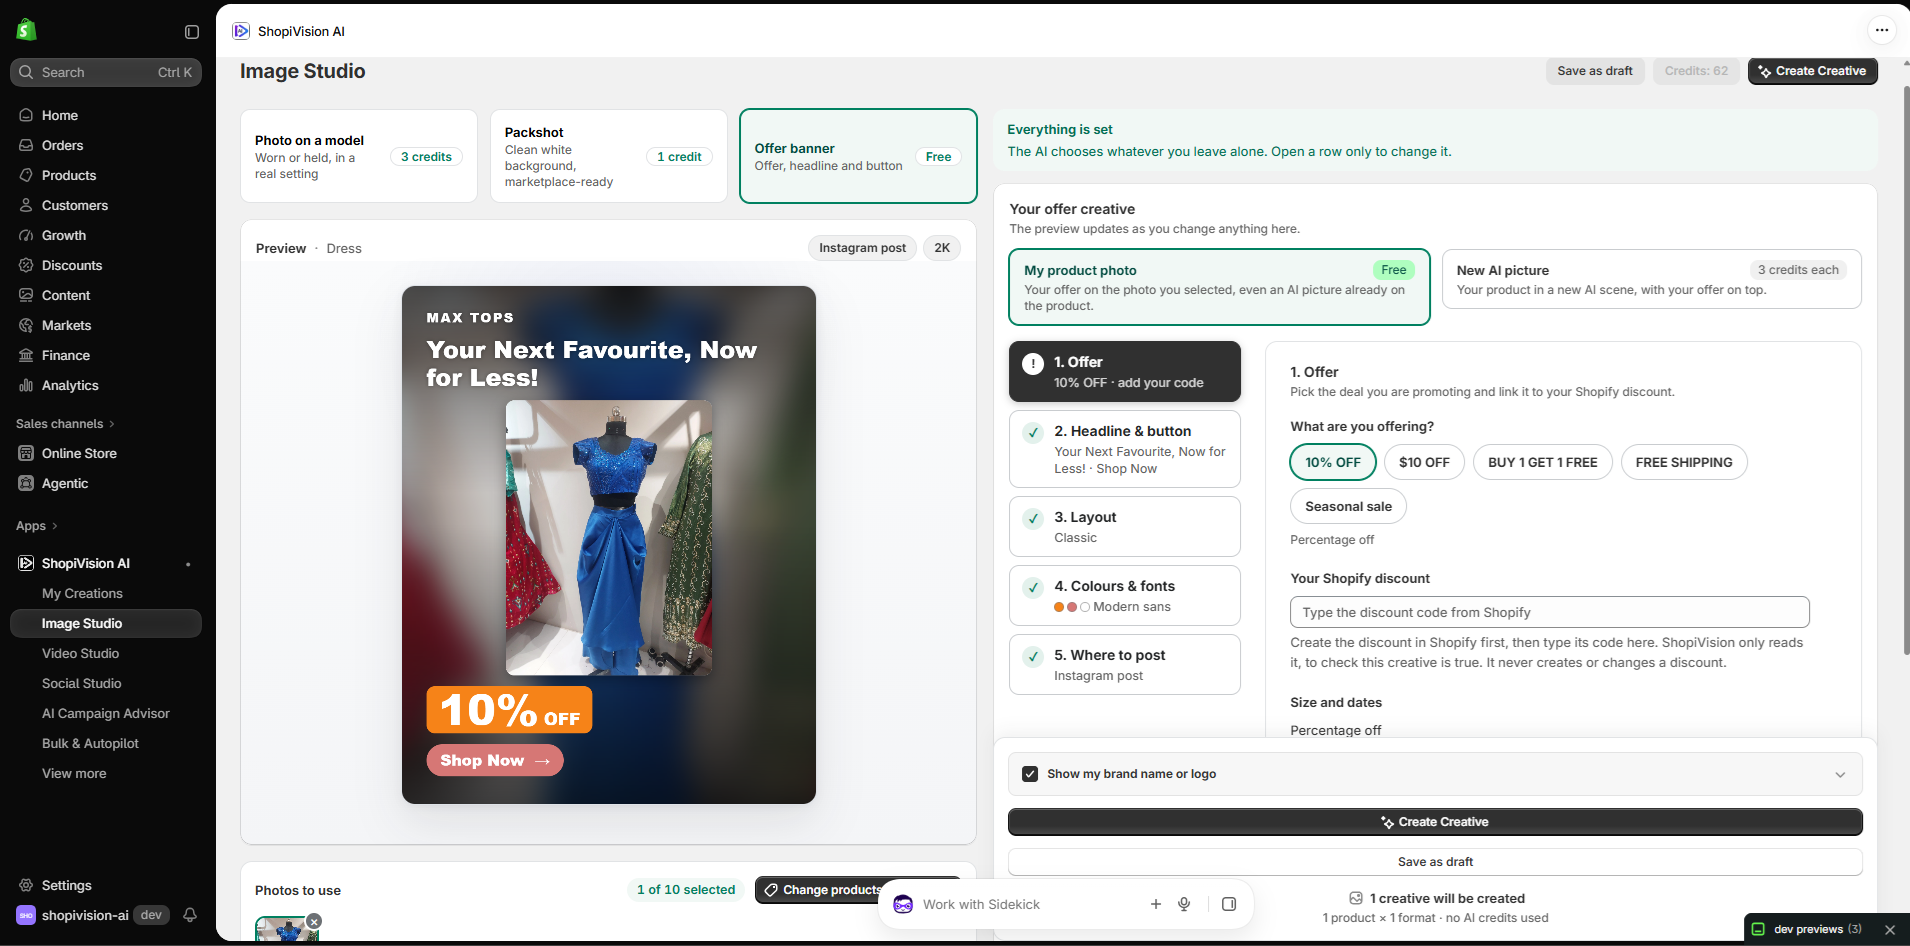
  • Five kinds of offerA percentage off (up to 90%), an amount off in your store’s currency, buy one get one free, free shipping, or a seasonal sale that names no price at all.
  • Fill in from ShopifyType your discount code and the app fills in the size of the discount and its dates, straight from Shopify.
  • Checked before you spendCheck the offer with Shopify at any time. It is checked again before any credit is spent, so a banner never promises more than your checkout gives.
  • Read onlyShopiVision AI Studio only reads your discounts. It never creates or changes one, so set the discount up in Shopify first.
Offer banner step one with a 10% off offer, a field for the Shopify discount code and a live Instagram post preview of the sale graphic on the product photo
Offer banner · Step 1, the offer
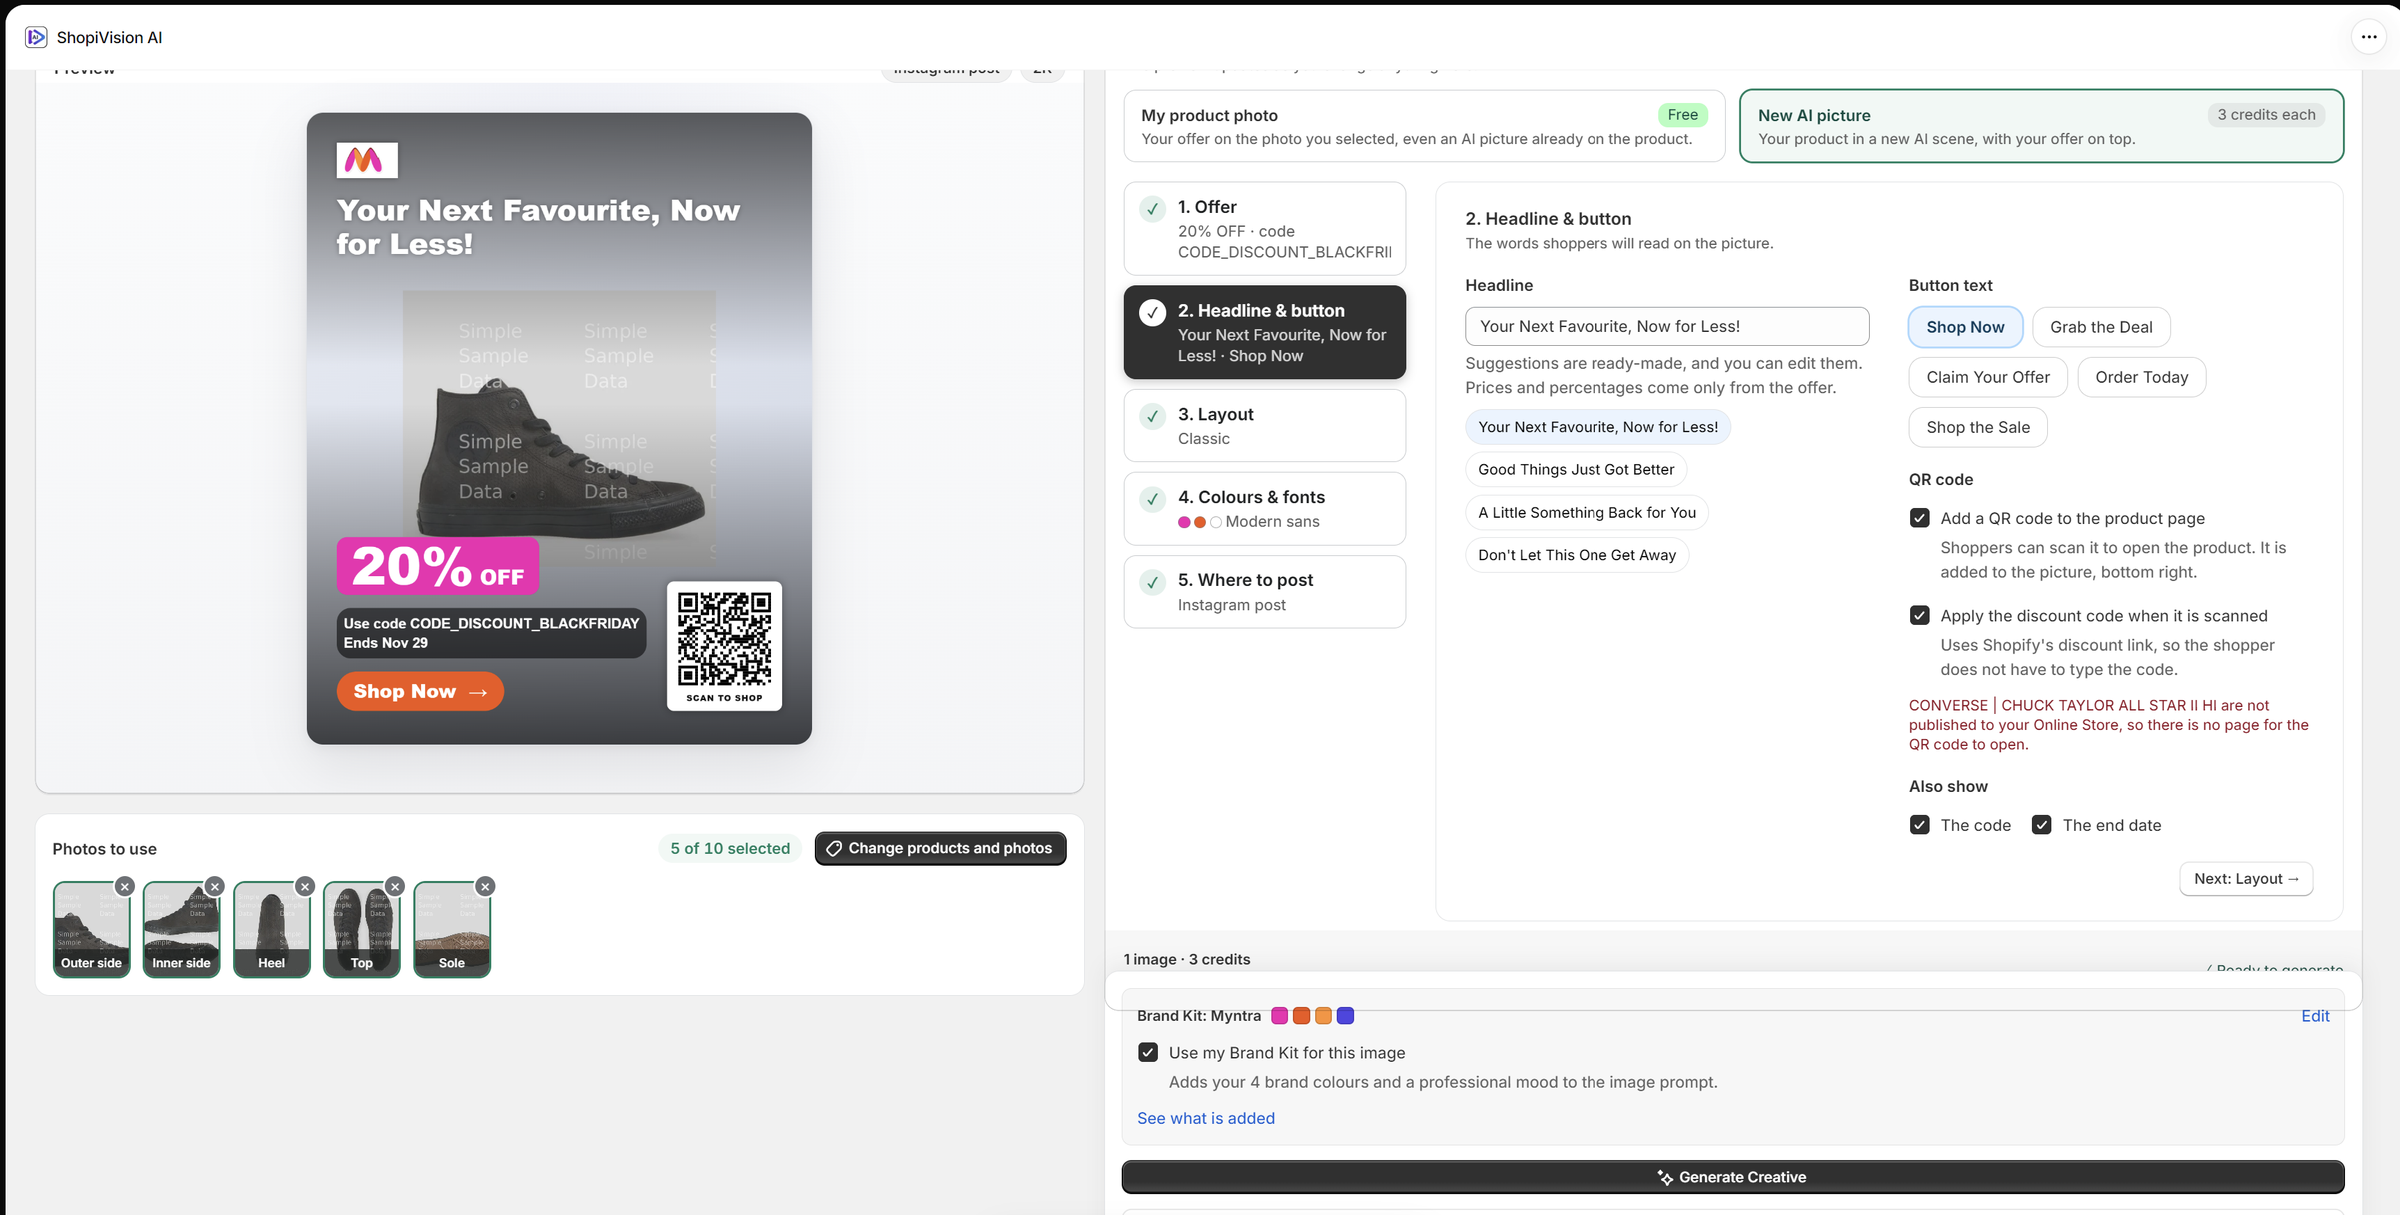
Headline and button step with suggested headlines, button text choices and a QR code option that applies the discount when scanned
Offer banner · Step 2, headline, button and QR code
STEP 2 · HEADLINE & BUTTON

Words that sell, and always read right.

Choose the words shoppers will read on the picture.

  • Ready-made headlinesPick a suggested headline or write your own. Prices and percentages come only from the offer, never from the headline.
  • A clear call to actionShop Now, Grab the Deal, Claim Your Offer, Order Today or Shop the Sale.
  • A QR code to the productAdd a QR code that opens the product page, and apply your discount code when it is scanned, so the shopper does not have to type it. The app warns you if the product is not published to your Online Store.
  • Real text, not AI letteringThe offer, headline, code, end date and button are added as real text, so every price and code reads exactly as you set it.
STEP 3 · LAYOUT

Eight layouts, previewed with your product.

Every layout shows the same offer, headline and button. Only where they sit changes, and each preview uses your own product.
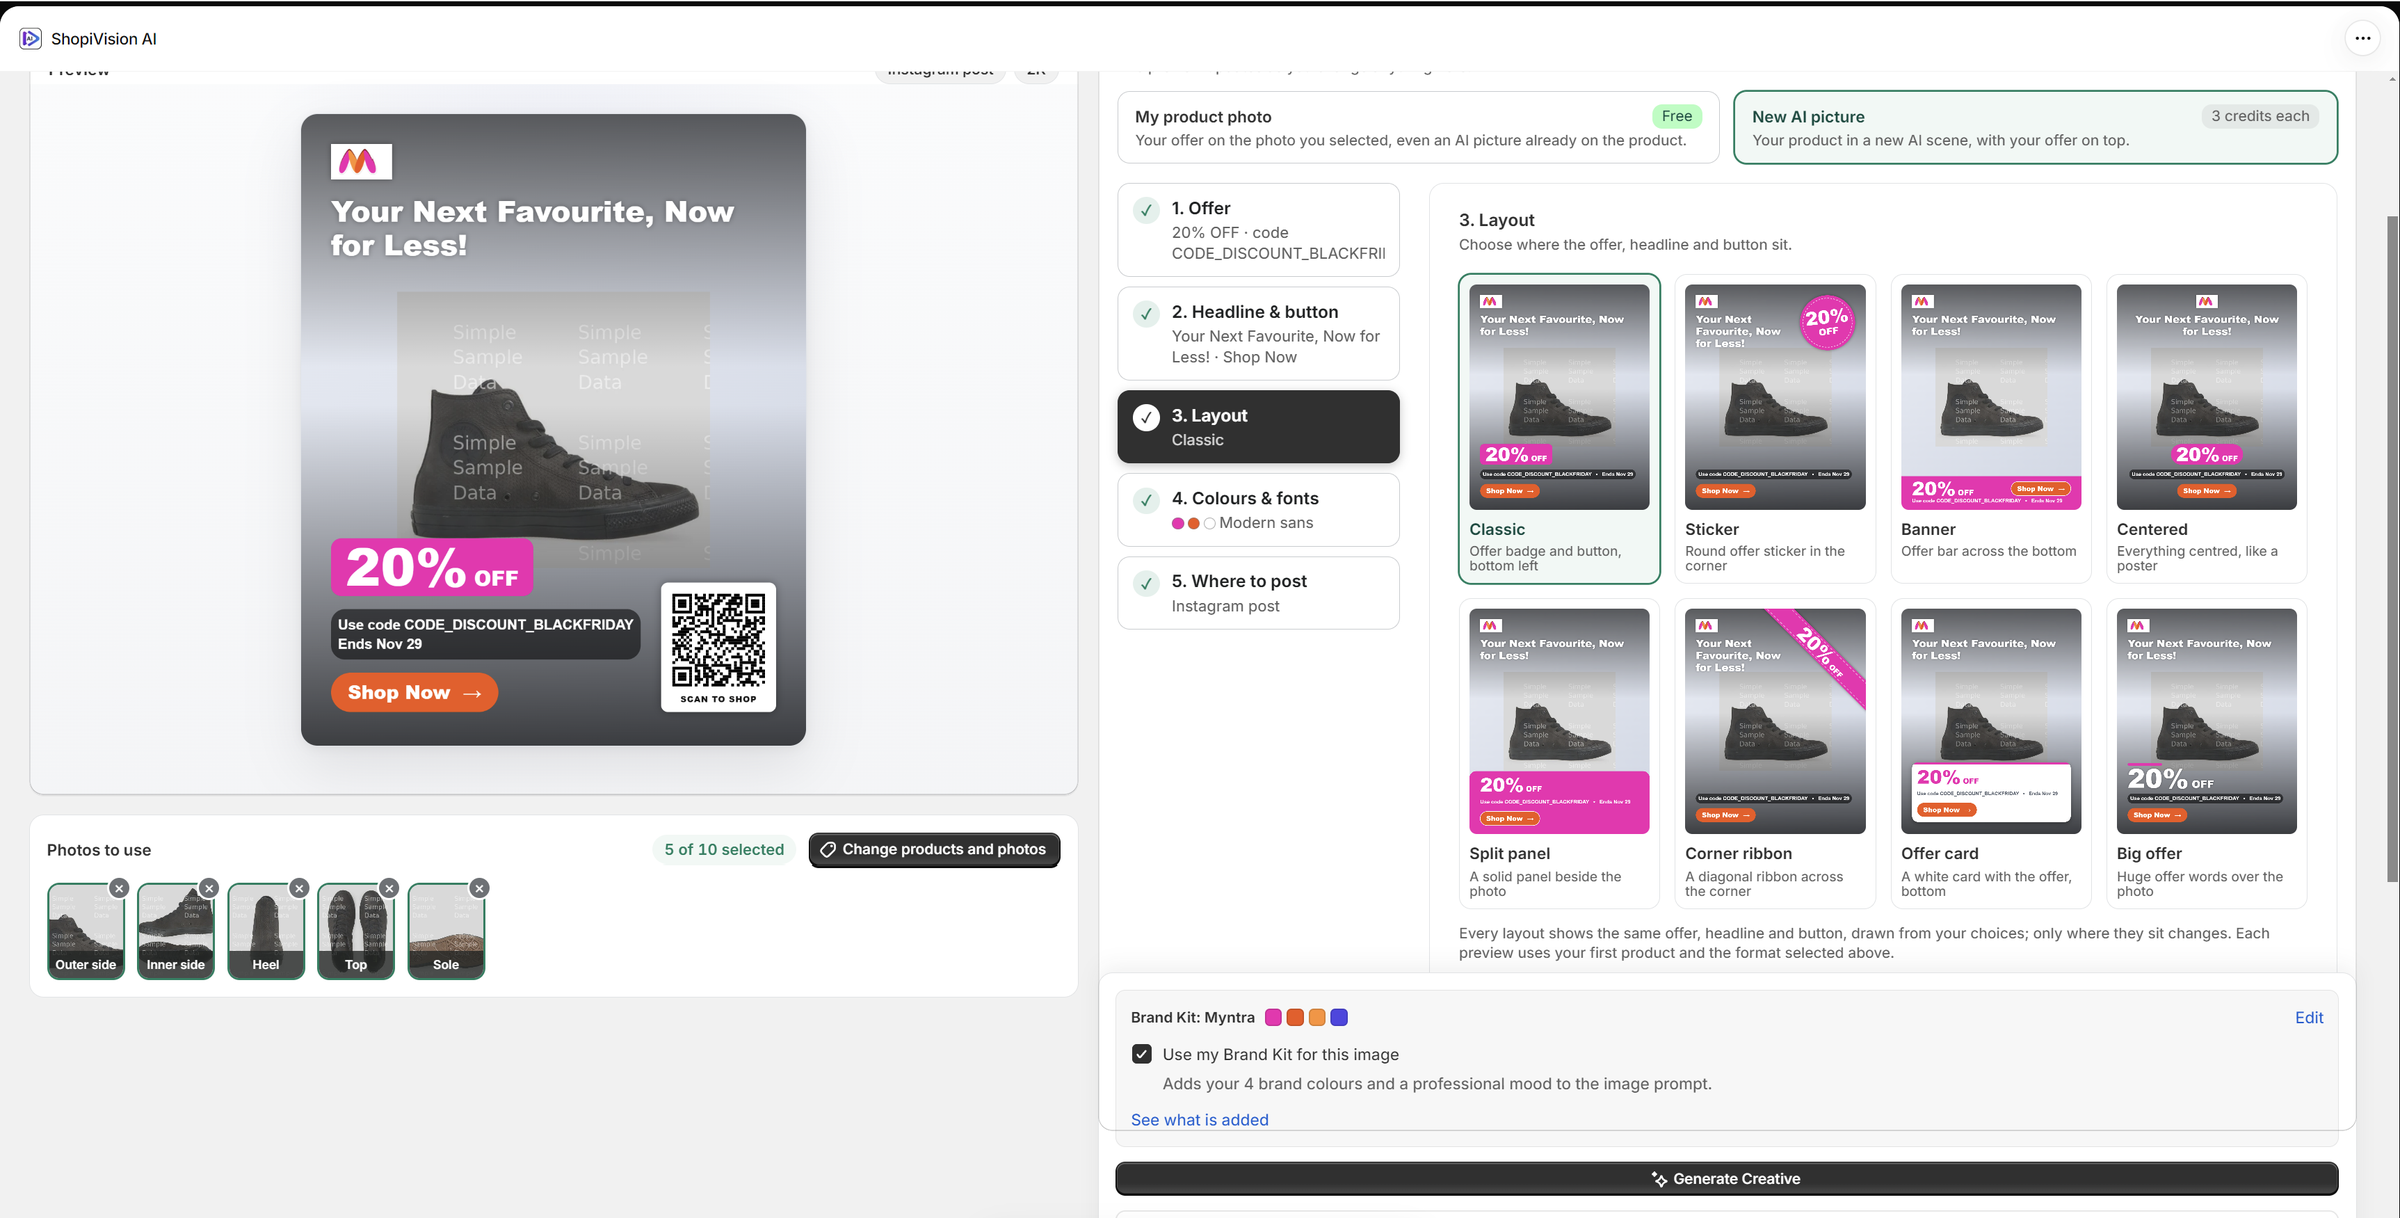
ClassicStickerBannerCenteredSplit panelCorner ribbonOffer cardBig offer
Layout step with eight previews of the same sale graphic: Classic, Sticker, Banner, Centered, Split panel, Corner ribbon, Offer card and Big offer
Offer banner · Step 3, layout
STEP 4 · COLOURS & FONTS

On brand, without the design work.

Choose a font style (Modern sans, Classic serif, Bold display or Friendly rounded), the size of the offer and headline, and the colours of the offer, headline and button. Text colours stay automatic, black or white, whichever reads better, until you pick one. Reset to your brand at any time.
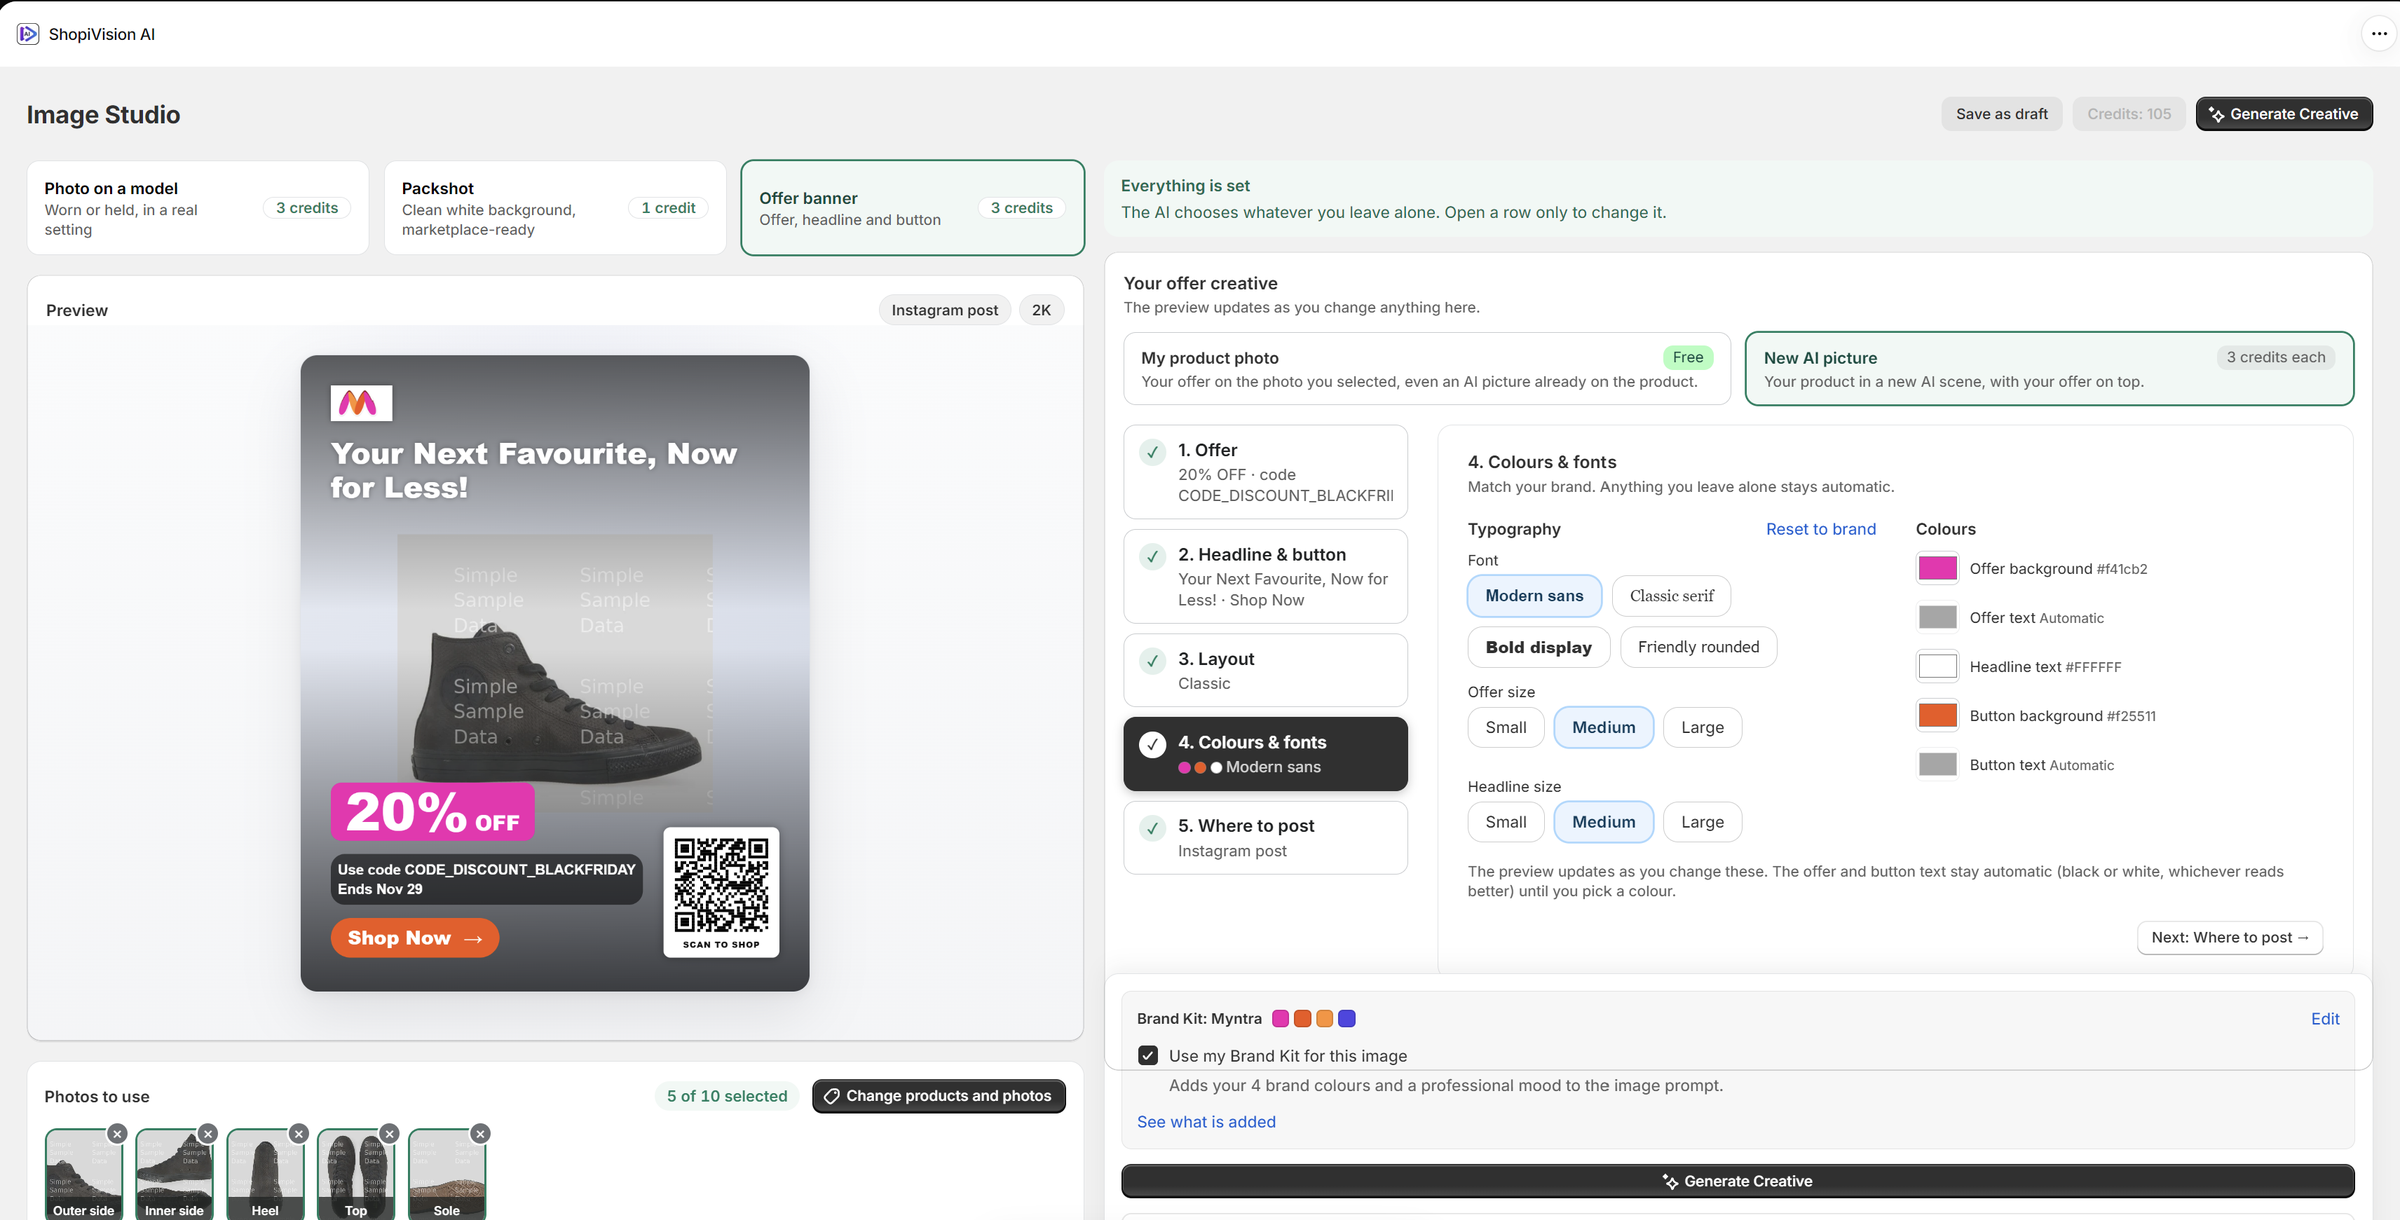
Colours and fonts step with four font styles, offer and headline sizes, and colour choices for the offer, headline and button
Step 4 · Colours and fonts
STEP 5 · WHERE TO POST

Sized for every feed.

Pick an Instagram post (4:5, 1080 × 1350), an Instagram Story (9:16, 1080 × 1920) or a Facebook post (1.91:1, 1200 × 630). Each format is its own picture, made to fit that shape, and the total cost is shown before you generate.
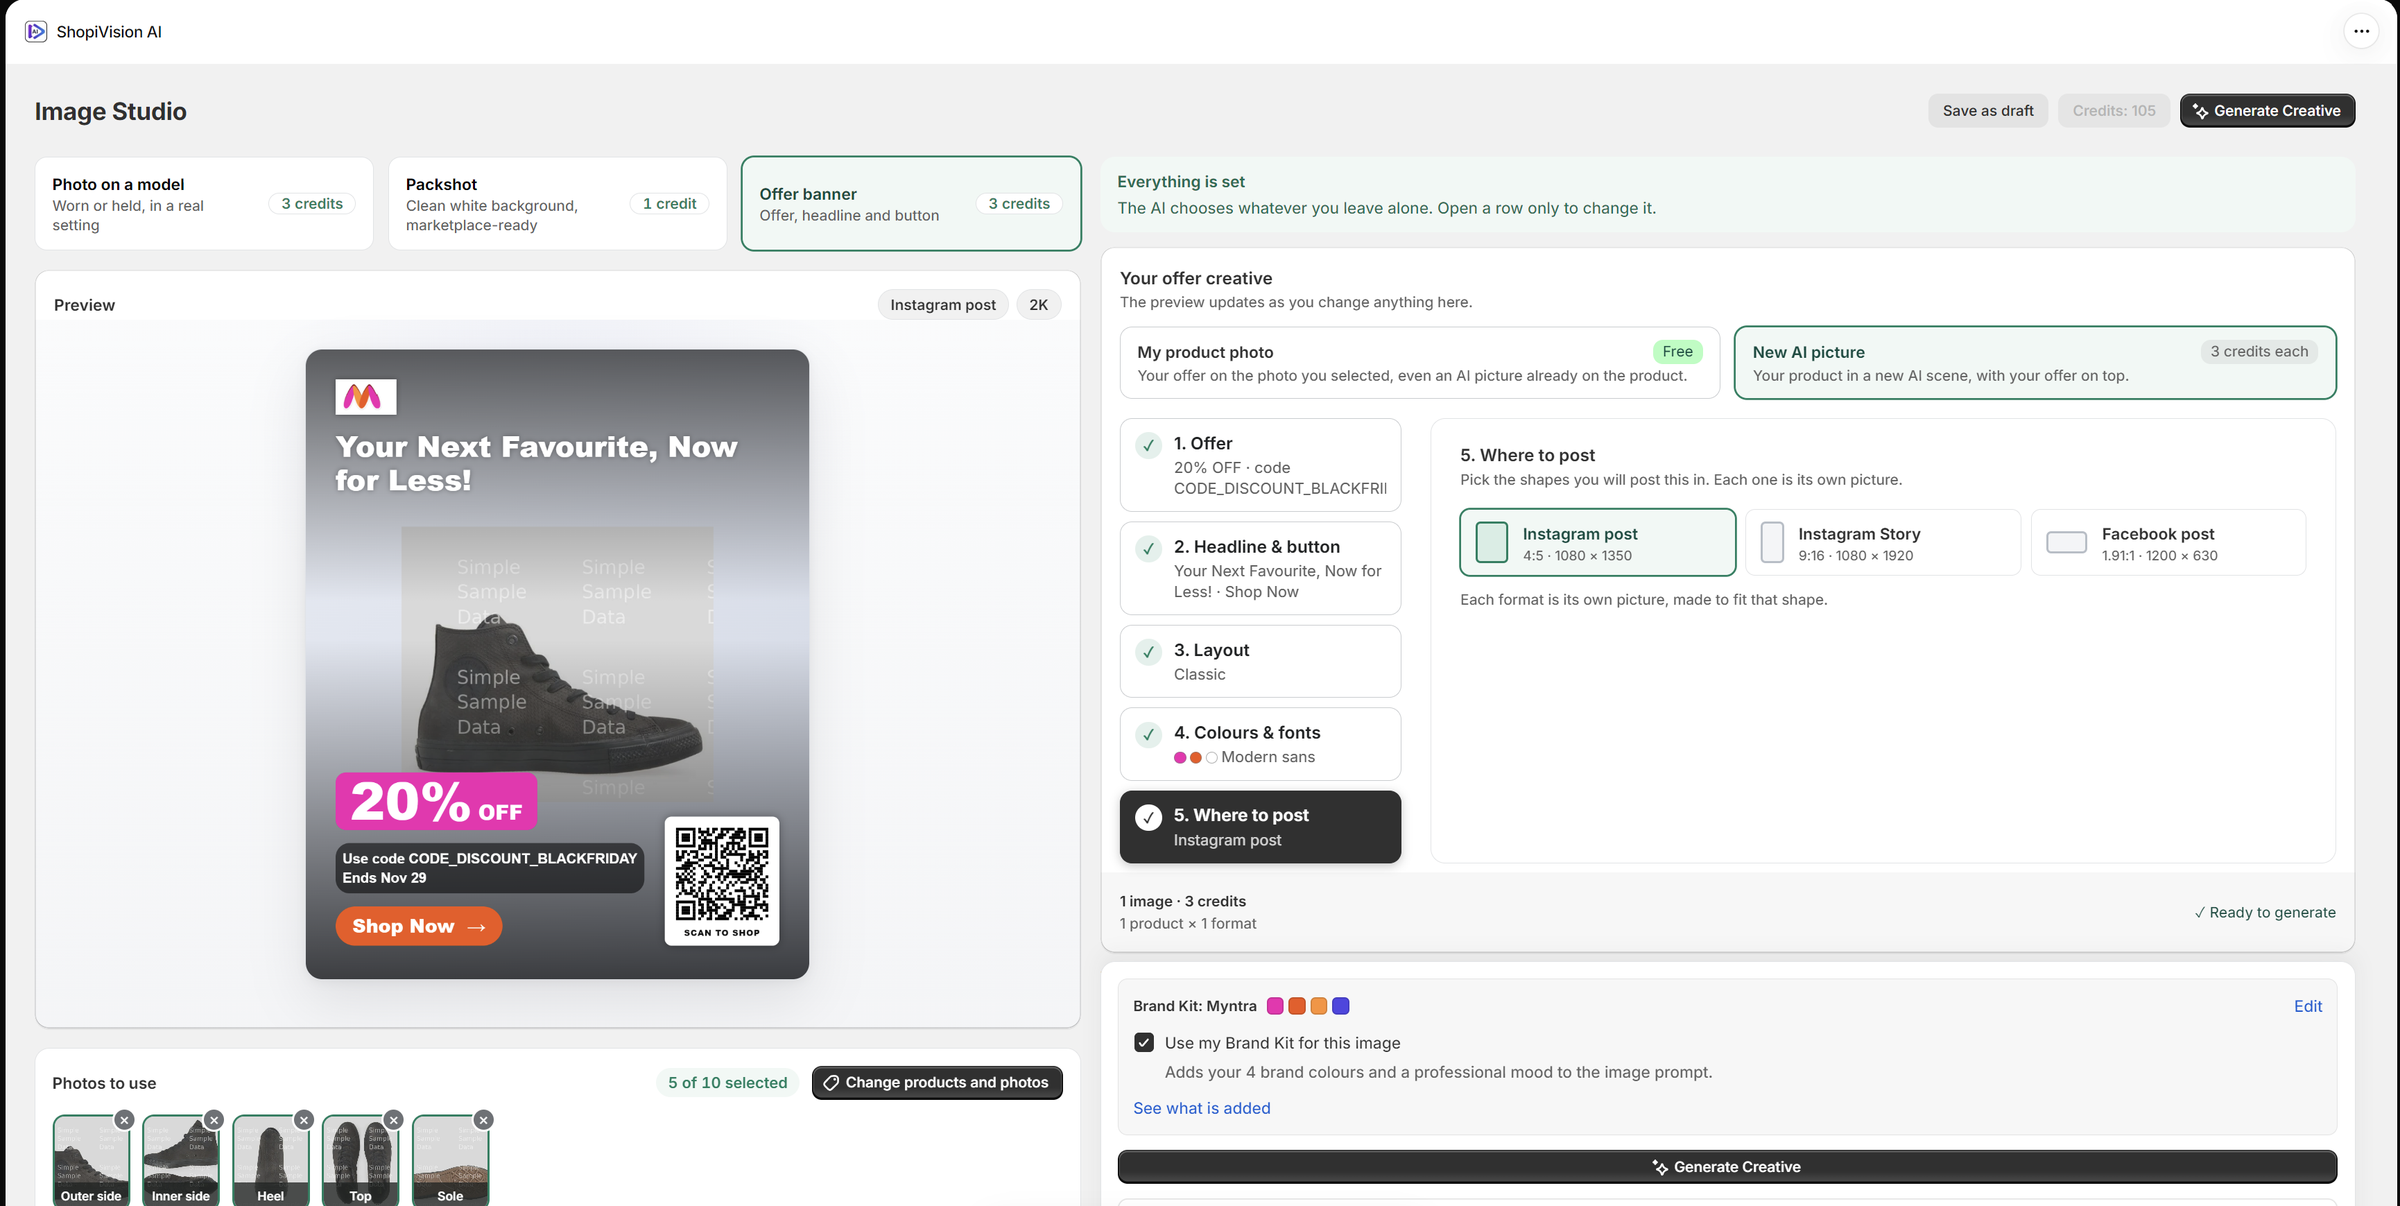
Where to post step with Instagram post, Instagram Story and Facebook post formats and a summary of one image for 3 credits
Step 5 · Where to post

Your Brand Kit, built in

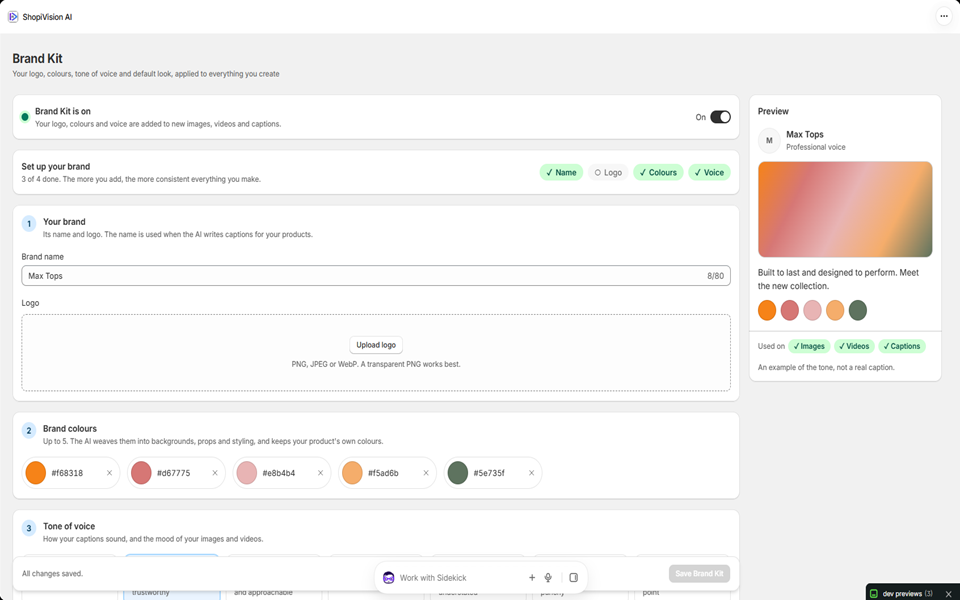
Show your brand name or logo on the creative, and start from your brand colours, all from your Brand Kit.

Discounts in campaigns

Any campaign can carry one offer: a percentage off, an amount off or free shipping, with its Shopify code and dates. Only products the discount covers are offered, and the offer is checked again before the campaign is approved.

Offer banner: free on your own product photo, 3 credits per image on a new AI picture.

YOUR PRODUCTS DESERVE A BIGGER STAGE

Create more.
Sell more. Know why.

Start your 14-day free trial and turn your catalog
into content that earns its place.

Start free trial